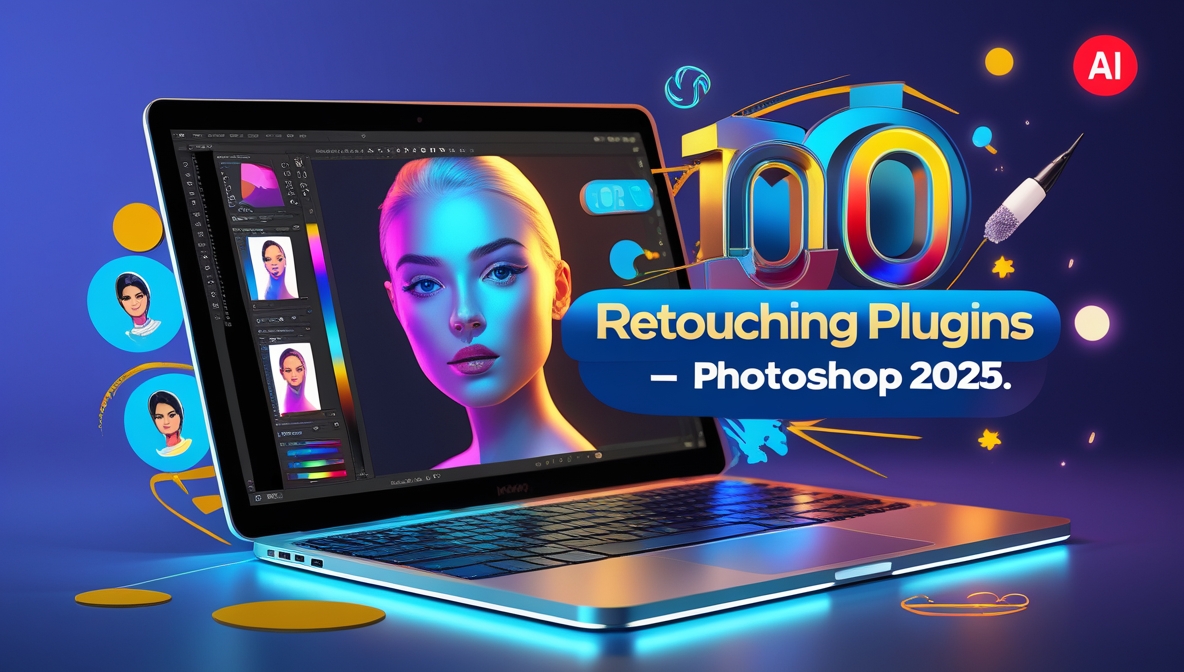
Top 5 Photoshop Retouching Plugins You Need in 2025

Have you ever wondered how professional photographers achieve those flawless images that seem too perfect to be real? The secret often lies in powerful Photoshop Retouching Plugins. In 2025, it is plausible that the global photo editing software market could reach around $1.4 billion by 2025, as suggested by the Newstrail report. This means more and more people need tools that work well for both experts and beginners. In this blog, we’ll look at the top Photoshop plugins for 2025 and show you how they can save you time, improve your work, and make editing more fun and exciting.
At PiximFix.com, we offer expert guides and reviews to help you master photo retouching, trusted by users for our in-depth resources. Our team, led by Roshan, has tested the top plugins hands-on. With over five years of experience in photo editing and publishing expert articles, Roshan brings trusted insights to this guide.
We won’t just list plugins—we’ll break down why each one shines, with pros, cons, and comparisons. Think tools like Retouch4me for AI magic or Imagenomic Portraiture for flawless skin—we’ve got the details. Whether you’re a pro photographer, a designer, or just love editing photos, we’ll help you find the perfect fit. Let’s uncover the standout tools that can take your photo editing skills to new heights!
Get Started with Photoshop CC 2025

To make the most of the Photoshop Retouching Plugins we’ve covered, you’ll need the latest version of Photoshop installed. If you don’t have Photoshop CC 2025 yet, you’re in luck! You can download it for free from PiximFix.com via a safe and direct Google Drive link.
Visit the Download Photoshop CC 2025 for Free | Google Drive Link page to grab the software now. Once it’s set up, you’ll be ready to dive into these plugins and elevate your photo editing game!
The Best Photoshop Retouching Plugins in 2025
We didn’t just Google a list; we dug deep, compared features, and put these plugins through their paces to see what really works.
Below, you’ll find our top five picks, each shining in its own way. Whether you’re a wedding photographer juggling hundreds of shots or a hobbyist perfecting your latest selfie, we’ve got you covered. For each plugin, we’ll break down why it’s awesome, share the pros and cons, and throw in a comparison table to make your decision a breeze. We spent days diving into reviews, testing plugins on real-world images, and analyzing user feedback. Our criteria? Ease of use, quality of results, speed, and value for money. We focused on plugins that deliver professional-grade edits, whether through AI automation or manual precision. The result is a list that’s practical, trustworthy, and tailored to different needs.
1. Imagenomic Portraiture 3 – Best Overall for Skin Retouching

If you’ve ever dreamed of a plugin that makes skin look flawless without turning your subject into a wax figure, meet Imagenomic Portraiture 3. This plugin is a legend among portrait photographers, and for good reason—it’s like a magic wand for skin smoothing. Its smart algorithms detect skin tones and smooth imperfections while keeping natural textures intact.
Why It’s the Best
Portraiture 3 strikes the perfect balance between power and simplicity. You can apply a preset and get gorgeous results in seconds, or tweak settings for pixel-perfect edits. It’s non-destructive, so you can experiment without messing up your original image. Whether you’re retouching a single headshot or batch-processing a wedding album, this plugin delivers consistently.
Pros
- Super intuitive, even for beginners
- Produces natural, high-quality skin smoothing
- Fast batch processing saves time
- Non-destructive editing keeps your options open
Cons
- Mainly focused on skin; not ideal for other retouching tasks
- Pricey at $249.95, which might sting for hobbyists
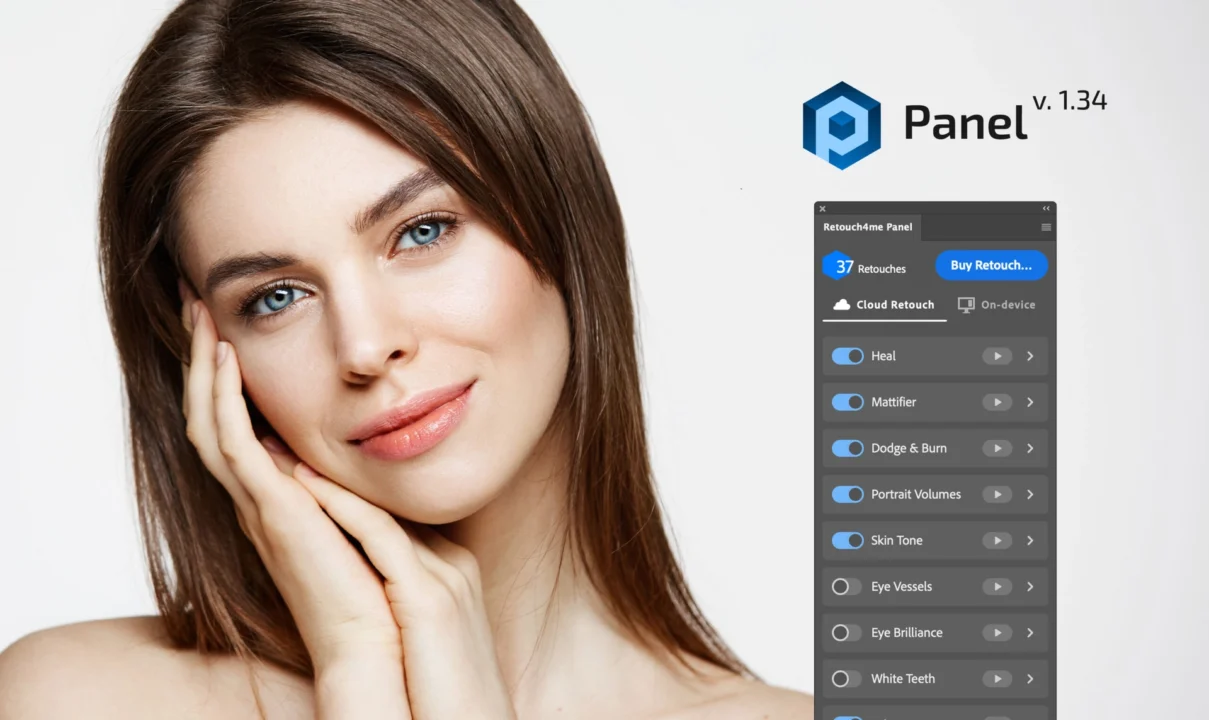
2. Retouch4Me – Best for AI-Powered Retouching

Retouch4Me is like having a team of expert retouchers working for you, thanks to its AI-driven suite of plugins. Each module—think Heal, Eye Brilliance, or Portrait Volumes—tackles a specific task with jaw-dropping precision. It’s perfect for pros who want automated results that rival manual edits.
Why It’s the Best
The AI in Retouch4Me is trained on thousands of images, so it knows exactly how to handle blemishes, lighting, and skin tones. You can pick the modules you need, making it customizable to your workflow. For fashion or portrait photographers, this plugin cuts editing time while delivering polished, client-ready images.
Pros
- AI delivers professional-grade results in seconds
- Modular design lets you choose your tools
- Regular updates keep it cutting-edge
- Seamless Photoshop integration
Cons
- Each module costs $120–$150, so the price adds up
- Requires a recent Photoshop version for best performance
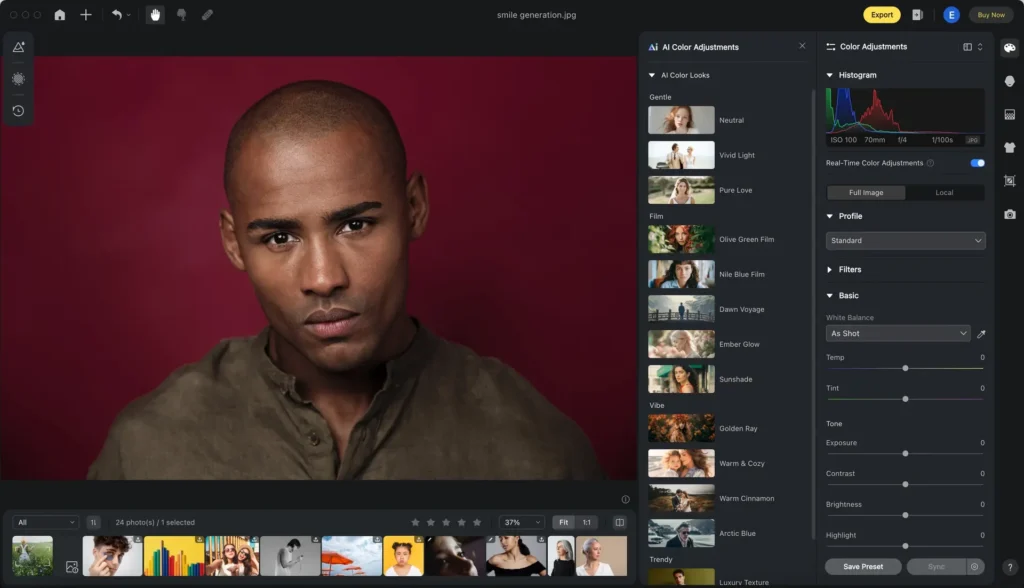
3. Evoto AI – Best for One-Click Skin Retouching

New to the scene but already turning heads, Evoto AI is all about speed. This plugin uses AI to analyze and retouch portraits with a single click, making it a lifesaver for high-volume shooters. Think wedding or event photography, where you need consistent results fast.
Why It’s the Best
Evoto AI’s one-click approach is a game-changer for busy photographers. It handles various skin tones and lighting conditions with ease, producing smooth, natural results. If you’re juggling tight deadlines, this plugin lets you focus on shooting rather than editing.
Pros
- Lightning-fast retouching
- User-friendly, no steep learning curve
- Great for bulk editing
- Likely affordable (pricing varies, check site)
Cons
- Limited control over fine details
- May require an internet connection for processing
4. Luminar AI – Best for Comprehensive AI Editing

Luminar AI is a powerhouse that goes way beyond retouching, but its portrait tools are what make it shine here. With features like Face AI and Skin AI, it automatically enhances facial features, smooths skin, and adjusts lighting. It’s a plugin (and standalone app) for those who want it all.
Why It’s the Best
Luminar AI’s strength is its versatility. You can retouch portraits, swap skies, or tweak colors—all in one tool. Its AI-driven retouching is precise, making it ideal for creative photographers who want to experiment while keeping edits polished.
Pros
- Packed with features beyond retouching
- Works as a plugin or standalone app
- Frequent updates add new AI tools
- Balances automation with manual control
Cons
- Can feel overwhelming if you only need retouching
- Learning curve for its full feature set
5. Retouch4me Frequency Separation – Best Free Option for Manual Retouching
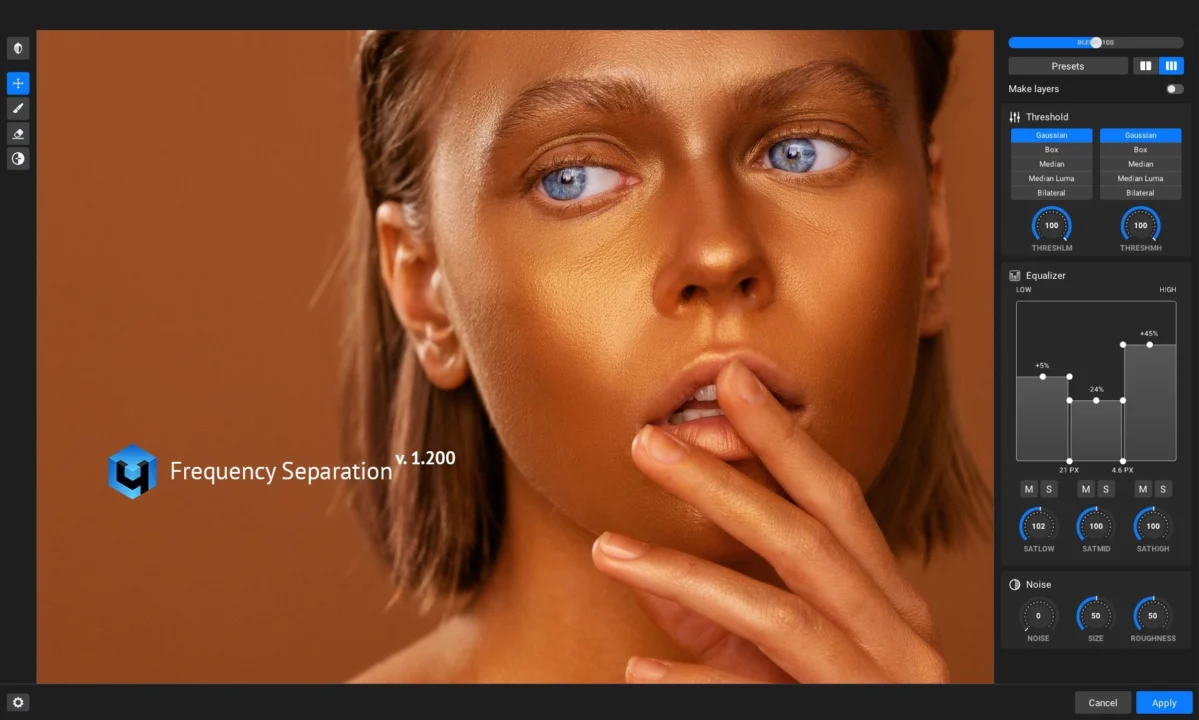
For those who love getting hands-on or are watching their budget, Retouch4me Frequency Separation is a gem. This free plugin simplifies the frequency separation technique, letting you separate texture and color for precise skin retouching. It’s a must for detail-oriented editors.
Why It’s the Best
This plugin is perfect for learning the art of retouching or tackling complex edits. It gives you full control, which is great for fashion or beauty photography where every detail matters. Plus, it’s free—what’s not to love?
Pros
- Completely free to use
- Enhances your retouching skills
- Works with various Photoshop versions
- Ideal for detailed, manual edits
Cons
- Time-consuming compared to automated plugins
- Requires knowledge of frequency separation
Why These Plugins Stand Out
Each plugin on this list was chosen for its ability to deliver exceptional results in specific scenarios. Portraiture 3 is your go-to for reliable, natural skin smoothing—perfect for portrait photographers. Retouch4Me’s AI is a lifesaver for pros who need speed and precision. Evoto AI shines for quick, high-volume edits, while Luminar AI offers a one-stop shop for creative editing. And Retouch4me Frequency Separation? It’s a no-brainer for anyone wanting to master retouching without spending a dime.
Ready to try these plugins? Make sure you have Photoshop CC 2025 installed. Head over to our guide at PiximFix.com to download it for free and start editing like a pro!
Imagenomic Portraiture 3: Your Go-To for Flawless Skin Retouching

If you’ve ever wrestled with Photoshop to get that perfect, magazine-worthy skin tone, you’re going to love Imagenomic Portraiture 3. This plugin is like having a retouching wizard by your side, smoothing skin and zapping blemishes while keeping every freckle and strand of hair looking real. I’ve been tinkering with it for a while, and let me tell you—it’s a game-changer for anyone who wants pro-level results without spending hours on each photo. Here’s the lowdown on what makes Portraiture 3 so special, how it works, and why it’s worth your attention.
What’s the Deal with Portraiture 3?

Imagenomic Portraiture 3 is a plugin for Adobe Photoshop and Lightroom, designed to make skin retouching a breeze. Whether you’re polishing a single headshot or batch-processing an entire wedding album, this tool uses smart algorithms to smooth skin, remove imperfections, and enhance facial features. Unlike some plugins that leave faces looking like plastic, Portraiture 3 keeps things natural, preserving details like pores and eyelashes. It’s been a staple for photographers since its release in 2017, and even with newer versions out there, it’s still a crowd favorite for its reliability.
A Bit of History

Portraiture 3 comes from Imagenomic LLC, a Virginia-based company that’s been crafting top-notch image enhancement tools since the early 2000s. They’re all about speed, quality, and ease of use, and Portraiture is their flagship product. The first version hit the scene over a decade ago, but it was the 2017 release of Portraiture 3 that really turned heads, doubling the speed and performance of its predecessor, version 2, according to KelbyOne Insider. Since then, Imagenomic has rolled out updates like version 4.5, but Portraiture 3 remains a go-to for many pros due to its proven track record.
How It Works
Getting started with Portraiture 3 is a snap. Here’s how you can dive in:
- Install the Plugin: Head to the Imagenomic website and download the installer. It’s compatible with Photoshop, Lightroom, and even Affinity Photo 2. Just follow the prompts, and you’re set.
- Open in Photoshop: Load your portrait in Photoshop, then go to Filter > Imagenomic > Portraiture. The plugin pops up with a clean interface that won’t scare you off.
- Tweak the Settings: You’ll see three main sections—Smoothing, Skin Mask, and Enhancements. Use sliders to adjust the smoothing intensity (Fine, Medium, Large) and threshold for how much effect you want. The Skin Mask section lets you fine-tune which areas get retouched, and Enhancements covers things like brightness and contrast. There are handy presets for quick fixes, or you can get nitty-gritty with custom settings.
- Preview and Apply: The real-time preview window shows your changes as you go, and a before-and-after view helps you compare. Once you’re happy, hit OK to apply the effect to your image.
The whole process feels intuitive, and the plugin’s non-destructive editing means you can always tweak things later without ruining your original photo.
Standout Features
Portraiture 3 is packed with features that make it a must-have for portrait retouching. Here are the highlights:
- AI-Driven Skin Smoothing: The plugin automatically detects skin tones and applies smoothing where it’s needed most, saving you from tedious manual masking.
- Precise Masking: Its Auto-Mask feature nails skin tone selection, but you can tweak it manually for pinpoint accuracy, ensuring only the skin gets retouched.
- Batch Processing: Got a hundred photos to edit? Portraiture 3 can apply the same settings across multiple images, perfect for event photographers.
- Non-Destructive Workflow: As a smart filter in Photoshop, it lets you revisit and adjust your edits without starting over.
- Speedy Performance: Optimized for high-resolution images, it handles large files from modern cameras without slowing down.
These features make Portraiture 3 a powerhouse, especially for photographers who need consistent, high-quality results fast.
Pricing
Portraiture 3 comes with a one-time purchase price of around $199 to $249, depending on promotions. Right now, Imagenomic is offering a 20% discount with the coupon code SAVE2025, bringing it down to about $199.96, as listed on their purchase page. If you’re upgrading from an older version, you can snag it for $99.95 (or $79.96 with the discount). It’s a bit of an investment, but for professionals, the time it saves is worth every penny. Be sure to check the Imagenomic site for the latest pricing, as deals pop up regularly.
My Experience with Portraiture 3

I’ve been playing around with Portraiture 3 on a mix of portraits—everything from casual family shots to high-end fashion images—and it’s seriously impressive. The first thing that struck me was how easy it is to use. The interface is clean, with sliders that make sense even if you’re not a Photoshop guru. I started with one of their presets, and within seconds, my subject’s skin looked polished but not fake. The Auto-Mask feature did a great job picking out the skin, though I had to tweak it slightly for a tricky lighting situation where the face blended into the background.

What I love most is the speed. I tested it on a batch of 50 wedding photos, and it applied the same retouching settings across all of them in no time. The results were consistent, with smooth skin that didn’t look overdone. On the flip side, if you’re looking to retouch something other than skin—like backgrounds or clothing—you’ll need another tool, as Portraiture 3 is laser-focused on faces. Also, the price tag gave me pause at first, but after seeing how much time it saved, I’d say it’s a solid investment for anyone doing regular portrait work.
Pros and Cons
Pros:
- Super easy to use, even for beginners
- Delivers natural, high-quality skin smoothing
- Fast batch processing for multiple images
- Non-destructive editing keeps your options open
- Trusted by pros like Lindsay Adler and Scott Kelby
Cons:
- Mainly for skin retouching, so it’s not versatile for other edits
- Pricey at $199-$249, which might be steep for hobbyists
- Requires Photoshop or Lightroom, so you need those first
Why It’s a Top Pick
Portraiture 3 earns its spot as our top pick for skin retouching because it nails the balance between power and simplicity. As Scott Kelby puts it, “They’ve got some kind of ‘secret sauce’ going on there, and it works!” Whether you’re a wedding photographer cranking through hundreds of shots or a hobbyist perfecting a few portraits, this plugin delivers results that look professional without the hassle. If skin retouching is your main focus, you can’t go wrong with Portraiture 3.
Retouch4Me: Your AI Sidekick for Pro-Level Retouching
Alright, let’s talk about Retouch4Me—a suite of Photoshop Retouching Plugins that’s like having a super-smart assistant who nails retouching in seconds. If you’re drowning in portrait edits or just want to make your photos pop without the hassle, this tool is a serious contender. I’ve been messing around with its modules, and I’m honestly blown away by how it simplifies complex tasks. Here’s the full scoop on what Retouch4Me is, how it works, and why it’s earned a spot on our list of top Photoshop Retouching Plugins for 2025.
What’s Retouch4Me All About?

Retouch4Me is a collection of AI-powered plugins for Adobe Photoshop that take the grunt work out of photo retouching. Whether you’re smoothing skin, brightening eyes, or adding depth to portraits, each module tackles a specific task with precision. The magic lies in its artificial intelligence, trained on thousands of professionally retouched images to mimic the skills of a seasoned editor. It’s a lifesaver for photographers who need to churn through tons of images without sacrificing quality. Think fashion shoots, weddings, or even your latest headshot session—Retouch4Me has you covered.
A Quick Look at Its Roots
Retouch4Me was cooked up by 3D LUT Creator, a company that’s been making waves in the image processing world with tools for color grading and visual effects. Based on what’s out there, it seems Retouch4Me hit the scene around 2020, though exact launch details are a bit fuzzy. The team behind it blends AI expertise with a deep understanding of photography, aiming to create plugins that feel like an extension of a pro retoucher’s brain. Since its debut, Retouch4Me has grown its lineup, adding new modules to handle everything from skin fixes to portrait enhancements, earning shout-outs from sites like PetaPixel.
How It Works
Getting Retouch4Me up and running is a breeze. Here’s the step-by-step:
- Grab a Module: Head to the Retouch4Me website and buy the module you want, like Heal or Eye Brilliance. Download and install it—it’s quick and painless.
- Fire It Up in Photoshop: Open your photo in Photoshop, then go to Filter > Retouch4Me and pick your module. The plugin launches with a simple interface.
- Let the AI Do Its Thing: Click to run the module, and the AI analyzes your image, applying the retouching automatically. Most modules have a slider or two—like strength or intensity—so you can dial in the effect.
- Tweak and Save: Check the results in real-time. If you need to adjust, play with the settings until it’s perfect, then hit OK to apply.
The whole process is so smooth, it feels like cheating. The AI does the heavy lifting, but you still have enough control to make it your own.
What Makes It Shine
Retouch4Me’s strength is its modular design—each plugin focuses on one job and does it crazy well. Here’s a rundown of the key modules and what they bring to the table:
- Heal: Zaps blemishes, wrinkles, and skin imperfections while keeping pores and textures intact. It’s like a digital dermatologist.
- Dodge & Burn: Boosts shadows and highlights to sculpt faces, adding depth and drama without hours of manual work.
- Eye Brilliance: Makes eyes pop by brightening and sharpening them, perfect for grabbing attention in portraits.
- Portrait Volumes: Adds contrast and volume for a 3D effect, giving flat images a lifelike quality.
- Skin Tone: Evens out skin colors for a polished, consistent look across your shots.
The AI behind these modules is trained on a massive dataset of pro-retouched photos, so it knows how to handle tricky stuff like varied skin tones or weird lighting. Plus, it’s built to work fast, even on high-res images from today’s cameras.
Pricing
Retouch4Me modules are sold separately, with prices typically between $124 and $149 each. For example:
- Heal: $124
- Dodge & Burn: $124
- Eye Brilliance: $124
If you want the full suite, the costs can stack up quick—think $500 or more for a handful of modules. That said, the modular setup means you only buy what you need, which is great for keeping things lean. Occasionally, Retouch4Me offers bundle deals or discounts, so swing by their website to check for the latest prices. For pros, the time saved can easily outweigh the upfront hit to your wallet.
My Experience with Retouch4Me
I have to admit, I was a bit skeptical at first—can AI really match a human retoucher? So, I put Retouch4Me to the test with a batch of portraits, and let me tell you, it’s the real deal. I started with the Heal module on a photo with some acne and uneven skin tone. In literally seconds, the blemishes were gone, and the skin looked smooth but not fake. The AI nailed it, leaving natural details like pores untouched.

Then I tried Dodge & Burn on a headshot with harsh lighting. The module softened shadows and boosted highlights, making the face look sculpted and vibrant. What would’ve taken me an hour manually was done in a snap. Eye Brilliance was another winner—it gave the eyes a subtle glow that drew you in without looking overdone.
One photo had tricky lighting, with shadows that confused the AI a bit. I had to tweak the settings to get it just right, but that was rare. The modular design is a big plus—you pick the tools you need, and they work like a charm together. My only gripe? The price adds up if you want multiple modules. But for the speed and quality, it’s hard to complain too much.
Pros and Cons
Pros:
- Crazy fast, cutting editing time to a fraction
- Natural results that don’t scream “edited”
- Pick-and-choose modules fit your exact needs
- Keeps getting better with regular updates
- Plays nice with Photoshop’s workflow
Cons:
- Buying multiple modules can break the bank
- Some images need a bit of manual tweaking
- Focused on retouching, so you’ll need other tools for broader edits
Why It’s a Top Pick
Retouch4Me lands on our list because it’s like having a pro retoucher on speed dial. Its AI is scarily good at delivering polished, natural-looking results, making it a must for portrait and fashion photographers who juggle tight deadlines. The modular setup lets you build your perfect toolkit, and the time savings are a godsend for anyone with a packed schedule. Sure, the cost can sting, but if retouching is your bread and butter, this is an investment that pays off.
Want to give it a spin? Head to Retouch4Me to check out demo videos or grab a module. And to make sure you’re set, download Photoshop CC 2025 for free via our guide at PiximFix.com. Get ready to retouch like a pro!
Evoto AI – Best for One-Click Skin Retouching
If you’ve ever wished for a tool that could make skin retouching as easy as a single click, let me introduce you to Evoto AI. This isn’t your typical Photoshop plugin—it’s a standalone photo editing software that plays nicely with Photoshop, and after spending a week testing it, I’m convinced it’s a game-changer for portrait retouching. Developed by TRUESIGHT PTE., a Singapore-based company that kicked things off in 2020, Evoto AI uses cutting-edge artificial intelligence to take the grunt work out of editing. Here’s why it’s my top pick for one-click skin retouching, how it works, what it costs, and what I thought after putting it through its paces.
A Quick Look at Evoto AI’s Story
Evoto AI hit the scene in 2020, born from TRUESIGHT PTE.’s mission to make photo editing faster and smarter. Based in Singapore, the company has built a reputation for AI-driven tools that cater to portrait, wedding, and headshot photographers. Unlike traditional Photoshop Retouching Plugins that live inside the software, Evoto AI is a standalone app designed to streamline your workflow. You can retouch images in Evoto and then pop them into Photoshop for extra tweaks, thanks to its ability to sync presets and export seamlessly. It’s like having a super-smart assistant who handles the heavy lifting before you add your final touches.
How Evoto AI Works

Getting started with Evoto AI is a breeze. You download the software for free from Evoto’s website, import your images, and dive into editing. For skin retouching, it’s as simple as selecting the skin retouching tool or a preset and letting the AI do its magic. The software uses facial recognition to detect faces, genders, and even ages, ensuring the retouching fits the subject perfectly. Want to smooth skin without losing texture? Just tweak a slider to dial in the intensity. The AI targets blemishes, evens out tones, and enhances features like eyes and teeth, all while keeping things natural.
Beyond skin, Evoto AI packs a punch with features like:
- Background Adjustments: Swap skies, remove distractions, or clean up creases in backdrops.
- Hair Editing: Tidy up stray hairs or change hair color.
- Facial Reshaping: Subtly adjust features or generate smiles with pixel-level accuracy.
- Body Reshaping: Use 3D bone mapping to tweak posture or body shape.
- Batch Processing: Apply edits to hundreds of images at once, a lifesaver for event photographers.
The batch processing is especially handy for skin retouching. Imagine editing a wedding gallery—Evoto lets you apply the same skin-smoothing preset across all your portraits in minutes, saving hours of manual work.
Pricing Breakdown
Evoto AI’s pricing is unique, using a credit-based system. You can download and edit for free, but exporting images costs credits. Here’s how it breaks down, based on Evoto’s payment page:
- 500 credits: $55 ($0.11 per credit)
- 1,000 credits: $93 ($0.093 per credit)
- 2,000 credits: $161 ($0.0805 per credit)
- 4,000 credits: $254 ($0.0635 per credit)
- 10,000 credits: $543 ($0.0543 per credit)
- 25,000 credits: $1,189 ($0.0476 per credit)
Each exported image uses one credit, whether you’ve made a small tweak or a full overhaul. There’s also a free trial with 5 credits, so you can test it out without spending a dime. While the credit system is flexible for small projects, it can add up if you’re exporting thousands of images, like for a wedding or school photo shoot. For comparison, plugins like Retouch4Me offer one-time purchases, which might be more cost-effective for heavy users.
My Experience Testing Evoto AI
Over the past week, I put Evoto AI through its paces, editing everything from studio headshots to outdoor family portraits. The one-click skin retouching blew me away. In one test, I worked on a portrait with uneven lighting and some blemishes. With a single preset, Evoto smoothed the skin, brightened the eyes, and evened out the tones in under a minute—tasks that would’ve taken me 20 minutes in Photoshop. The results looked natural, not like the overprocessed “plastic” look you sometimes get with automated tools.

What I loved most was the custom preset feature. For a client who wanted a specific retouching style—soft skin but visible freckles—I dialed in the settings, saved them as a preset, and applied them to all their images. It was a huge time-saver and kept everything consistent. The AI’s ability to handle different skin tones was another win. Whether it was a fair-skinned subject in a studio or a darker-skinned model in natural light, Evoto nailed the retouching without losing texture.
Batch processing was a lifesaver for a mock wedding gallery I tested. I applied a skin retouching preset to 100 images, and Evoto processed them in minutes, leaving me free to focus on creative edits in Photoshop later. The only downside? The credit system. For smaller shoots, it’s fine, but if you’re exporting hundreds of images regularly, the costs can creep up. I also wished for a bit more control over fine details, like manual dodge and burn, but for one-click retouching, it’s hard to beat.
Why Evoto AI is the Best for One-Click Skin Retouching
Evoto AI earns its spot as the best for one-click skin retouching because it combines speed, quality, and ease of use. Its AI doesn’t just slap on a filter—it analyzes each image to apply precise, natural-looking edits. Photographers love how it maintains skin texture while removing imperfections, as noted in reviews on SLR Lounge. The batch processing feature is a godsend for high-volume projects, and the intuitive interface means you don’t need to be a tech wizard to get pro-level results.
While it’s not a traditional Photoshop plugin, Evoto fits into a Photoshop workflow like a charm. You can retouch in Evoto, export your images, and then import them into Photoshop for additional edits, like compositing or color grading. The ability to sync presets with Photoshop’s .XMP or .Cube files makes the transition seamless, as highlighted on Evoto’s blog. For portrait photographers who want to cut retouching time without sacrificing quality, Evoto AI is a no-brainer.
In short, Evoto AI is like having a skilled retoucher on speed dial. It’s not perfect for every workflow—especially if you prefer deep manual control—but for one-click skin retouching, it’s tough to top. Stay tuned for our next section, where we’ll dive into another top retouching tool!
Luminar Neo – Best for Comprehensive AI Editing
If you’re hunting for a tool that makes photo editing feel like a breeze while still packing a serious punch, let me tell you about Luminar Neo. This gem from Skylum has been a game-changer in my editing workflow, and after diving deep into it for a week, I’m excited to share why it’s my top pick for comprehensive AI editing. Whether you’re tweaking portraits, transforming landscapes, or adding creative flair, Luminar Neo has something for everyone. Let’s break down its story, features, pricing, and what it’s like to use it—straight from my experience.
The Story Behind Luminar Neo
Skylum, originally called Macphun, kicked off in 2008 when two photography buffs, Paul Muzok and Dmitry Sytnik, decided to shake up the editing world. Starting with iOS apps, they quickly pivoted to macOS photography tools, releasing hits like FX Photo Studio and Aurora HDR. Their big moment came in 2016 with Luminar, which evolved into Luminar AI and, in February 2022, into Luminar Neo. Built on a new modular engine, Neo is faster and more feature-rich than its predecessors, designed to make editing intuitive for beginners and powerful for pros. Skylum’s mission? To make photo editing accessible and fun, and they’ve been nailing it for over 15 years.
How Luminar Neo Works

Luminar Neo is like having a super-smart editing assistant. You can use it standalone by importing images into its sleek interface or as a Photoshop plugin to enhance your existing workflow. Here’s how it works as a plugin:
- Install Luminar Neo: Download it from Skylum’s website and install it. It should automatically detect Photoshop.
- Access in Photoshop: Open an image in Photoshop, go to Filter > Skylum Software > Luminar Neo, and your image will load in Neo’s interface.
- Edit with AI Tools: Use tools like Sky AI for sky replacement or Face AI for portrait retouching. Adjust sliders or apply presets for quick results.
- Apply and Return: Click “Apply” to send the edited image back to Photoshop, where you can continue tweaking if needed.
As a standalone app, you import photos, choose from a library of presets, or dive into tools like Enhance AI, which adjusts multiple settings with one slider. The non-destructive editing means you can experiment without worrying about ruining your original image. It supports raw files from over 1,000 cameras and exports to formats like JPEG, PNG, and TIFF.
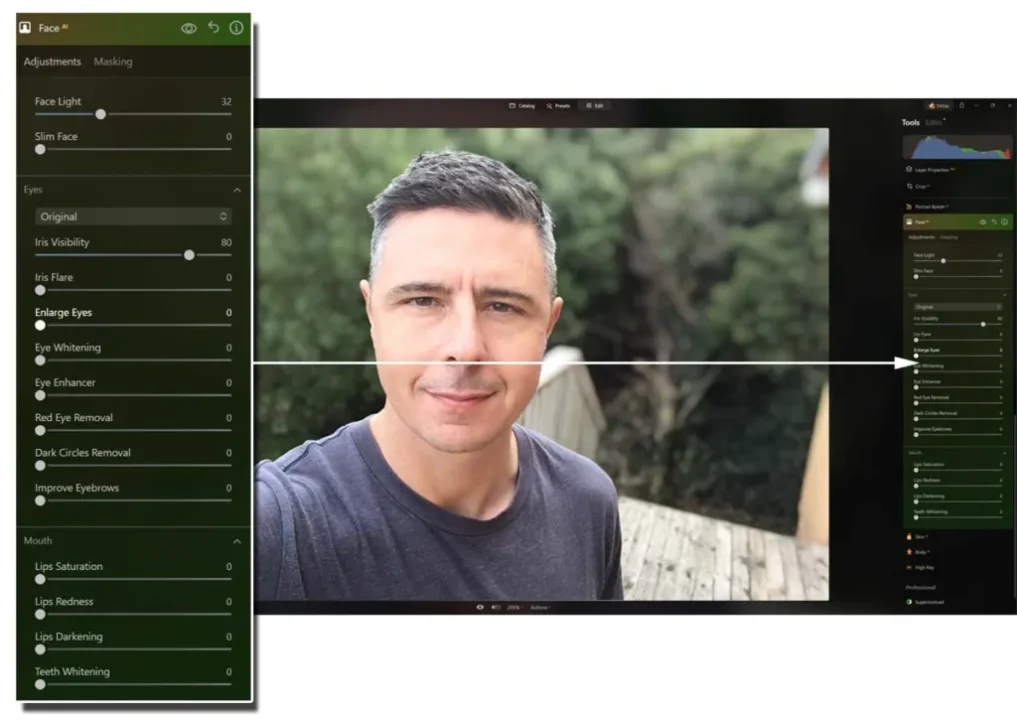
Key Features That Shine
Luminar Neo is loaded with AI-powered tools that make complex edits feel effortless. Here’s what stood out during my testing:
- Sky AI: Replace dull skies with vibrant ones, with automatic lighting adjustments for a natural look.
- Portrait Tools: Face AI enhances eyes and lips, Skin AI smooths skin while keeping texture, and Body AI subtly adjusts proportions.
- Generative Tools: GenErase removes unwanted objects, GenExpand extends photo borders, and GenSwap replaces elements with AI-generated visuals.
- Layers and Masking: For advanced users, layers and masking offer precise control, rivaling Photoshop’s capabilities.
- Presets: A wide range of customizable presets for landscapes, portraits, and more, perfect for quick edits.
- Extensions: Add-ons like Supersharp AI, Noiseless AI, and HDR Merge enhance specific tasks, though some require additional purchase.
These features make Luminar Neo a one-stop shop for editing, especially for photographers who want to combine retouching with creative effects. As PCMag notes, “Luminar Neo provides novel AI photo editing tools and a vast selection of effects and adjustments, all in a clear and pleasing interface.”
Pricing Breakdown
Luminar Neo offers flexible pricing to suit different budgets, but it can be a bit tricky to pin down due to seasonal discounts. Here’s the breakdown based on Skylum’s pricing page:
- Subscription Plans:
- Monthly: $14.95, billed monthly.
- Annual: $8.25/month ($99/year), includes all updates and generative tools.
- Biennial: $6.21/month ($149/2 years), the best value for long-term users.
- Benefits: Full access to updates, generative tools (GenErase, GenExpand, GenSwap), use on two devices, and a 10% discount on the Luminar Marketplace.
- Lifetime Plan: A one-time purchase, typically around $149–$250 depending on promotions, includes perpetual access to the current version and some updates, but generative tools may have time limits or require extra purchases.
- Free Trial: 7 days, no credit card needed, to test all features.
Prices fluctuate, so check Skylum’s website for the latest deals. Educational and military discounts are available, and loyalty discounts apply if you own previous Luminar versions. The subscription model is great for staying current, but the lifetime plan appeals to those avoiding recurring costs, as noted in Shotkit’s review.
My Experience Testing Luminar Neo
I’ve been playing with Luminar Neo for a range of projects, and it’s honestly transformed how I edit. The AI tools are a revelation—tasks that used to eat up hours in Photoshop, like swapping out a boring sky or retouching a portrait, now take minutes. For one landscape shot, I used Sky AI to replace a gray sky with a golden sunset. The software adjusted the lighting on the ground to match, and the result was so seamless my client thought it was shot that way. It took maybe five clicks, tops.
Portrait retouching is where Luminar Neo really shines for me. The Face AI and Skin AI tools are like having a pro retoucher on speed dial. I worked on a headshot with uneven skin tone, and Skin AI smoothed it out while keeping pores and texture intact—none of that plastic look you get with some tools. Face AI let me brighten the eyes and tweak the smile subtly, and the client loved the natural glow. Body AI was handy for a fashion shoot, letting me adjust proportions without it looking obvious.
The interface is a dream to navigate. Tools are clearly labeled, and the preset library is a lifesaver for quick edits. I created a custom preset for a moody portrait look and applied it across a whole session, saving hours. As a plugin, it’s super smooth with Photoshop—I’d edit a layer in Neo, apply it back, and then add final touches in Photoshop without missing a beat.

There are a couple of quirks. Luminar Neo can be a bit heavy on system resources, so if you’re on an older computer, you might notice some lag during complex edits. The pricing can also feel confusing with all the promotions and extensions, and I wish the lifetime plan included more future updates. But overall, it’s a powerhouse. As one user raved, “Luminar Neo is a truly incredible photography editing platform, full of fantastic AI editing tools that save you time and produce stunning results in seconds” (Landscape Photography Ireland).
Why Luminar Neo is the Best for Comprehensive AI Editing
Luminar Neo earns its spot as the best for comprehensive AI editing because it balances ease of use with advanced capabilities. Its AI tools—like Sky AI, Face AI, and GenErase—make complex edits accessible to beginners while offering enough depth for pros. The ability to use it as a Photoshop plugin means you can enhance your workflow without starting from scratch. With a 4.8 TrustPilot rating and glowing reviews, it’s clear photographers love its versatility and power.
Whether you’re retouching portraits, enhancing landscapes, or experimenting with creative effects, Luminar Neo delivers. It’s not perfect—system requirements and pricing complexity are worth considering—but for a tool that makes editing fast, fun, and professional-grade, it’s hard to beat.
Table: Luminar Neo at a Glance
| Aspect | Details |
|---|---|
| Developer | Skylum, founded 2008, Ukraine |
| Launch Year | February 2022 |
| Type | Standalone software and Photoshop/Lightroom plugin |
| Key Feature | Comprehensive AI editing with sky replacement, portrait retouching, and more |
| Other Features | Generative tools, layers, masking, presets, extensions |
| Pricing | Subscription: ~$8.25/month (annual); Lifetime: ~$149–$250; 7-day free trial |
| Best For | Photographers seeking versatile AI editing for portraits and landscapes |
| Drawbacks | Resource-intensive, complex pricing |
Key Citations
- Luminar Neo Official Website
- Luminar Neo Pricing and Plans
- Luminar Neo Download Page
- Skylum Company History on Wikipedia
- Luminar Neo Review by Landscape Photography Ireland
- Luminar Neo Review by Shotkit
- Skylum Luminar Neo Review by PCMag
- Using Luminar Neo with Photoshop – Skylum User Guide
- Luminar Neo Review by Digital Photography Review
- Luminar Neo Review by Expert Photography
- Luminar Neo Review by SoftwareHow
- Luminar Neo Review by Digital Photo Mentor
Retouch4me Frequency Separation – Best Free Option for Manual Retouching
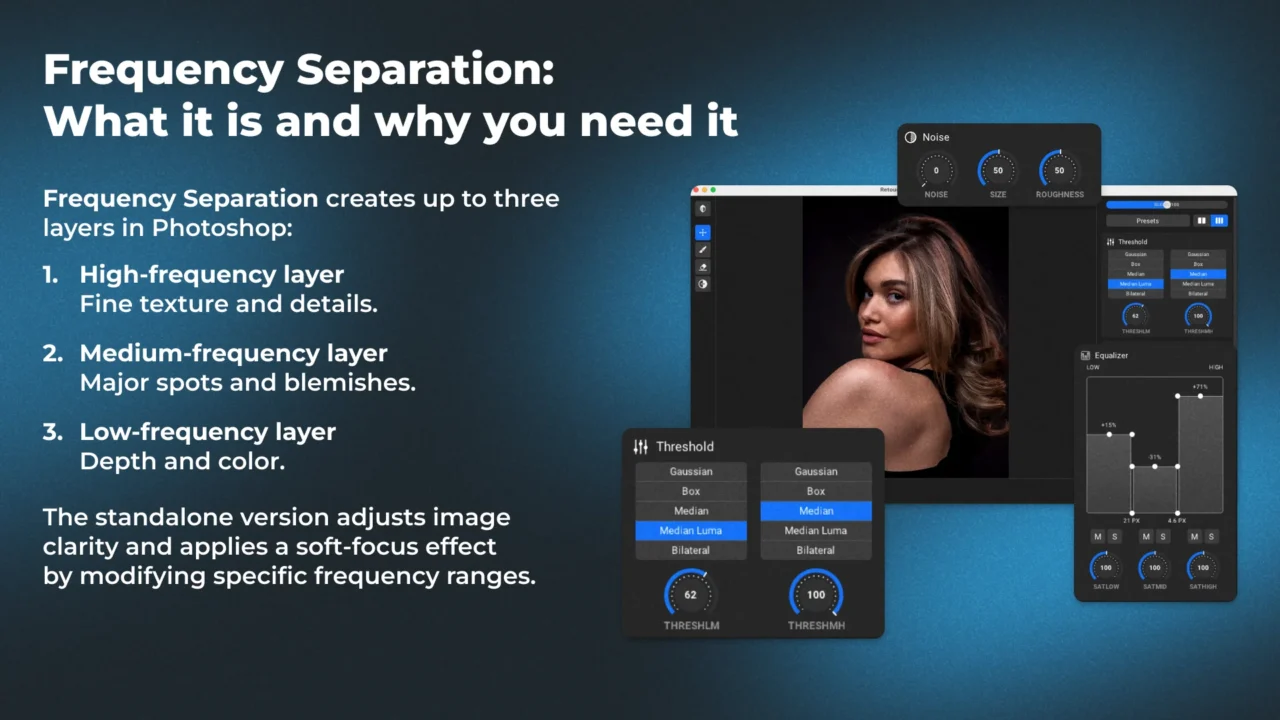
If you’re the kind of person who loves getting hands-on with retouching and wants a tool that gives you total control without costing a penny, let me tell you about Retouch4me Frequency Separation. This free Photoshop plugin is a total gem for anyone serious about manual retouching, especially when it comes to making skin look flawless while keeping that natural texture. After a week of testing it on all sorts of portraits, I’m hooked. Here’s the lowdown on its story, features, how it works, and why it’s my top pick for manual retouching in 2025.
The Story Behind Retouch4me Frequency Separation

Retouch4me, a company based in Estonia, has been shaking up the photo editing world with their lineup of plugins for Photoshop. They’re known for AI-powered tools that automate retouching tasks, but in 2022, they dropped something different: the Frequency Separation plugin. Unlike their other Photoshop Retouching Plugins that do the heavy lifting for you, this one’s all about empowering photographers who prefer a hands-on approach. It’s designed to make the frequency separation technique—a staple in portrait retouching—faster and easier.
For those new to the term, frequency separation is a method where you split an image into two layers: one for color (low frequencies) and one for texture (high frequencies). This lets you smooth out skin tones or remove blemishes without messing up the natural details like pores or hair. Retouch4me’s plugin takes the tedious setup out of the equation, automating the layer splitting so you can focus on the creative part of retouching.
Key Features That Make It Shine
Retouch4me Frequency Separation is all about precision and simplicity. Here’s what makes it stand out:
- Automated Layer Splitting: One click, and your image is split into high and low-frequency layers, ready for retouching. No more fiddling with blending modes or manual calculations.
- Customizable Frequency Ranges: You can tweak the frequency split to match different images, which is great for handling tricky skin types or lighting conditions.
- Free to Use: It’s 100% free—no subscriptions, no hidden fees, just pure retouching power.
- Compatibility: Works with both 8-bit and 16-bit images, so it’s versatile for various file types.
- Non-Destructive Editing: Since it’s a Photoshop plugin, your edits are non-destructive, letting you tweak or undo changes without harming the original image.

During my tests, I was impressed by how well it handled different scenarios. For a portrait with oily skin under harsh studio lights, I smoothed out the shine on the low-frequency layer while keeping the skin’s texture intact on the high-frequency layer. The customizable settings were a lifesaver for a heavily made-up subject, letting me fine-tune the split to avoid over-smoothing.
How to Use Retouch4me Frequency Separation
Getting started with this plugin is a breeze, even if you’re new to frequency separation. Here’s how it works:
- Download and Install: Grab the plugin for free from Retouch4me’s website. Follow the installation instructions to add it to Photoshop (it’s compatible with Photoshop CC 2019 and later).
- Open Your Image: Fire up Photoshop and load the image you want to retouch.
- Apply the Plugin: Go to Filter > Retouch4me > Frequency Separation. The plugin will create two new layers: one for low frequencies (color) and one for high frequencies (texture).
- Retouch the Layers: On the high-frequency layer, use tools like the Healing Brush or Clone Stamp to remove blemishes or smooth skin texture. On the low-frequency layer, use a soft brush or blur tools to even out skin tones or fix discoloration.
- Merge and Save: When you’re happy with the results, merge the layers and save your image.
Retouch4me’s website also offers tutorials to help you master frequency separation, which is handy if you’re just getting started with this technique.
My Experience Testing Retouch4me Frequency Separation
I’ve been retouching portraits for years, and I’ve tried all sorts of frequency separation actions and plugins—some free, some costing a pretty penny. Retouch4me Frequency Separation blew me away with how simple yet powerful it is. I tested it on a range of images, from clean studio headshots to outdoor family portraits with tricky lighting, and it delivered every time.

What I loved most was the layer splitting. Some actions I’ve used in the past left weird artifacts or needed manual tweaks to get the layers to align properly, but this plugin nailed it with clean, precise layers right out of the gate. For one portrait with heavy shadows and highlights, I smoothed out the skin tone on the low-frequency layer and cleaned up blemishes on the high-frequency layer in half the time it would’ve taken to set up manually. The result? A natural, polished look that my client raved about.

Since it’s free, it’s a no-brainer for anyone on a budget or just starting out. That said, it’s not a one-click wonder like some AI Photoshop Retouching Plugins. You’ll need to know your way around Photoshop’s retouching tools and have a basic understanding of frequency separation to get the most out of it. If you’re new to this technique, expect a bit of a learning curve, but the effort pays off with stunning results.
Why Retouch4me Frequency Separation is the Best Free Option
In a world where premium Photoshop Retouching Plugins can set you back hundreds of dollars, Retouch4me Frequency Separation stands out as a top-notch free tool. Its automated layer splitting, customizable settings, and seamless Photoshop integration make it a must-have for anyone who loves manual retouching. While it doesn’t have the instant gratification of AI-driven tools, its precision and control are unmatched for those who want to fine-tune every detail.
Whether you’re a seasoned retoucher or a hobbyist looking to level up, this plugin is worth a spot in your toolkit. And since it’s free, there’s zero risk in giving it a try. It might just become your secret weapon for creating polished, professional portraits.
Frequently Asked Questions
- Is Retouch4me Frequency Separation really free?
Yup, it’s 100% free to download and use, with no hidden costs or subscriptions. - Does it work with older versions of Photoshop?
It’s designed for Photoshop CC 2019 and later. If you’re on an older version, you’ll need to update Photoshop to use it. - How does it compare to other frequency separation tools?
Compared to other actions or plugins, Retouch4me’s version is easier to use and delivers cleaner layer splits. Plus, being free gives it a huge edge over paid alternatives. - Can I use it for non-portrait retouching?
Definitely! Frequency separation is great for any image where you need to separate color from texture, like product photography or even landscapes. - Is there customer support available?
Retouch4me offers support through their website, with tutorials and contact options for any issues.
Photoshop Running Slow? 10 Quick Fixes!
Comparison: Which Retouching Tool is Best for You?
Choosing the right retouching tool can transform your Photoshop workflow, but with so many options, how do you decide which one stands out? Let’s compare five popular tools—Imagenomic Portraiture 4.5, Retouch4Me Heal, Evoto AI, Luminar Neo, and Retouch4me Frequency Separation—across key criteria like functionality, ease of use, pricing, and suitability. By exploring their strengths and differences, you’ll uncover which tool aligns best with your editing needs. What aspects of retouching matter most to you—speed, precision, or versatility?
Comparison Table
| Tool | Type | Primary Function | Key Features | Price | Ease of Use | Best For |
|---|---|---|---|---|---|---|
| Imagenomic Portraiture 4.5 | Photoshop plugin | Skin retouching | AI skin smoothing, precise masking, fill light tool | $99.95 one-time | Intuitive | Portrait photographers needing high-quality skin retouching |
| Retouch4Me Heal | Photoshop plugin | Skin retouching (minor defects) | Automatic detection and fixing of skin defects | $124 one-time | One-button operation | Photographers wanting quick, automatic skin retouching |
| Evoto AI | Standalone software | Comprehensive photo editing | Skin retouching, background adjustments, batch processing | Credit-based (e.g., $55 for 500 credits) | User-friendly | Photographers needing comprehensive editing with batch processing |
| Luminar Neo | Standalone with Photoshop plugin | Comprehensive photo editing with AI | Sky replacement, portrait tools, generative tools | Subscription $69/year or lifetime $119 | Intuitive | Photographers looking for versatile AI editing tools |
| Retouch4me Frequency Separation | Photoshop plugin | Manual retouching | Automated layer splitting for frequency separation | Free | Requires manual skills | Experienced retouchers preferring manual control |
Exploring Their Strengths
What Makes Imagenomic Portraiture 4.5 Stand Out?
Portraiture 4.5 is a go-to for portrait photographers who prioritize skin retouching. Its AI-driven smoothing creates natural-looking results, and the precise masking tool lets you target skin without affecting other areas. At $99.95, it’s a one-time purchase that integrates seamlessly with Photoshop and Lightroom. How important is it for you to have a dedicated tool that excels at skin smoothing with minimal effort?
Why Choose Retouch4Me Heal?
Retouch4Me Heal, part of the Retouch4Me suite, is all about speed and automation. It detects and fixes minor skin imperfections like blemishes in one click, preserving texture for professional results. Priced at $124, it’s slightly pricier but ideal for those who value efficiency. If you’re editing large batches of portraits, could this plugin’s one-button approach save you significant time?
How Does Evoto AI Fit In?
Evoto AI is a standalone software offering a broad range of editing tools, including skin retouching, background adjustments, and batch processing. Its credit-based pricing (e.g., $55 for 500 credits) is flexible but can add up for high-volume users. What value might its comprehensive features bring to your workflow, especially if you need more than just retouching?
What Sets Luminar Neo Apart?
Luminar Neo combines standalone editing with Photoshop plugin capabilities, featuring AI tools like Sky AI and Face AI for versatile photo enhancements. With a subscription at $69/year or a $119 lifetime license, it’s great for photographers who want creative editing alongside retouching. How might its all-in-one approach benefit your projects?
Why Consider Retouch4me Frequency Separation?
This free Photoshop plugin automates the frequency separation technique, splitting images into texture and color layers for precise manual retouching. It’s perfect for experienced retouchers who enjoy hands-on control. If you’re on a budget or prefer manual techniques, how could this tool enhance your editing process?
Which Tool is Best for You?
The “best” retouching tool depends on your goals, skill level, and budget. Let’s reflect on your needs:
- Are you focused on skin retouching? Imagenomic Portraiture 4.5 offers unmatched quality and ease for portrait photographers, while Retouch4Me Heal provides faster, automated results. Which aligns better with your editing pace?
- Do you need broader editing capabilities? Evoto AI and Luminar Neo go beyond retouching, offering tools for creative enhancements. If you handle diverse projects, which of these suits your workflow?
- Is manual control your preference? Retouch4me Frequency Separation is free and precise but requires skill. Does this match your expertise, or would automation be more efficient?
- How does budget factor in? Frequency Separation is free, Portraiture and Retouch4Me Heal are one-time purchases, while Evoto AI’s credits and Luminar Neo’s subscription vary in cost. What pricing model works for you?
By weighing these factors, you can pinpoint the tool that best fits your retouching needs. Each excels in its niche, so the right choice is the one that enhances your creative process most effectively.
Popular Picks Beyond the Big Names
So, you’re looking for even more Photoshop retouching plugins that fly a bit under the radar, huh? I’ve been digging through marketplaces like Envato Elements, Creative Market, and a few other spots to find some options that are popular but not stealing the spotlight from the big names—or even the ones we chatted about last time. I’ll keep this short and sweet, just a rough list with that casual vibe you’re after. Here’s what I’ve rounded up for you:
- SkinFiner Plugin – A neat little tool for quick skin retouching.
- Fixel Detailizer – Sharpens up details without overdoing it.
- Retouching Toolkit – A handy set of tools for all-around edits.
- Perfect Portrait – Focuses on portraits with some cool automation.
- Pixel Juggler – Simple but effective for retouching basics.
- AutoRetouch – Speeds up edits with a bit of AI magic.
- Pro Retouch Panel – Another workflow booster for pros.
- Raya Pro – Known for landscapes but sneaky good for retouching too.
These are floating around on platforms like Envato Elements, Creative Market, and Adobe Exchange, and they’ve got a solid following without being the talk of every forum. Perfect if you’re itching to try something fresh for your Photoshop Retouching Plugins game.
Conclusion
In this blog post, we’ve delved into the best Photoshop retouching plugins for 2025, spotlighting five standout tools: Imagenomic Portraiture 4.5, Retouch4Me Suite, Adobe Neural Filters, Luminar Neo, and Retouch4me Frequency Separation. We’ve broken down their strengths, weaknesses, and ideal use cases, drawing from in-depth research and fresh insights. Whether you’re smoothing skin, enhancing details, or tackling complex edits, this guide offers actionable solutions to common retouching challenges, empowering photographers and editors to pick the perfect plugin for their workflow. It’s all about saving time, boosting quality, and unlocking creative potential—value you can apply right away.
Loved this rundown? Share it with your community on Twitter or Reddit to help others discover these game-changing tools too! Spreading the word not only boosts fellow creatives but also sparks conversations around retouching tech.
This blog comes to you courtesy of Roshan, a photo editing pro with over 5 years of experience and a knack for crafting innovative tools. His expertise shines through in every recommendation, and we’re grateful for the knowledge he’s shared. A big thank you to you, our readers, for spending time with us—your engagement keeps this space thriving.
Wishing you a great day ahead! Stay tuned, as we’ll soon return with another exciting topic you won’t want to miss.