How To speed up Windows 11 Faster Than Ever 2024

With Windows 11, Microsoft’s primary operating system has entered a new era. For more users, it improves and expands the usefulness of Windows 10. The majority of Window 11’s modifications took place in 2024. They are now more efficient, secure, and beneficial to all. Although these modifications are beneficial, the system may become slower as a result of their increased resource usage.
With the improved virtual displays, improved Start menu, and improved methods for interacting with other Microsoft products, users ought to enjoy themselves more. Your computer may use more RAM and perform better with these updates, provided that you keep them installed. After some time, it can travel more slowly. More than ever, Windows 11 needs to be speedy, easy to use, and practical.
Why Is Your Computer So Slow?
Computers, much like humans, tend to slow down with age. However, it’s not just the older machines that face performance challenges; even the newest systems can experience slowdowns. If you’ve noticed your Windows 11 computer isn’t as quick as it used to be, you’re not alone. Several factors, both old and new, contribute to this sluggishness. Understanding these can help you pinpoint the root cause and apply the appropriate fixes.
Hardware Limitations: The most fundamental cause of a slow computer is hardware that struggles to keep up with the demands of modern software and operating systems. Even with Windows 11’s efficiency improvements, inadequate hardware can lead to noticeable lag. It’s essential to ensure your hardware meets or exceeds the recommended specifications for Windows 11 and to consider upgrades if it doesn’t.
Extensive Multitasking: Windows 11, with its robust multitasking features, can tempt users to run many applications simultaneously. However, pushing your computer beyond its capability can result in sluggish performance as the system struggles to allocate resources effectively.
Background Services: Some applications and services continue to run in the background even after you’ve closed them. These can consume valuable CPU and memory resources, slowing down essential tasks. Windows 11’s Settings app provides more control over background app activities, but it’s up to users to adjust these settings for optimal performance.
Thermal Throttling: Poor heat management can cause your CPU to throttle its performance to avoid overheating, leading to slower operation. This is true for any PC but can be particularly problematic in compact Windows 11 devices with limited cooling options. Regular cleaning of air vents and fans can help maintain cooling efficiency.
Limited Storage Space: A nearly full C: drive can significantly hamper Windows 11’s performance. The operating system needs ample free space to create temporary files and for system updates. Managing storage space efficiently, including using storage sense in Windows 11, can mitigate this issue.
Malware and Viruses: Malicious software can consume system resources, slowing down your PC. Windows 11 includes built-in security features like Windows Defender, but staying vigilant about the software you download and keeping your system updated are critical preventative measures.
Outdated Software: Using outdated versions of software, including Windows 11 itself, can lead to compatibility issues and slow performance. Regularly checking for and applying software updates can improve stability and speed.
Impact of System Updates and Temporary Files: Windows 11 receives regular updates that can temporarily affect performance as they’re being installed. Additionally, these updates, along with everyday use, can lead to the accumulation of temporary files. Over time, these files can take up significant space and slow down your system. Utilizing built-in cleanup tools like Storage Sense can help manage these files effectively.
Understanding these common culprits behind a slow Windows 11 PC is the first step towards a faster, more responsive system. In the following sections, we’ll explore specific strategies and tips to address these issues and enhance your Windows 11 experience.
Checking Your Computer’s Performance
You should check out how Windows 11 works and fix any problems you find so it stays quick and easy to use. Window 11 has a lot of tools you can use to check on your computer, figure out why it’s running slowly, and fix it. Step by step, here’s how to use some of these tools:
1. Using Task Manager to Monitor Performance
- 1. Open Task Manager: This shows how much network traffic, CPU, memory, and file space your computer has. In Task Manager, you can see how fast it’s going.
- View Performance: Right-click the Start button or press Ctrl + Shift + Esc to get to Task Manager.
- Analyze Performance Metrics: Click “More details” at the bottom of the screen to see more. This will show you the whole picture instead of just the easy view. On the “Performance” tab, you can see how fast your computer is and learn more about it.
Find out how to tell if something did or not. If an app or program uses a lot of CPU, memory, or files, it may be taking up too much room.
2. Using Resource Monitor for Detailed Analysis
Resource Monitor offers more detailed information about your system’s resources.
- Open Resource Monitor: Press
Windows key + Rto open the Run dialog, typeresmon, and press Enter. - Explore Tabs: Use the tabs (CPU, Memory, Disk, and Network) to delve deeper into how resources are being used. You can see which processes are using the most resources and get detailed information on hardware usage.
3. Using Performance Monitor to Track Performance Over Time
Performance Monitor is a powerful tool that allows you to view detailed performance data and system information.
- Open Performance Monitor: Press
Windows key + R, typeperfmon, and press Enter. - Use Data Collector Sets: Navigate to “Data Collector Sets” > “System” to use predefined sets. Right-click “System Performance” and select “Start” to begin collecting performance data.
- Review Reports: After stopping the data collection, navigate to “Reports” > “System” > “System Performance” to view the report. This report provides a wealth of information about your system’s performance and potential issues.
4. Checking for Disk Errors and Optimization
- Open File Explorer and right-click on the C: drive (or your Windows installation drive) and select “Properties”.
- Navigate to the “Tools” tab and under “Error checking,” click “Check”. This can help you find and fix any disk errors that might be affecting performance.
- Under “Optimize and defragment drive”, click “Optimize”. This will help optimize your drive’s performance by reorganizing data.
5. Monitoring Startup Impact
Control which apps run at startup to improve boot times and overall performance.
- Open Task Manager and navigate to the “Startup” tab.
- Review Startup Impact: This column shows the impact of each startup application on your boot time. Disable any non-essential apps with high impact by right-clicking them and selecting “Disable”.
By regularly monitoring your system’s performance using these built-in Windows 11 tools, you can identify and address issues that might be slowing down your computer. This proactive approach can help ensure that your Windows 11 PC remains fast, efficient, and reliable.
Boost Windows 10’S Performance Like Never Before
- Find Resource-Hungry Programs
- Your PC Is Acting Sluggish Because Something Is Sucking Up All Those Resources. If It’s Suddenly Performing Slow, For Example, A Runaway Process Could Be Taking Up 99 Percent Of Your CPU Resources. Or, A Program May Have A Memory Leak And Require A Large Amount Of Memory, Forcing Your PC To Switch To Disk. Alternatively, One Application May Be Using The Disk Too Much, Causing Other Apps To Slow Down When They Need To Load Data Or Save It To The Drive.

You Can Locate The Task Manager In Several Manners
Use The Methods Listed Below To Gain Access To The Task Manager.
- Using The Specific Keyboard Shortcut Is The Quickest And Easiest Way To Open The Task Manager. All You Have To Do Is Press “Ctrl+Shift+Esc” At The Same Time To Bring Up Task Manager. As Long As Your Keyboard Works Properly And Nothing Prohibits You From Using Shortcuts, This Should Be Your Preferred Method Of Accessing The Task Manager.
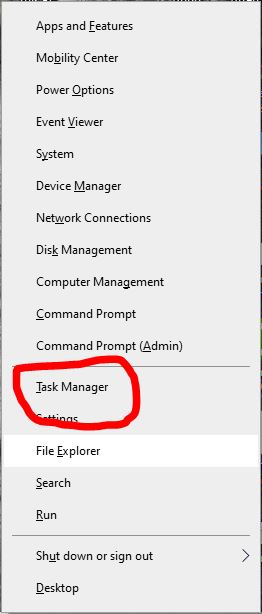
- The Task Manager Is Also Accessible Through The Windows 10 Power User Menu. Right-Click The Start Menu Button Or Press The “Windows+X” Keys To Get To It. To Open The Task Manager, Go To The Power User Menu And Click On It. When Your Keyboard Isn’t Working Or You Just Want To Utilize The Mouse, This Solution Can Come In Handy.
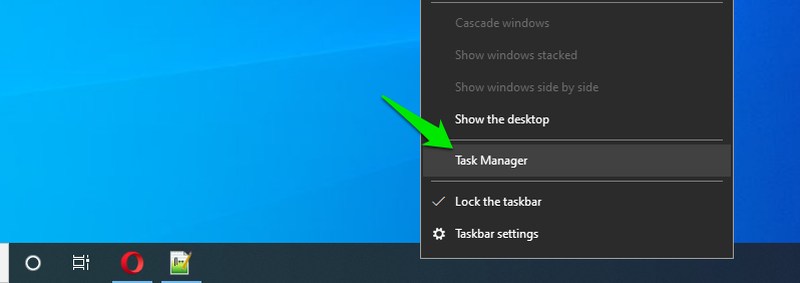
- Similar To The Preceding Technique, There Is An Option To Open The Task Manager From The Taskbar Menu As Well. Right-Click On Any Empty Area On The Taskbar And Pick Task Manager From The Menu That Shows Up.
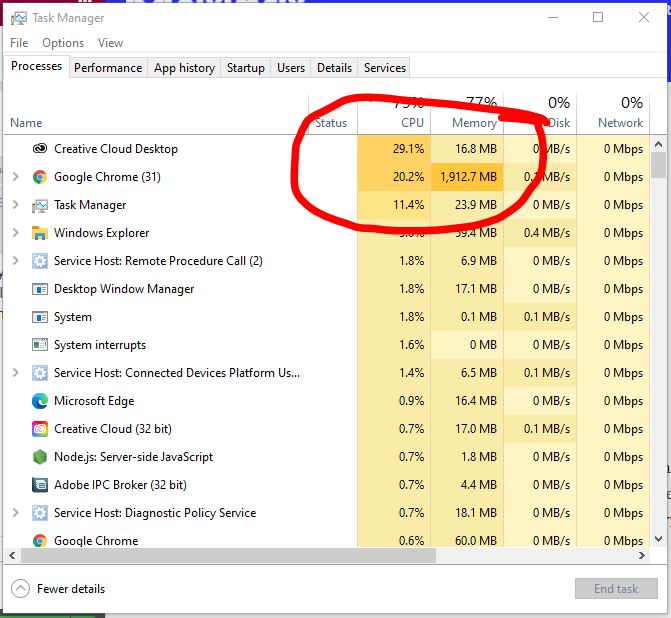
The New Task Manager In Windows 8, 8.1, And 10 Has An Improved UI That Color-Codes Applications That Use A Lot Of Resources.
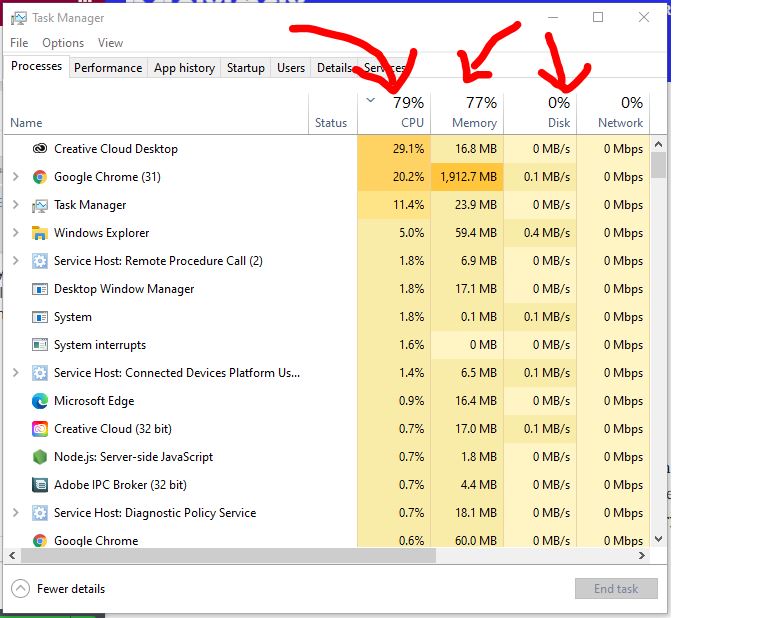
To Order The List By The Applications That Use The Maximum Resources, Click On “CPU,” “Memory,” And “Disk” Headers.
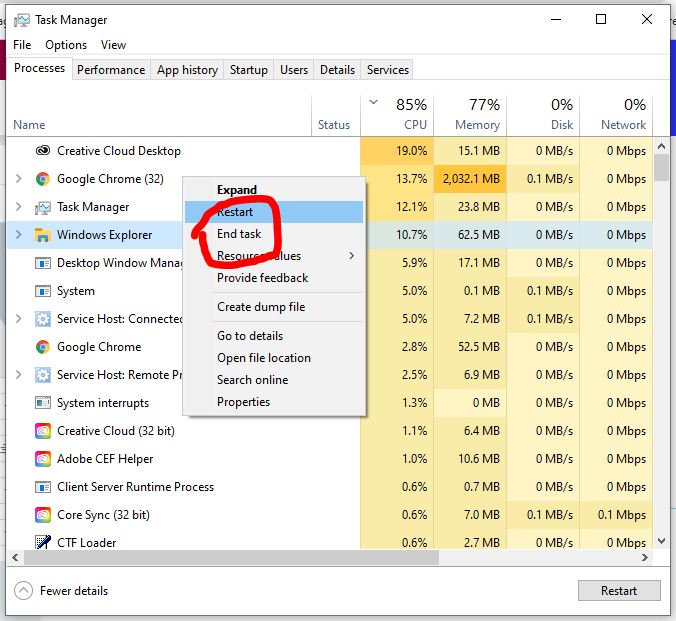
If A Program Is Consuming Too Many Resources, You Must Close It Manually If Possible; If You Can’t, Pick It Here And Click “End Task” To Force It To Shut Down.
- Reduce AnimationsWindows Utilizes Quite A Few Animations, And Those Movements Can Make Your PC Look A Bit Sluggish. For Example, Windows May Reduce And Maximize Windows Immediately If You Eliminate The Related Animations.
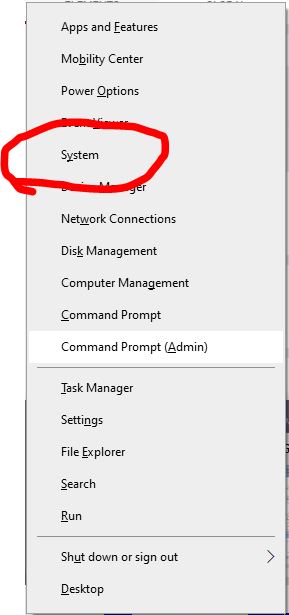
To Disable Animations, Hit Windows Key + X Or Right-Click The Start Button And Select “System.”
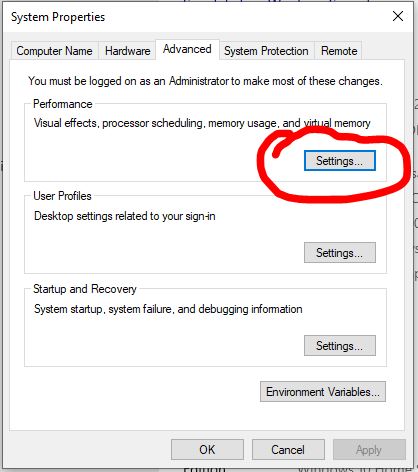
Click “Advanced System Settings” On The Left And Click The “Settings” Option Under Performance.
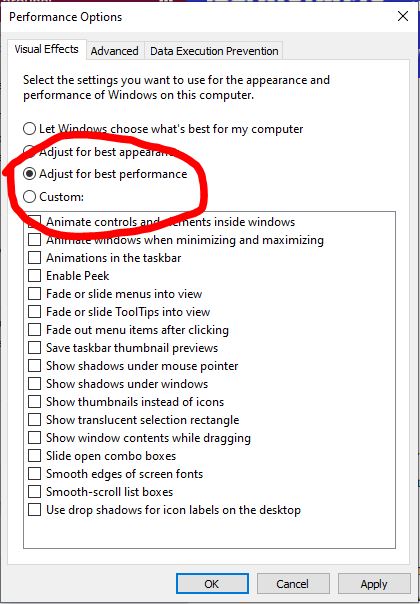
Choose “Adjust For Best Performance” Under Visual Effects To Eliminate All The Animations, Or Pick “Custom” To Disable The Particular Animations You Don’t Want To See.
For example, uncheck “Animate windows when minimizing and maximizing” to prevent the minimize and maximize animations.
- SET UP POWER MANAGEMENT
By default, Windows configures all computers to use the “Balanced” power plan, but there are also “Power saver” and “High performance” plans. Your PC maker may even have their own custom power plans. If you have your power plan set to “Balanced” or “Power saver” and are experiencing audio crackles, dropouts, or other negative performance issues, we recommend switching to the “High performance” power plan. It consumes more energy, but it should improve Live’s performance (and other CPU intensive programs).
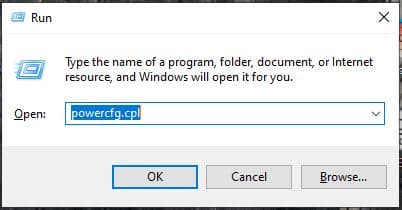
To open the Run dialogue box, press the Windows + R keys togethe, and type powercfg.cpl then press Enter.
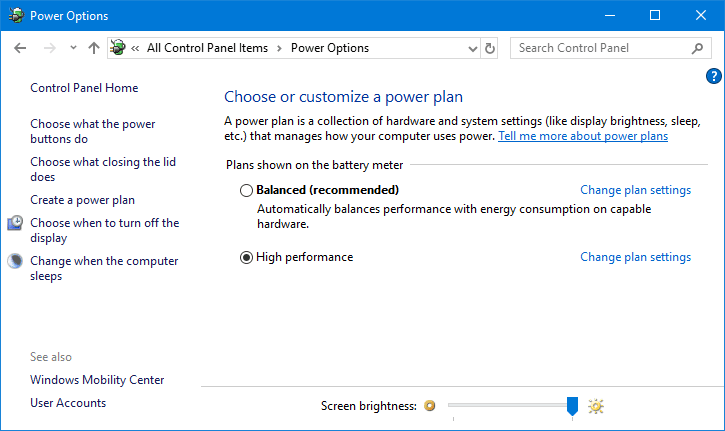
Choose High Performance in the Power Options window under Select a power plan.
Click the down arrow next to Show additional plans if you do not see the High Performance option, On Windows XP, select Always On from the Power Schemes tab in the Power Options Properties dialogue box.
Change the settings for System standby and System hibernates to Never if they’re available.
Click Save changes or click OK.
- defragment and optimize drives
Fragmentation causes your hard disc to perform additional tasks, which can cause your computer to slow down. USB flash drives and other removable storage devices can become fragmented as well. Windows’ Disk Defragmenter reorganises fragmented data to improve the performance of your discs and drives. Disk Defragmenter is a scheduled programme, but you can also manually analyse and defragment your discs and drives. Follow these instructions to accomplish this:
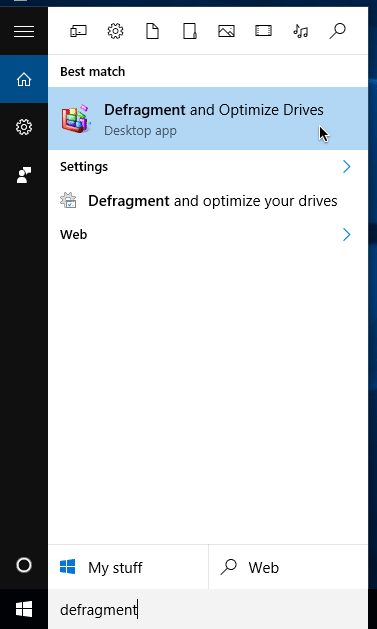
Type defragment into the Start menu’s search field, then choose Defragment and Optimize Drives.
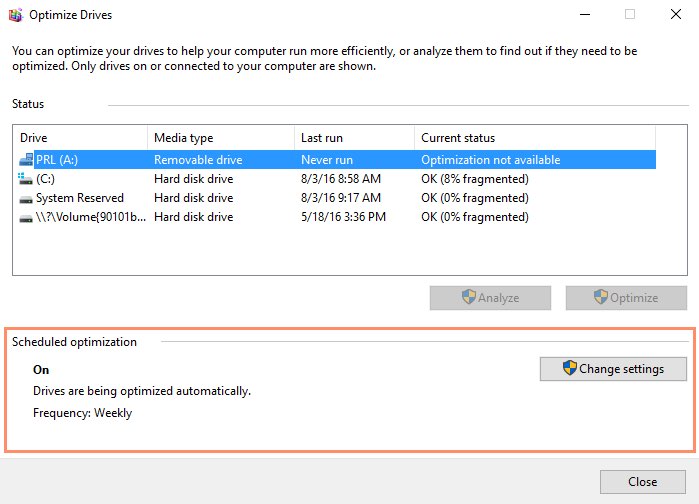
The Optimize Drives menu will appear. At the bottom, it will show you how frequently your hard drive is scheduled to be defragged. If you want your hard drive to be defragged more or less frequently, use the Change settings button on the right to change the schedule settings.
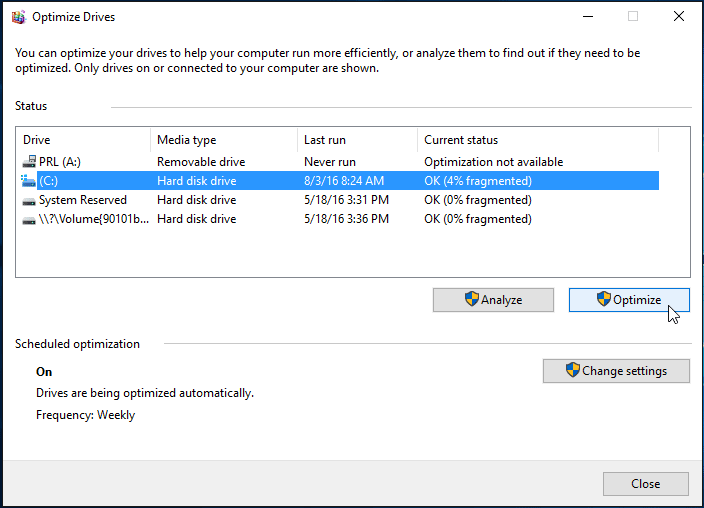
If your hard disc is not being defragmented automatically, you can perform a manual defragmentation. After selecting the drive to defrag, click the Optimize option. Because defragging can take a long time, you might wish to leave it running overnight or when you aren’t using your computer.
- delete temporary files
Temporary files are files that apps save on your computer in order to save information for a limited time. Other sorts of temporary files in Windows 10 include those left over when a new version is installed, upgrade logs, error reporting, temporary Windows installation files, and more. In most cases, these files will not cause any problems. They can, however, quickly use valuable hard disc space, which may prohibit you from installing a new version of Windows 10 or cause you to run out of space on your computer. If you’re using Windows 10, the Settings programme and the Disk Cleanup application are two options for properly removing temporary files.
Using the Settings app on Windows 10, delete temporary files.
On Windows 10, you can manually or automatically delete temporary files using the Settings app. However, depending on which release you have installed on your computer, the steps will differ slightly.
- On Windows 10, go to the Settings app.
- Click on System. and navigate storage.
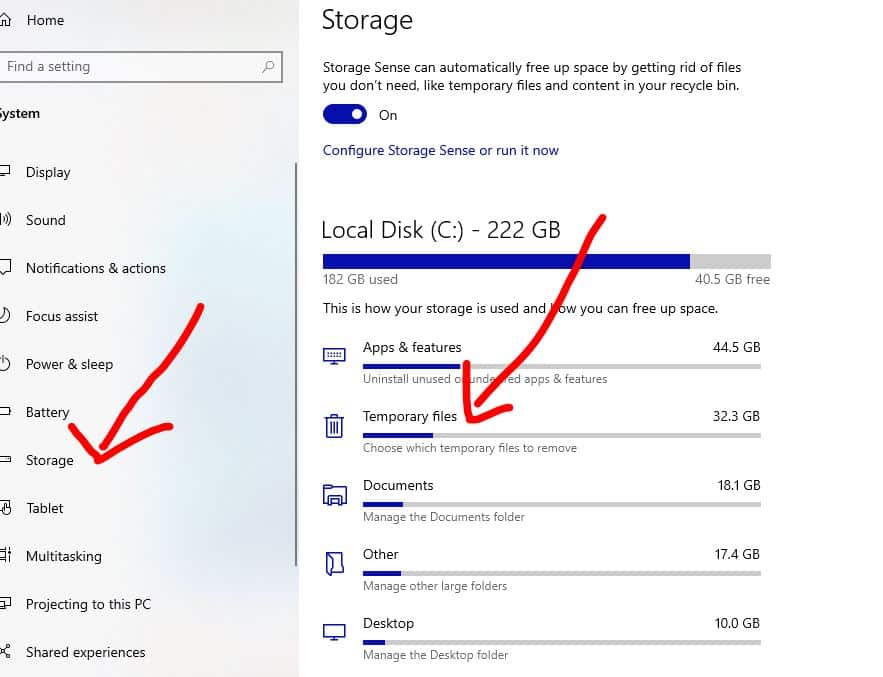
Choose the temporary files you’d like to get rid of.
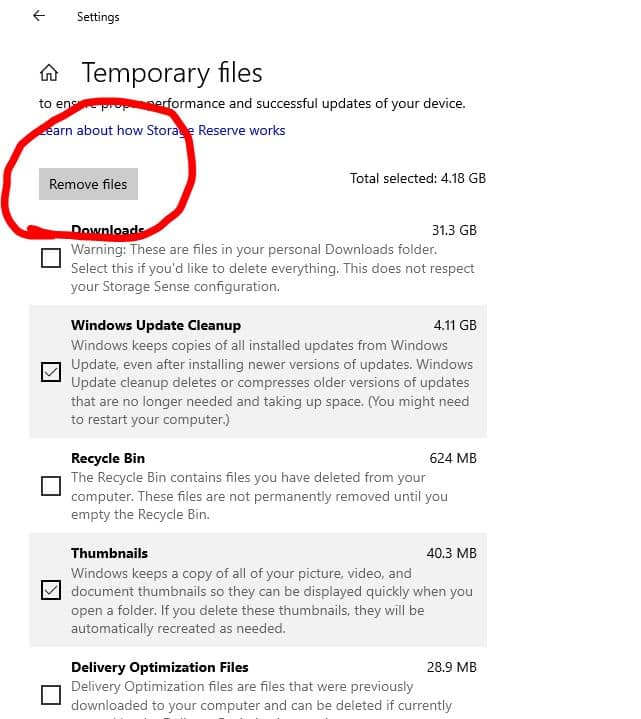
Select the Remove files option.
Delete all temporary files
A quick way to prevent our system from slowing down is to delete temporary files that are created automatically, as this will improve your system’s performance.
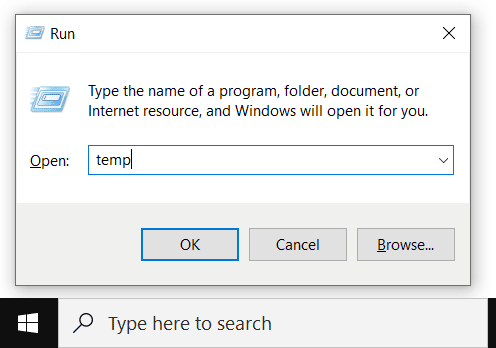
To open the Run command, press Windows key + R. Then, in the search field, type “temp” and press enter.
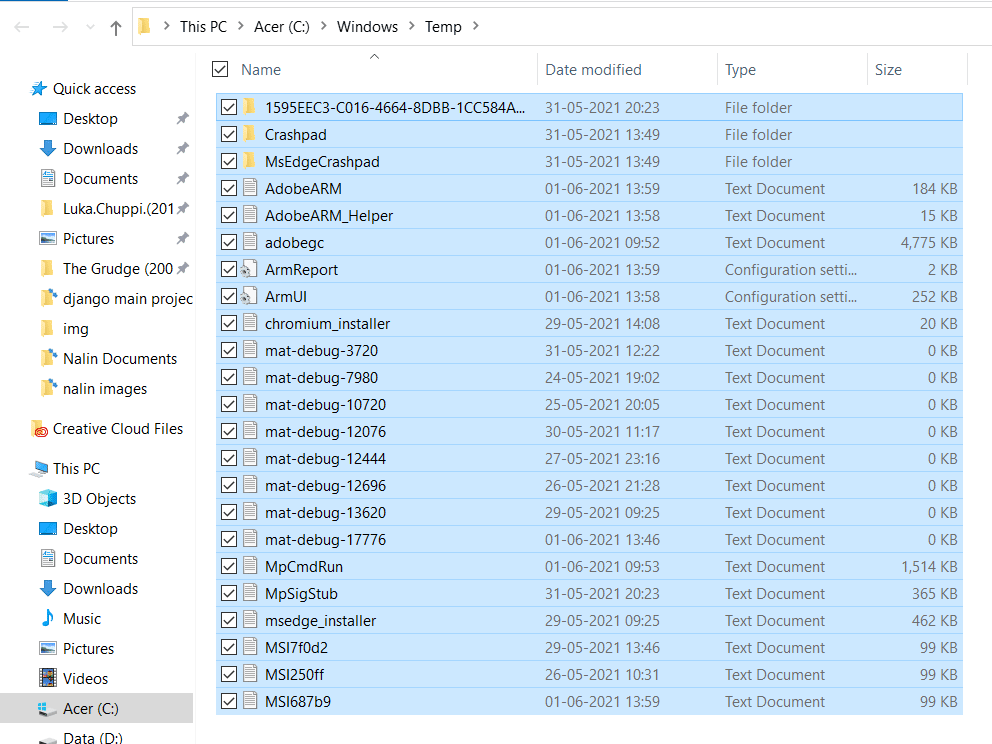
Now, press Ctrl + A to select all temp files and then delete them.
Deleting local temp files
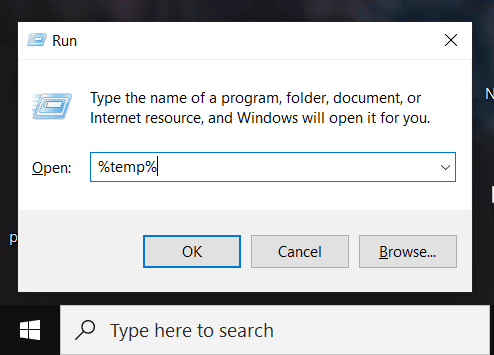
To open the Run command, press Windows key + R. Then, in the search field, type “%temp% “ and press enter.
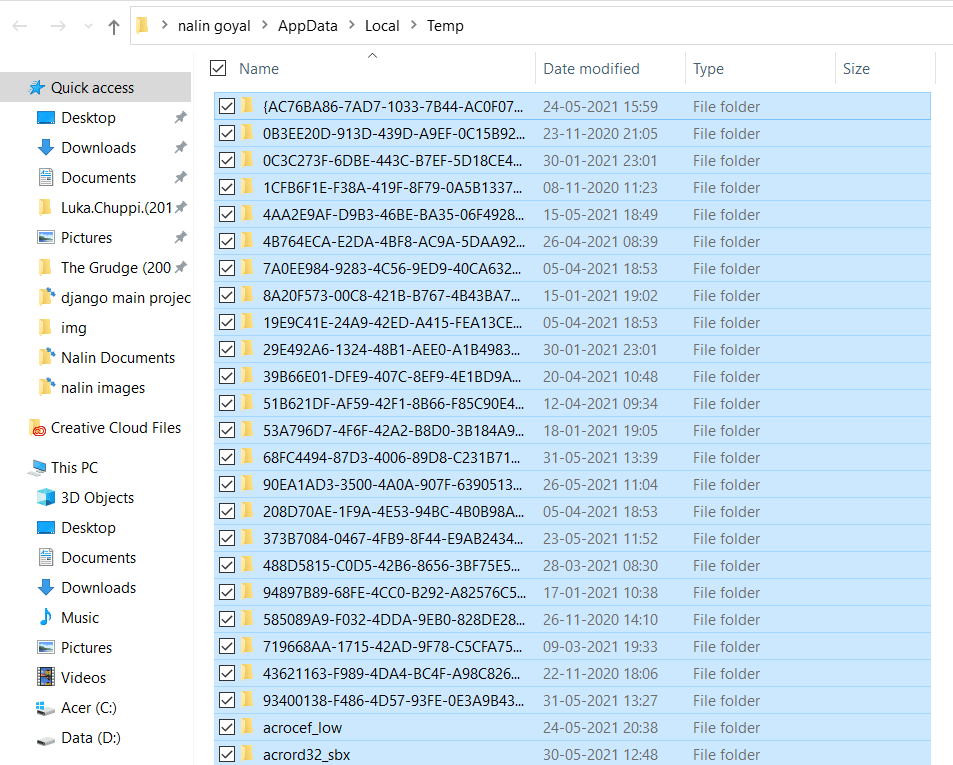
Now, press Ctrl + A to select all temp files and then delete them.
Deleting local temp files using Prefetch
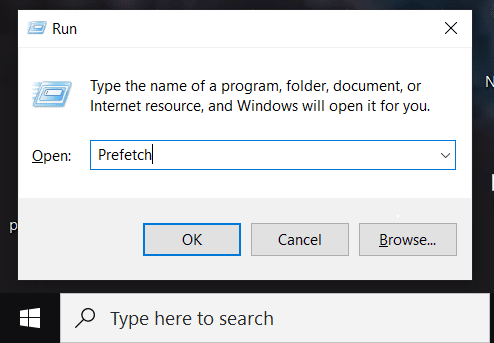
To open the Run command, press Windows key + R. Then, in the search field, type “Prefetch” and press enter.
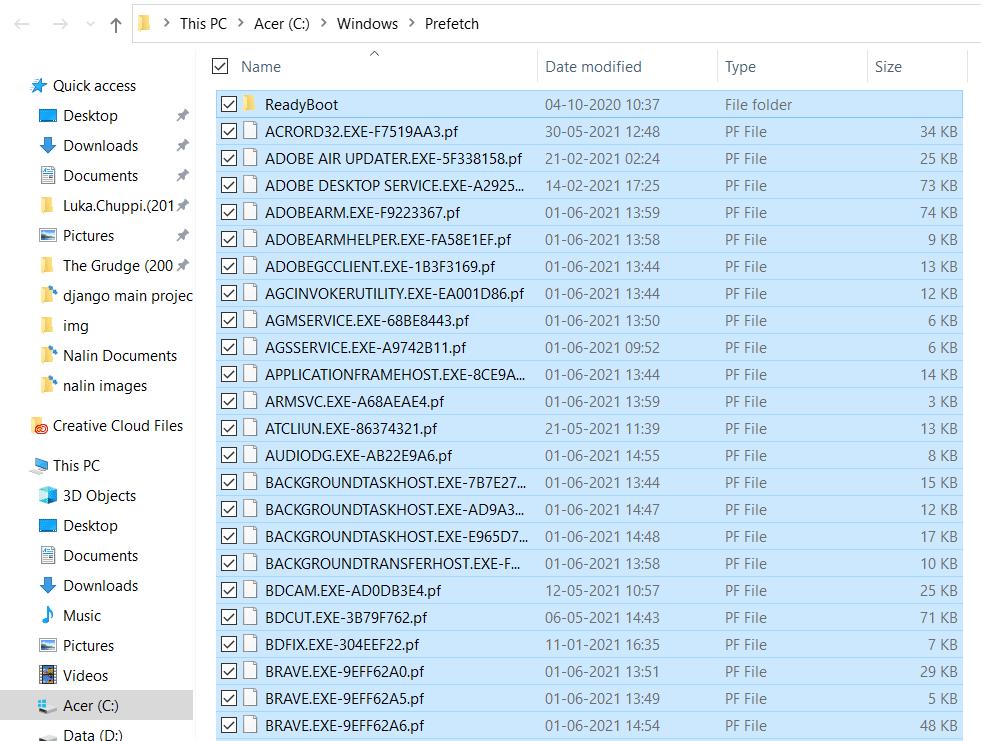
Now, press Ctrl + A to select all temp files and then delete them.
Disk cleanup
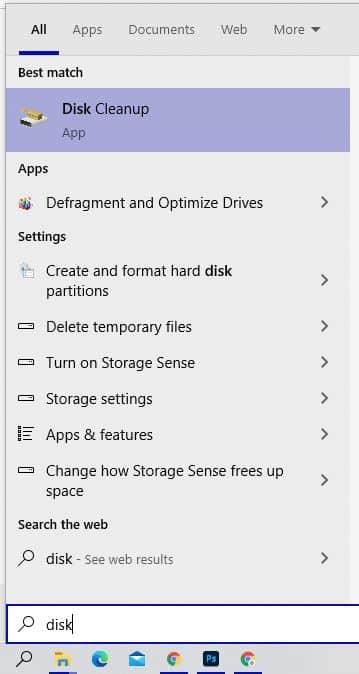
Type disk cleanup into the taskbar’s search box, and then select Disk Cleanup from the list of results.
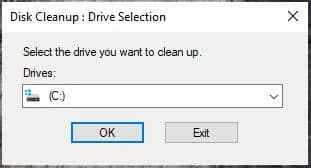
After that, select the drive you want to clean up and click OK.
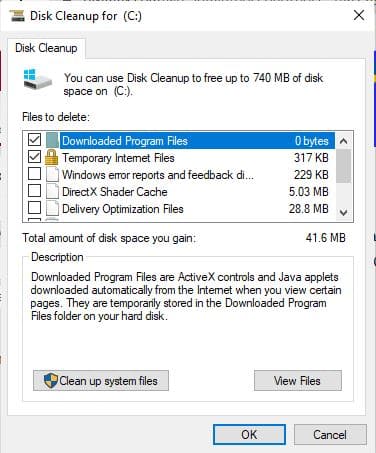
Choose the file types you want to get rid of. and hit ok
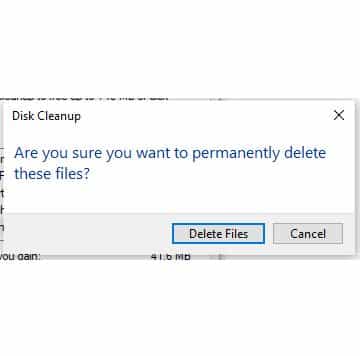
delete files
You can also delete system files to free up more space if necessary:
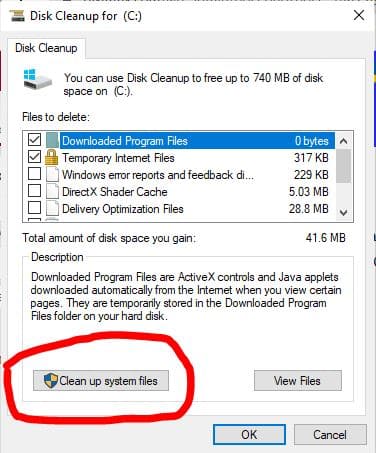
now Click on “Clean up system files”.
Finally, empty the recycle bin of all files. All temporary files have been deleted, and you are now ready to go!!
When you finish the steps, junk files will be removed from your computer, making room for more important files.
- Registry tweaks to improve performance
Windows Registry holds all the tweaks to customize your Windows experience and deal with little nuisances that Microsoft wrongly assumes every user will love. From changing the Windows design to unlocking hidden features, there are tweaks for everything. To help you improve your Windows 10 (and now, a little bit of your Windows 11) experience,
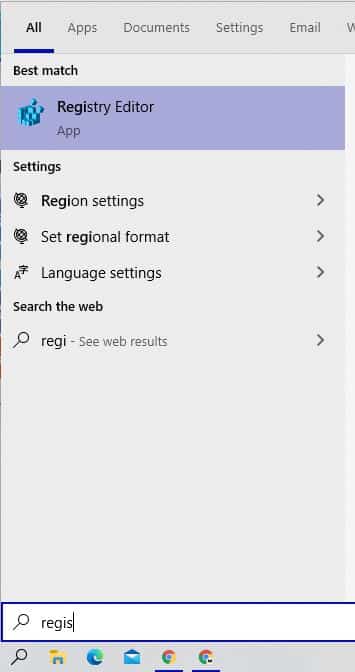
Type Registry Editor into the taskbar’s search box, and then select Registry Editor from the list of results.
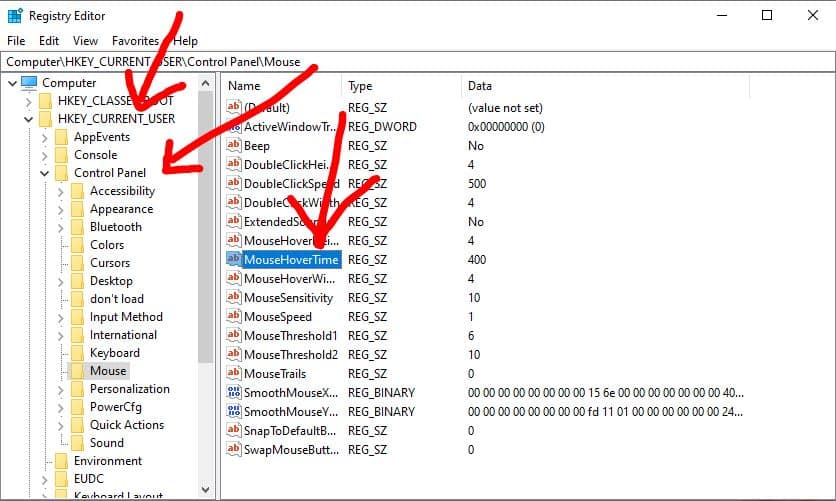
Navigate using the following route:
Computer\HKEY_CURRENT_USER\Control\PanelMouse
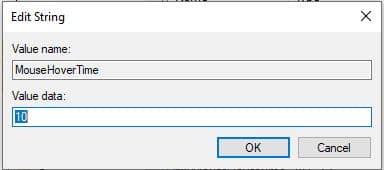
now change the values of mousehovertime 400 to 10, and Click on Ok
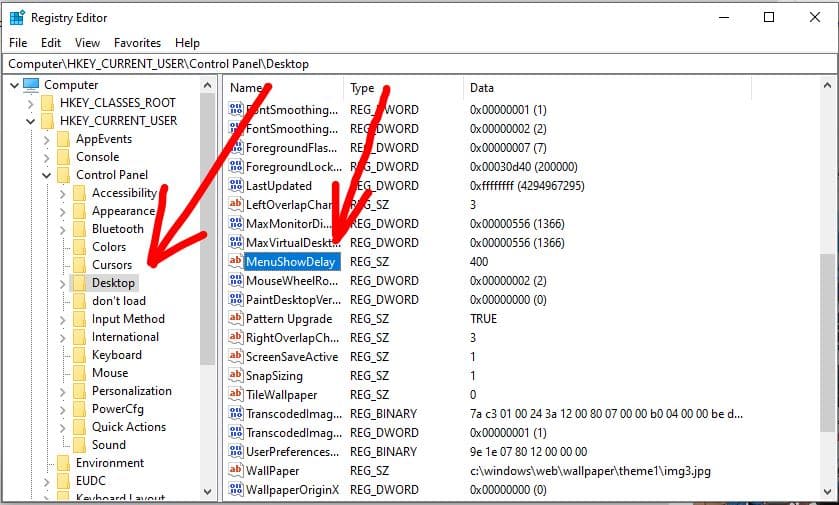
then select desktop and double-click MenuShowDelay
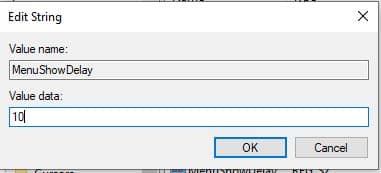
change the MenuShowDelay values 400 to 10, and Click on Ok
After completing all of the steps, simply restart your computer.


