How I Saved 90% on My Hosting Renewal | 100% Legal and Safe


If you’ve ever bought web hosting, you probably remember how good that first-year deal looked. Big discounts, flashy banners, and a price that almost feels too good to be true. But the real surprise comes a year later — when hosting renewal time hits and that same plan suddenly costs almost double.
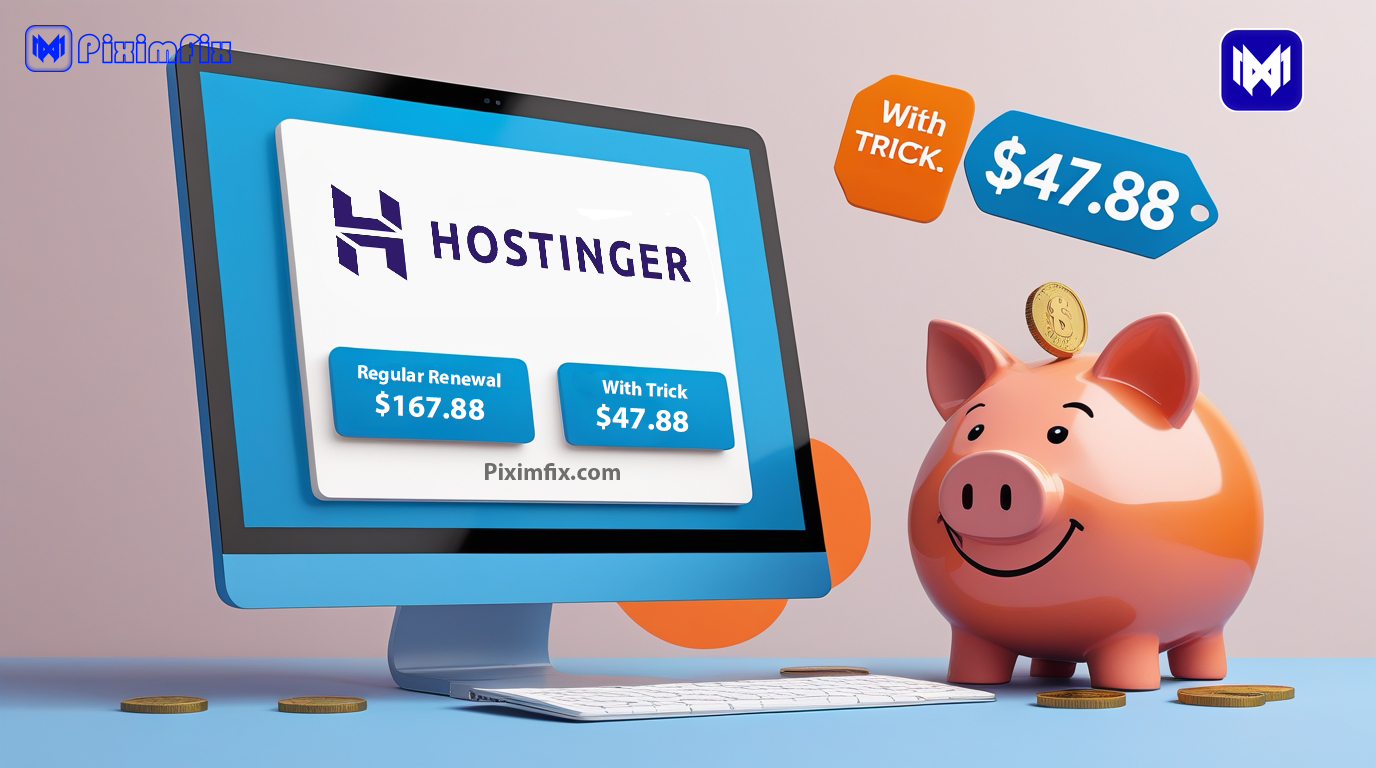
I’ve been through that exact moment more than once, and honestly, it never gets easier. The last time it happened, I was using Hostinger’s Cloud Startup Plan. I’d paid around ₹11,830 the first year, but when renewal time came, the price shot up to somewhere between ₹19,000 and ₹20,000. My heart sank.
At that point, I didn’t have the budget for it. I was already juggling personal expenses, and the thought of paying nearly twenty thousand just to keep my site online felt impossible. For a few days, I genuinely thought about quitting blogging altogether — letting the hosting expire and walking away.
But that low moment turned out to be the start of something unexpectedly smart. Out of pure necessity, I stumbled upon a simple, completely legal trick that ended up saving me more than ₹10,000 on my renewal. It wasn’t something I’d ever read online — I figured it out by experimenting and talking to support.
In this post, I’ll walk you through exactly what I did — how downgrading and then upgrading again helped me keep my website alive during one of my toughest financial phases. More importantly, I’ll explain how you can try the same approach safely if your renewal price ever leaves you stuck like I was.
If you’re planning to buy hosting or renew your current one, I genuinely recommend Hostinger — it’s the same platform I’ve trusted for years. You can support my work by purchasing through my referral link: Hostinger India Official Site. Your support helps me continue sharing real, experience-based guides like this one ❤️
20 Benefits of Cloud-Based Hosting For Businesses Afly Pro
The Struggle — When Renewal Prices Hit Hard

When I first logged in and saw that renewal amount, I honestly froze for a few seconds. ₹19,000 to ₹20,000 for the same hosting plan I had bought for ₹11,830? It felt almost unreal. Like many beginner bloggers, I had entered the world of hosting with excitement, not realizing how tricky renewal pricing can be.
That moment hit harder than I expected — not just because of the money, but because of what it meant emotionally. My site wasn’t just a website; it was something I had built from scratch, late at night, writing articles and fixing things on my own. And now, all of that work was about to vanish simply because I couldn’t afford to renew at double the cost.
At that time, I was going through a financial crunch. Every rupee mattered. I remember staring at the renewal page, doing mental math, and realizing there was no way I could stretch my budget that far. I even told myself, “Maybe this is it. Maybe I should just let it expire.” It’s a thought that crosses the mind of many small creators — when passion meets practical limits.
For a few days, I didn’t do anything. I just accepted that maybe my site would go offline. But the idea of losing years of effort kept eating at me. That’s when something clicked — maybe there was a cheaper plan, maybe a temporary downgrade could buy me some time. I didn’t have a clear plan; I just knew I had to try something.
That small decision — to look for a way instead of giving up — changed everything.
The Turning Point — Discovering the Downgrade Option
After a few restless nights, I finally decided to explore my options. I opened my Hostinger dashboard and started checking if there was any way to reduce my plan. That’s when I noticed something strange — there were clear buttons for upgrading but nothing that said downgrade.
It almost felt like a one-way street: you could always pay more, but never less. I think that’s intentional for most hosting companies — they make upgrading easy but quietly hide the path to downgrade. Still, I wasn’t ready to give up.
I thought, “If the button isn’t there, maybe a real person can help.” So, I clicked on Live Chat and explained my situation honestly:

“Hey, I’m struggling with renewal costs right now. Is it possible to temporarily move to a cheaper plan?”
To my surprise, the support agent didn’t hesitate at all. They immediately understood what I wanted, explained how the downgrade would work, and processed my request right there. No long verification, no pushy upsells — just simple help. Within a day, my account was moved from the Cloud Startup Plan to the Business Web Hosting Plan, which cost about ₹8,481 for the year.

That moment felt like a huge relief. I had gone from almost quitting my blog to suddenly keeping it alive — all because of one quick conversation. I’ve always appreciated Hostinger’s quick and friendly support. If you’re thinking about getting hosting for your blog, you can use my referral link here: Buy Hosting via Hostinger. It won’t cost you anything extra, but it really helps me keep creating transparent, first-hand reviews like this.
And honestly, this is where most people get stuck. Many assume that if there’s no downgrade option on-screen, it’s impossible. But in reality, hosting support teams often have manual access to switch plans internally. You just have to ask.
So if you ever find yourself in a similar situation, don’t rely only on what the dashboard shows. Open that chat window, explain your problem clearly, and see what solutions they can offer. Sometimes, one small message can save you thousands — just like it did for me.
The Downside — What Happened After Downgrading
At first, I was just relieved that my site was still online. Paying ₹8,481 instead of nearly ₹20,000 felt like a win. But within a few days, I began to notice something was off.
Pages that once loaded instantly started taking longer. The dashboard felt sluggish. My analytics showed small dips in page speed, and some visitors even messaged me saying the site felt slower than before. That’s when I realized the harsh truth — downgrading had come with trade-offs.

The Business Web Hosting plan had fewer resources compared to the Cloud Startup plan I’d been using earlier. Less CPU power, fewer website slots, and lower priority on shared servers. In simple words — it was designed for smaller, lighter sites. My site, with its daily visitors and media files, clearly needed more breathing room.
Still, I tried to make it work. I optimized images, reduced plugin load, and even installed a caching plugin to squeeze out extra performance. But despite all that, the difference was clear — the downgraded plan just couldn’t match the stability of cloud hosting.
It wasn’t a failure, though. I saw it as a lesson in understanding what my website truly needed. Many beginner bloggers think all hosting plans are basically the same, just with different names. But once you experience the downgrade firsthand, you realize how much backend power affects real-world performance.
So yes, the downgrade saved me money temporarily, but it also showed me that cutting costs blindly isn’t always the right answer. It worked as a temporary solution — something to keep my site alive while I figured out the next step.
And that next step turned out to be the most unexpected (and rewarding) part of this whole journey.
The Unexpected Solution — Paying the Difference to Upgrade Back
A few weeks later, while checking my Hostinger dashboard, I noticed something new — a small banner suggesting I upgrade back to the Cloud Startup plan. Out of curiosity, I clicked on it, expecting to see another massive renewal charge.
But what I saw next genuinely surprised me.

Instead of asking for the full ₹11,000 or ₹12,000 price, the system showed that I only needed to pay around ₹3,000 extra to upgrade back. That’s it — just the price difference between my current Business plan and the Cloud Startup plan.
I remember staring at the screen for a few seconds, half-confused, half-relieved. Could it really be that simple? I double-checked with support, and they confirmed it:
“Yes, you’ll only need to pay the difference. Your current plan’s value will be adjusted automatically.”
That’s when it clicked — this wasn’t a loophole or hack. It’s just how hosting billing systems are structured. When you upgrade, you’re not buying a whole new plan; you’re simply paying the difference between your existing package and the higher one.
That realization changed everything.
I went ahead and made the payment. Within minutes, my hosting was upgraded back to the Cloud Startup plan, and instantly, the performance issues disappeared. My site was fast again, and more importantly, I hadn’t spent ₹19,000 or ₹20,000 to make it happen. In total, I’d saved around ₹10,000–₹11,000 — all because I downgraded first and then upgraded later.
That moment felt like a massive relief — not just financially, but emotionally too. What had started as a stressful, uncertain situation ended with a smart, legal workaround that kept my site alive and my budget intact.
I know this might not work exactly the same way for every hosting provider, but with Hostinger, it worked perfectly. It showed me that sometimes the solution isn’t about finding “tricks” — it’s about understanding how things actually work behind the scenes.
Step-by-Step Guide — How You Can Try This Safely
When I shared this experience with a few blogger friends, most of them were shocked. They didn’t even know downgrading was possible — let alone that you could later upgrade again by paying just the difference.
So, if you’re stuck in the same situation and want to try this safely, here’s exactly how I did it and how you can too.
Step 1: Check Your Current Plan and Renewal Price
Before you do anything, log in to your hosting account and look at your renewal amount. Note the current plan you’re on and what cheaper alternatives are available.
Most hosts display renewal rates clearly — use that to compare which plan fits your budget temporarily.
💡 Tip: Take a quick screenshot of your renewal pricing. It helps you later when explaining your situation to support.
Step 2: Ask Support About Downgrading
If you don’t see a downgrade option (like in Hostinger), don’t assume it’s impossible.
Open the live chat or email support and explain your situation honestly. You don’t need to overthink it. I simply said,
“I can’t afford the renewal cost right now. Can you please downgrade my plan to a cheaper one?”
Within a few minutes, they processed it. The key is to stay polite and clear. Support teams often have access to manual downgrade tools that users can’t see in their dashboard.
Step 3: Downgrade to a Cheaper Plan Temporarily
Once your downgrade request is accepted, your billing adjusts automatically. You’ll either receive a partial refund or an extended term on the cheaper plan depending on your host’s policy.
Keep your website running smoothly during this phase — it’s your safety net while you plan your next move.
⚠️ Important: Always make a full backup before downgrading. Some lower-tier plans may have file or database size limits.
Step 4: Monitor Your Website’s Performance
After downgrading, give it a few days. Watch how your website performs.
If it feels slower or runs into limitations, that’s okay — remember, this step is temporary. You’re not downgrading for long-term use, just to bridge the renewal gap safely.
Step 5: Upgrade Back by Paying the Difference
Now comes the rewarding part. When you’re ready (and can afford it), go back to your dashboard and check the upgrade option.
You’ll likely see that you only need to pay the price difference — just like I did with Hostinger.
If you haven’t picked your hosting yet, this is a great time to try Hostinger — the same company I used in this story. You can buy it here: Hostinger Official Link. Using this link directly supports Piximfix and helps me write more guides that come from real experience, not promotions.
Once you upgrade, your website will instantly return to its original performance level, and you’ll still have saved a huge chunk of money compared to paying the full renewal upfront.
This process may sound simple, but it’s powerful because it gives you control over how you handle expensive renewals. You’re not breaking any rules or exploiting a bug — you’re simply using the system’s flexibility to your advantage.
For me, this method wasn’t just about saving ₹10,000 — it was about learning that there’s almost always a middle path, even when things look unaffordable at first.
What I Learned — The Bigger Truth About Hosting Renewals

After everything that happened — the panic, the downgrade, the upgrade, and finally the relief — I started to see hosting renewals in a whole new light. What I once thought was just “how things work” turned out to be a pricing game that many beginners don’t fully understand.
The Marketing Trap
Most hosting companies use the same playbook: attract new users with unbelievably low first-year prices and then recover their profit at renewal time. It’s smart business, but it hits small creators the hardest.
When I first paid ₹11,830 for my Hostinger plan, it felt like a great deal. But when that renewal quote jumped to nearly ₹20,000, I realized that the initial price wasn’t really a discount — it was bait. The real cost shows up later, once you’ve already invested your time and effort into building your site.
And honestly, this is why many bloggers quit early. They underestimate long-term costs, and when renewal shock hits, they assume there’s no way out. But there usually is — if you stay calm and think creatively.
Don’t Panic, Explore Alternatives
When I first saw the renewal price, my instinct was to give up. But taking a pause instead of panicking changed everything.
By exploring other plans and simply talking to support, I discovered options that weren’t visible on the dashboard.
That one step — asking for help — turned a financial dead end into a money-saving solution. So if you’re ever stuck, don’t rush to cancel your hosting or abandon your project. Contact your provider, check alternative plans, and see what flexibility they can offer. You might be surprised at how willing they are to help once you explain your situation honestly.
Hosting Companies Aren’t the Enemy
This experience also reminded me that hosting providers aren’t out to trick you — they just run their business in a way that rewards attention and initiative.
If you approach their team politely and ask the right questions, you’ll often find they have room to make exceptions.
The truth is, support teams want to keep loyal customers, and sometimes that means adjusting plans, offering temporary downgrades, or waiving small fees. It’s all about communication.
In short, I learned that renewal time doesn’t have to be a nightmare. The key is to stay patient, stay curious, and remember that you always have more options than the pricing page shows.
Pros and Cons of the Downgrade-Upgrade Trick
When something works well, it’s easy to get excited and call it a “secret hack.” But the truth is, every method comes with its own pros and cons. This downgrade-then-upgrade approach worked beautifully for me, but it’s important to see the full picture before trying it yourself.
✅ The Benefits

1. You Save Real Money
Let’s start with the obvious one. By downgrading first and then upgrading later, I ended up saving around ₹10,000–₹11,000. For a blogger managing everything alone, that’s a big deal. The amount I saved covered other essential tools I needed for my site.
2. You Learn How Hosting Actually Works
This experience forced me to understand how billing systems operate. I learned that upgrades are often based on price difference, not full renewal amounts. Once you grasp that logic, you start seeing more flexibility in the system than what hosting companies advertise.
3. It Keeps Your Website Alive
Instead of losing my website due to an expired plan, downgrading kept it running. Even though performance dropped a little, it gave me breathing space to recover financially and plan my next move without losing everything.
4. It’s Completely Safe and Legal
There’s nothing shady about this. I didn’t exploit a bug or loophole — I simply used the official downgrade and upgrade options through customer support. Everything went through their billing system transparently.
⚠️ The Risks and Limitations

1. Performance Can Drop
Downgrading means fewer resources. My site became slower, and I saw the impact on user experience. If your website has high traffic or uses heavy plugins, a cheaper plan might not hold up well.
2. Not Every Host Allows It
Hostinger handled my request smoothly, but not all providers will. Some companies completely lock plan changes until your billing cycle ends. That’s why it’s always crucial to confirm with support first.
3. Short-Term Fix, Not a Long-Term Strategy
This trick is best used as a temporary bridge, not a permanent cost-cutting method. Long-term, your site still needs proper hosting power to perform well.
4. Requires Careful Timing
If you downgrade too close to your renewal date or during active campaigns, you could face brief slowdowns or resource limits. Always plan it during a calm period.
In my case, the pros clearly outweighed the cons — because I went into it fully aware of what could go wrong. That’s the difference between trying something smart and taking a blind risk. As long as you’re transparent with your hosting provider and take proper backups, this approach can genuinely save you money without putting your website at risk.
Transparency & Safe Practices
Whenever I share this story, I make one thing clear — this isn’t a “hack” or some secret loophole. It’s simply a smart, responsible way to handle renewals within the rules. Still, because every hosting provider operates differently, you need to approach it with care and awareness. Here’s how to keep things completely safe and transparent.
1. Always Confirm With Support First
Before downgrading, talk to your hosting provider. Ask if your files, emails, and databases will stay intact during the downgrade. Every company has its own system — some handle plan switches instantly, while others may require manual migration.
That short chat can save you from unexpected downtime.
💬 What I said to Hostinger:
“I want to temporarily downgrade my plan because I can’t afford the renewal. Will my website stay safe during the switch?”
Their quick, reassuring reply gave me the confidence to move forward.
2. Keep Backups Before Any Change
Even if your hosting provider promises a smooth switch, never skip backups. Use a plugin like UpdraftPlus or your host’s built-in backup tool to download your site files and database.
If something goes wrong, you can restore everything instantly without losing content or SEO progress.
3. Understand That Prices Vary
The prices I mentioned — ₹11,830 for the Cloud Startup plan, ₹8,481 for the downgrade, and ₹3,000 for the upgrade — are from my personal case.
Hosting prices change depending on discounts, region, and billing cycles. So while this method can still save you money, your numbers might look a bit different.
4. Use It as a Temporary Fix, Not a Long-Term Strategy
Downgrading is great for buying time, but it’s not something you should rely on every renewal cycle. Your website deserves stable resources, so once you’re financially comfortable, stick to the plan that meets your site’s needs long-term.
5. Compare Before You Commit
If your host refuses to allow downgrades, don’t panic. Check renewal rates from other hosting companies like Bluehost, Namecheap, or HostArmada.
Sometimes switching providers entirely can still cost less than renewing at inflated prices — just make sure to research performance and migration costs first.
Being transparent about the pros, cons, and limitations isn’t just about honesty — it’s about building trust. The goal isn’t to trick the system but to understand it better, so you can make smarter financial decisions without risking your website’s stability.
Final Thoughts — What This Experience Taught Me

Looking back, this entire experience wasn’t just about saving ₹10,000. It was about realizing that even in tough financial moments, there’s almost always a way forward — if you stay calm and keep looking for it.
When I first saw that renewal bill, I was ready to give up. My site had been my passion project for years, and suddenly it felt like it was slipping away because of one renewal price. But by choosing to explore instead of panic, I found a simple path that not only saved me money but also taught me how hosting systems really work.
I learned that most obstacles in blogging aren’t technical — they’re mental. We often assume things are fixed the way we see them on the screen. But once you start asking questions, reaching out to support, and understanding the backend, you realize how much flexibility actually exists.
That small decision to contact Hostinger’s support changed everything for me. Within a day, my plan was downgraded, and a few weeks later, I upgraded again by just paying the difference. What started as a desperate situation turned into one of the smartest financial moves I’ve ever made online.
So, if you’re reading this while feeling stuck with a high renewal bill — don’t quit. Take a breath. Look for alternatives. Reach out to your hosting provider. There’s a good chance they’ll help if you just ask.
Hosting renewals might feel like a trap sometimes, but they’re also a reminder that knowledge truly is power. The more you understand how these systems work, the more control you have over your website and your money.
In my case, that control brought relief, clarity, and confidence — proof that sometimes, the best solutions come from staying patient, curious, and a little bit stubborn about not giving up.
If this story helped you, please consider supporting my work by getting your hosting through my referral link: Hostinger – Affordable & Reliable Hosting. It’s completely optional, but every purchase helps me continue testing, writing, and sharing honest reviews that save others from costly mistakes.
FAQ: Common Questions About the Downgrade–Upgrade Trick
1. Can I use this trick with any hosting company?
Not always. Each hosting provider has its own billing rules. Some allow downgrades and upgrades freely, while others may restrict changes until your plan expires. That’s why the first step is always to contact support and ask.
In my case, Hostinger handled it smoothly — but your experience may vary depending on the company.
2. Will my website go offline during the downgrade or upgrade?
No, not if the process is handled properly. When I switched plans, Hostinger kept my site running the entire time. But to be safe, always confirm this with support before making any changes. A short downtime can happen on some providers, especially during migrations.
3. Do I lose my files or data when I downgrade?
Usually not. Hosting companies transfer everything automatically when you switch plans. Still, I always recommend keeping a full backup before doing anything. It’s the safest habit a blogger can have.
4. Is this trick allowed under hosting policies?
Yes — completely. You’re not breaking any rules. You’re simply requesting a downgrade and later upgrading again. Both actions are fully supported by legitimate billing systems. Think of it as using the flexibility you’re already paying for.
5. Can I do this multiple times to keep saving?
Technically you can, but I wouldn’t suggest turning it into a yearly routine. Downgrading is best used as a temporary solution during tight budgets. In the long run, it’s better to invest in a stable plan that matches your site’s growth.
6. What if my hosting company refuses to downgrade?
If your host doesn’t allow it, compare renewal costs elsewhere. Many providers offer free migrations when you switch to them. Sometimes, changing hosting entirely can be cheaper than renewing a plan that’s too expensive.
7. What did you personally take away from this experience?
That patience and curiosity can save you a lot more than just money. I learned that when you feel stuck, it’s rarely the end — it’s usually just a signal to ask better questions. My hosting stayed online, my site survived, and I came out more confident as both a creator and a problem-solver.