Update! GitHub Banned Roop Unleashed | install Roop-Floyd

Hey there! If you’ve been exploring the wild world of face-swapping or deepfake tech, you’ve likely stumbled across “Roop Unleashed”—a nifty tool that made swapping faces in photos and videos feel like a superpower. But if you’ve searched for it on GitHub lately, you probably hit a dead end. Why? GitHub pulled it due to concerns over misuse—like creating fake videos without consent or fueling online misinformation. With hot-button issues like elections and privacy making headlines, they played it safe and took it down. Curious about what’s next? You’re in the right place! At PiximFix.com, we’re all about demystifying tech like this. Our in-depth guides and exclusive tutorials break down everything from deepfake tools to responsible usage, making us your go-to source for navigating this tricky terrain. Readers love our step-by-step insights—because who doesn’t want to master cool tech without the headache?
Before we get into the nitty-gritty, let me introduce our guide for today: Roshan. With over 5 years in the deepfake tech space, Roshan’s no stranger to the game. He’s built innovative tools for spotting deepfakes and penned articles that have reached thousands, earning him a solid rep as a trusted voice. You’re in expert hands here!
And here’s a jaw-dropper to set the stage: Did you know deepfake fraud cases shot up tenfold from 2022 to 2023? That’s straight from Security.org, highlighting why tools like “Roop Unleashed”—and its new incarnation—matter more than ever. Speaking of which, it’s not gone for good! It’s reborn as “ROOP-FLOYD” over on Codeberg, and we’ve got the full scoop on how to get it running.
Stick with us as we unpack why it left GitHub, where to snag it now, and how to install it like a pro. Let’s dive in!
What is Roop-Floyd? And What About Roop Unleashed?

If you’re wondering about face-swapping tools like Roop Unleashed and its newer sibling Roop-Floyd, you’ve landed in the perfect spot. These are AI-powered tools that let you swap faces in photos or videos—think of putting your face on a superhero, your friend in a meme, or even creating a wild Bollywood cameo. They’re a blast to use, but there’s more to their story, especially with deepfakes popping up in the news. Let’s unpack it step-by-step, keeping it simple and packed with value.
🚀 What Was Roop Unleashed?

Roop-Unleashed was a supercharged version of an earlier tool called Roop, which was all about one-click face swaps using deepfake tech. Imagine taking a photo or video and—bam!—swapping your face onto your favorite celebrity or cartoon character. Roop was cool, but Roop-Unleashed took it to the next level. It was created by a developer known as C0untFloyd, who wanted to make face-swapping more powerful and fun for everyone.
- Multi-face detection: Swap multiple faces in one go.
- Batch video processing: Perfect for editing lots of clips at once.
- Real-time fake cam: Swap faces live on Zoom or video calls.
- AI face restoration: Fix blurry faces for sharper results.
- Web-based interface: Easy to use, no tech degree required.
C0untFloyd built Roop-Unleashed as an open-source project, meaning it was free for anyone to download, tweak, and share. It started as a fork (a spin-off) of the original Roop, but C0untFloyd added all these extra features to make it stand out. People loved it for creating AI art, messing around with friends, or even making consistent characters for videos. It lived on GitHub, where a big community of fans grew around it—until things took a dramatic turn.
⚠️ The GitHub Takedown Drama
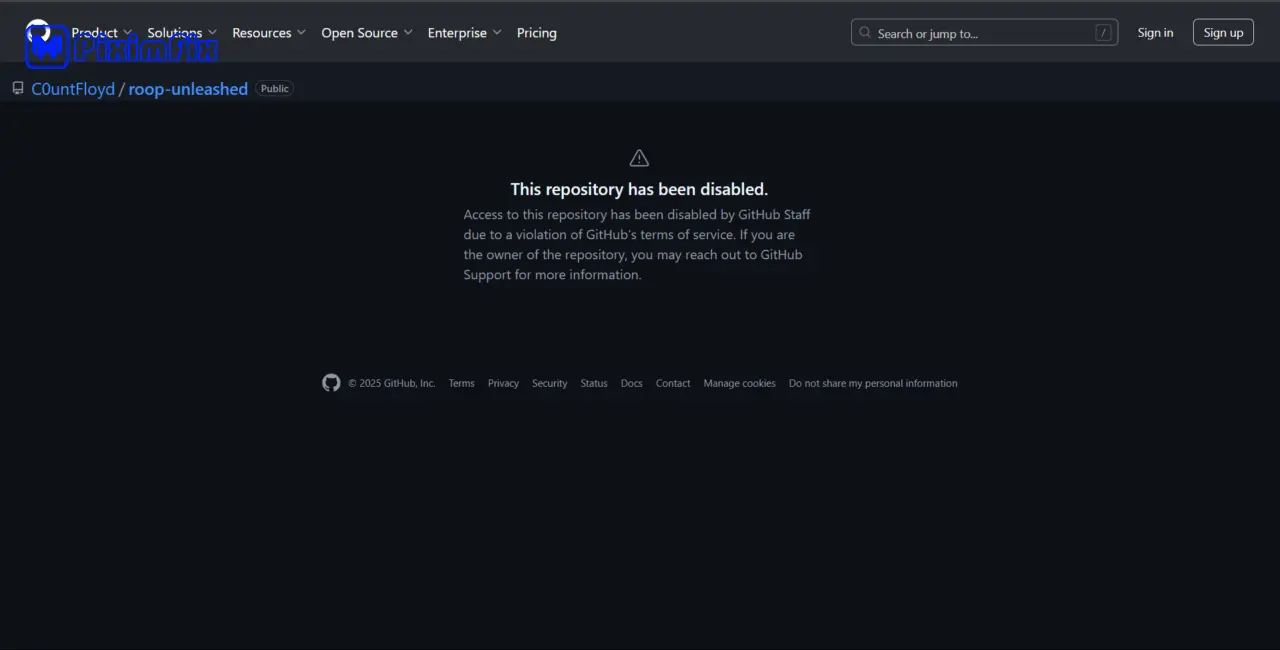
In January 2025, GitHub pulled the plug on Roop-Unleashed, removing its repositories (including C0untFloyd’s version) from the platform. Why? GitHub had updated its rules to crack down on tools that could be misused. They were worried about stuff like:
- Non-consensual intimate imagery (NCII): Using face swaps to make fake, harmful content without permission.
- Disinformation: Creating videos to trick people, especially with elections and scams on the rise (deepfake fraud shot up 10x from 2022 to 2023, according to Security.org).
Even though C0untFloyd designed Roop-Unleashed for fun and learning, its power made it a target. GitHub didn’t send a warning or explanation—just poof, it was gone. This left C0untFloyd and the community pretty shocked.
C0untFloyd’s Reaction: Frustration and a Fresh Start

So, how did C0untFloyd handle the takedown? They weren’t happy, that’s for sure. In a Reddit post, they said, “I’m honestly baffled. I haven’t received any DMCA notices, copyright infringement claims, or any other communication that would explain why my project was suddenly pulled.” They felt blindsided—after all, they saw Roop-Unleashed as a tool for education and personal creativity, not something breaking GitHub’s rules.

C0untFloyd was also frustrated because other face-swapping tools were still up on GitHub, making the takedown feel unfair. They wrote, “I’ve decided against [requesting a review]. I’m done with Roop and GitHub.” Instead of fighting to get it back, they took a bold step: they moved on and created something new. That’s where Roop-Floyd comes in.
The community had a big reaction too. Some fans were mad at GitHub, with one Reddit user joking, “It’s insane. Let’s see them apply that logic to anything else. You can build stuff with a hammer, but you can also use one to cave in someone’s skull. Therefore, in the interest of safety, we are banning hammers.” Others started looking for alternatives or making their own backups of the code.
🔁 What is Roop-Floyd?

Rather than let the takedown kill their work, C0untFloyd bounced back with Roop-Floyd, a rebranded and upgraded version of Roop-Unleashed. They moved it to Codeberg, a platform like GitHub but friendlier to projects that might face censorship. Roop-Floyd keeps all the best parts of Roop-Unleashed and adds some slick improvements:
- Easier setup: Works smoothly on Windows, Linux, or whatever you’ve got.
- Better performance: Runs on GPUs or CPUs, depending on your setup.
- Fewer bugs: Improved error handling so it doesn’t crash as much.
- Same awesome features: Fake webcam, batch processing, face restoration—you name it.
Roop-Floyd was born out of necessity after the GitHub takedown in January 2025. C0untFloyd didn’t just copy-paste the old tool—they polished it up, made it more stable, and gave it a fresh home. It’s like Roop-Unleashed got a glow-up and a new address! You can check it out at Cognibuild/ROOP-FLOYD on Codeberg.
🔗 How Are They Connected?
Roop-Unleashed and Roop-Floyd are two chapters of the same story. Roop-Unleashed was the original hit, created by C0untFloyd to make face-swapping easy and fun. When GitHub took it down, C0untFloyd didn’t give up—they rebranded it as Roop-Floyd, moved it to Codeberg, and kept the magic alive with some upgrades. It’s the same core idea, just tougher and smarter after the setback.
💡 Roshan’s Tip
“Roop-Floyd is an awesome tool for creativity—like making AI art or funny videos—but always use it responsibly. Get permission before swapping someone’s face, and don’t use it to trick or hurt anyone. It’s all about fun, not trouble!”
💻 Roop-Floyd System Requirements
| Component | Minimum Requirements | Recommended Requirements |
|---|---|---|
| Operating System | Windows 10/11 (64-bit), macOS, Linux (Ubuntu/Debian) | Windows 11 (64-bit), Latest stable macOS or Linux (Ubuntu 22.04+) |
| Processor (CPU) | Multi-core CPU (e.g., Intel i5 or AMD Ryzen 5) | High-performance CPU (e.g., Intel i7 or AMD Ryzen 7) |
| Graphics (GPU) | Optional (CPU mode supported); AMD GPUs with DirectML support may work on Windows | NVIDIA GPU with 4GB+ VRAM and CUDA support (e.g., GTX 1660 or RTX 2060) |
| RAM | 8 GB | 16 GB or more |
| Storage | At least 10 GB free disk space | SSD with 20 GB+ free space for faster performance |
| Python Version | Python 3.10.x | Latest Python 3.10 build (e.g., 3.10.11) |
| Other Software | Git, FFmpeg; (Windows: Visual Studio Build Tools 2019+ with C++ desktop development) | Same as minimum, plus virtualenv for environment management |
| Internet | Required for initial setup and model downloads | Stable connection for updates and dependencies |
| Web Browser | Chrome, Edge, Firefox (for UI access via localhost) | Latest version of Chrome or Firefox |
💡 Note: While Roop-Floyd can run in CPU-only mode, using a supported NVIDIA GPU significantly improves performance, especially for high-resolution video processing. For AMD GPU users on Windows, DirectML support is available, but performance may vary compared to NVIDIA GPUs with CUDA.
Explanation of Requirements
- Web Browser: A modern browser (e.g., Chrome, Edge, or Firefox) is required to access the tool’s web-based interface via localhost. The latest version of Chrome or Firefox is preferred for the best experience.
- Operating System: Roop-Floyd is compatible with Windows 10/11 (64-bit), macOS, and Linux (e.g., Ubuntu or Debian-based distributions). The recommended versions ensure optimal compatibility with the latest software updates and dependencies.
- Processor (CPU): A multi-core CPU, such as an Intel i5 or AMD Ryzen 5, is the minimum needed for basic operation. For faster processing—particularly with video or large image batches—a high-performance CPU like an Intel i7 or AMD Ryzen 7 is recommended.
- Graphics (GPU): The tool can run on CPU alone, making a GPU optional for minimum use. However, an NVIDIA GPU with at least 4GB VRAM and CUDA support (e.g., GTX 1660 or RTX 2060) is strongly recommended for better performance. AMD GPUs with DirectML support may function on Windows, though performance might not match NVIDIA’s CUDA-accelerated results.
- RAM: A minimum of 8 GB is required to run Roop-Floyd, but 16 GB or more is advised for smoother operation, especially when processing large files or utilizing GPU acceleration.
- Storage: At least 10 GB of free disk space is necessary to accommodate the software, downloaded models (approximately 500MB), and temporary files. An SSD with 20 GB or more free space is recommended for faster read/write speeds during processing.
- Python Version: Python 3.10.x is explicitly required, with the latest build (e.g., 3.10.11) recommended to ensure compatibility with all dependencies.
- Other Software:
- Git: Needed to clone the repository and manage updates.
- FFmpeg: Essential for video processing tasks.
- Windows-specific: Visual Studio Build Tools 2019 or later with the C++ desktop development workload is required to compile certain dependencies. Adding virtualenv is recommended for managing isolated Python environments.
- Internet: An internet connection is mandatory during the initial setup to download models and dependencies, which can take time depending on your network speed. A stable connection is recommended for ongoing updates.
🛠️ Check If Your System Is Ready for Roop-Floyd with This Handy Script

Before you jump into the exciting world of face-swapping with Roop-Floyd, you’ll want to ensure your system is up to snuff. To make this easy, I’ve created a custom BAT file that scans your computer and checks all the necessary requirements in one go. It’s a quick way to see if you’re ready or if you need to install or update anything. Let’s dive into what it does and how you can use it!
🚀 What Does the Script Do?
This BAT file acts like a system detective, inspecting key components of your setup to confirm compatibility with Roop-Floyd. Here’s what it checks:
- Operating System: Ensures you’re running Windows 10 or 11.
- RAM: Verifies you have at least 8 GB of RAM (16 GB is ideal for best performance).
- Disk Space: Confirms you’ve got at least 10 GB free on your C: drive.
- Software: Checks for Python 3.10, Git, and FFmpeg (all required), plus Visual Studio Tools (optional).
- Internet Connection: Tests if you’re online by pinging Google.
- GPU Detection: Lists any GPUs it finds on your system.
After running these checks, it gives you a ✅ PASS or ❌ FAIL verdict, complete with a nicely formatted report featuring boxes and emojis for easy reading!
🔗 Why Use This Script?
This script takes the guesswork out of preparing for Roop-Floyd. Instead of manually checking each requirement, you get a clear, visually appealing report that pinpoints any issues. It’s a time-saver and ensures you’re fully prepped before diving into the installation.
Pro Tip: If you see a ❌ FAIL, don’t worry! The script will tell you what’s missing (e.g., “FFmpeg Not Found”). Fix those items, rerun it, and you’ll be good to go.
💻 Installing Roop-Floyd with CMD: Copy-and-Paste Commands
Below is a detailed, step-by-step guide to installing Roop-Floyd, a face-swapping tool hosted on Codeberg. This guide includes all necessary Command Prompt (CMD) commands for Windows, with prompts you can copy and paste, along with explanations, troubleshooting tips, and notes for macOS and Linux users. Whether you’re a beginner or an experienced user, this should help you get Roop-Floyd up and running smoothly!
📋 Step-by-Step Installation Guide
Step 1: Check if Python is Installed
- Prompt (Windows CMD):
python --version
- What It Does: Checks if Python 3.10.x is installed. You should see output like Python 3.10.11
- .If It Fails: If you get an error like “‘python’ is not recognized,” download Python from python.org. During installation, check the box labeled “Add Python to PATH”.
- For macOS/Linux: Use this instead:
python3 --version
Explanation: Roop-Floyd requires Python 3.10.x for compatibility. This step ensures it’s ready.
Step 2: Check if Git is Installed
- Prompt (Windows CMD):
git --version
- What It Does: Verifies Git is installed. Expect output like git version 2.49.0.windows.1.
- For macOS/Linux: Same command works:
git --version
Explanation: Git is needed to download the Roop-Floyd files from Codeberg.
Step 3: Download Roop-Floyd Files
- Prompt (Windows CMD):
git clone https://codeberg.org/Cognibuild/ROOP-FLOYD.git
- What It Does: Clones the Roop-Floyd repository into a folder named ROOP-FLOYD in your current directory.
- If It Fails: If you see “destination path ‘ROOP-FLOYD’ already exists,” the folder is already there. Either delete it (rmdir /S ROOP-FLOYD) and retry, or skip to the next step.
- For macOS/Linux: Same command:
git clone https://codeberg.org/Cognibuild/ROOP-FLOYD.git
Explanation: This pulls all the project files from Codeberg to your computer.
Step 4: Navigate to the Roop-Floyd Folder
- Prompt (Windows CMD):
cd ROOP-FLOYD
- What It Does: Changes your working directory to the ROOP-FLOYD folder.
- If It Fails: If you get “The system cannot find the path specified,” ensure the clone worked. List files with dir to confirm.
- For macOS/Linux: Same command:
cd ROOP-FLOYD
Explanation: You need to be in this folder to run the remaining commands.
Step 5: Set Up a Virtual Environment
- Prompt (Windows CMD):
python -m venv venv
- What It Does: Creates a virtual environment in a folder called venv to isolate Roop-Floyd’s dependencies.
- If It Fails: If Python isn’t in PATH, reinstall it with the PATH option checked.
- For macOS/Linux: Use:
python3 -m venv venv
Explanation: A virtual environment keeps this project’s files separate from your system’s Python setup.
Step 6: Activate the Virtual Environment
- Prompt (Windows CMD):
venv\Scripts\activate
- What It Does: Activates the virtual environment. You’ll see (venv) before your prompt.
- If It Fails: If it says “‘venv’ is not recognized,” ensure Step 5 completed successfully.
- For macOS/Linux: Use:
source venv/bin/activate
Explanation: This ensures all subsequent commands use the isolated environment.
Step 7: Install Required Packages
- Prompt (Windows CMD):
pip install -r requirements.txt- What It Does: Installs all Python packages listed in requirements.txt (e.g., torch, gradio). This may take a few minutes.
- If It Fails: If you get “ModuleNotFoundError” for a specific package (e.g., torch), install it manually:
pip install torch - Check pytorch.org for GPU-specific versions if needed.
- What It Does: Installs all Python packages listed in requirements.txt (e.g., torch, gradio). This may take a few minutes.
- For macOS/Linux: Same command:
pip install -r requirements.txt
Explanation: These are the libraries Roop-Floyd needs to function.
Step 8: Upgrade Key Packages
- Prompts (Windows CMD):
pip install –upgrade gradio –force
pip install –upgrade fastapi pydantic
pip install “numpy<2.0”
- What It Does: Updates gradio, fastapi, pydantic, and ensures numpy is below version 2.0 for compatibility.
- If It Fails: If antivirus flags gradio, see troubleshooting below.
- For macOS/Linux: Same commands:
pip install –upgrade gradio –force
pip install –upgrade fastapi pydantic
pip install “numpy<2.0”
Explanation: These updates improve stability and performance.
Step 9: Start Roop-Floyd
- Prompt (Windows CMD):
python run.py
- What It Does: Launches Roop-Floyd, opening a web interface at http://127.0.0.1:7860 in your browser.
- If It Fails: If you see “can’t open file ‘app.py’,” use run.py instead. Check with dir to confirm the file exists.
- For macOS/Linux: Use:
python3 run.py
Explanation: This starts the app, and the first run may download ~2GB of models—be patient!
🛠️ Troubleshooting Common Issues
Problem 1: Antivirus Blocks the App
- Symptoms: Windows Defender flags frpc_windows_amd64_v0.3 as a virus, stopping the app.
- Fix:
- Go to Settings > Privacy & Security > Windows Security > Virus & threat protection > Manage settings.
- Turn off Real-time protection temporarily.
- Run python run.py again.
- Re-enable protection after launch.
- Explanation: Some tools in Roop-Floyd trigger false positives.
Problem 2: FFmpeg Not Found
- Symptoms: Error like “ffmpeg not found” when running run.py.
Fix:
- Windows: Download FFmpeg from ffmpeg.org, extract it, and add the bin folder to your PATH (e.g., set PATH=%PATH%;C:\ffmpeg\bin).
- Linux: Install with:
sudo apt install ffmpeg - macOS: Use Homebrew:
brew install ffmpeg
Explanation: FFmpeg is essential for video processing.
Problem 3: GPU Isn’t Working
- Symptoms: App uses CPU instead of NVIDIA GPU, or errors like CUBLAS_STATUS_EXECUTION_FAILED.
Fix:
- Open settings.py in the ROOP-FLOYD folder with Notepad.
- Find self.provider = self.default_get(data, ‘provider’, ‘cuda’) and change ‘cuda’ to ‘cpu’.
- Set self.force_cpu = True in the same file.
- Alternatively, install the NVIDIA CUDA Toolkit 11.8.
Explanation: GPU setup requires CUDA; fallback to CPU if unsupported.
Problem 4: Missing Modules
- Symptoms: Errors like “ModuleNotFoundError: No module named ‘yaml’”.
Fix:
- Install the missing module, e.g.:
pip install pyyaml
Explanation: Sometimes requirements.txt misses a dependency.
🌟 Platform-Specific Notes
For macOS Users
- Use python3 instead of python (e.g., python3 run.py).
- Install Python 3.10
- Activate the virtual environment with:
source venv/bin/activate
For Linux Users
- Use python3 commands (e.g., python3 run.py).
- Install FFmpeg with:
sudo apt install ffmpeg - Activate the virtual environment with:
source venv/bin/activate
🎉 Verification
- Open your browser and go to http://127.0.0.1:7860.
- Upload a test image or short video and try a face swap.
- Check the CMD window for errors if it doesn’t work.
You’re now set to enjoy Roop-Floyd! Follow these steps, use the provided prompts, and refer to the troubleshooting tips if needed. If you hit a snag, the community at Codeberg or r/StableDiffusion can offer extra support. Have fun face-swapping!
What Happens After You Hit “Start” in Roop-Floyd

So, you’ve selected your source image (the face you want to swap in) and your target image or video in Roop-Floyd, and you’re ready to hit that “Start” button. What happens next inside this face-swapping tool? Let’s dive into the process that unfolds behind the scenes, step by step, as Roop-Floyd transforms your inputs into a swapped-face masterpiece—all while keeping things simple and automated for you.
Kicking Things Off: Initialization

When you click “Start,” Roop-Floyd launches into action. It begins by firing up its interface, typically through a Python script like run.py. This sets up a local server (usually at http://127.0.0.1:7860) using Gradio, a user-friendly platform that lets you interact with the tool via your browser. Your source and target files are now locked in, either through the interface or command-line options like -s SOURCE_PATH and -t TARGET_PATH.
Checking the Hardware: GPU or CPU?

Next, Roop-Floyd figures out how to handle the heavy lifting. It checks if your computer has a GPU (like an NVIDIA one with CUDA support) to speed things up. If it finds one, it uses it—think of it like putting your car in turbo mode. No GPU? No problem—it falls back to your CPU, though this might mean a slower ride, especially for videos. This decision is crucial because swapping faces is computationally intense, and a GPU can make a big difference.
Loading the Tools: Models Come Online

Now, Roop-Floyd loads its secret weapons: pre-trained deep learning models. These are like the blueprints it follows to swap faces. If it’s your first time running the tool, it’ll download them—expect files like:
- inswapper_128_fp16.onnx: The main face-swapping model, about 500MB, designed to replace faces seamlessly.
- GFPGANv1.4.onnx: An optional enhancement model to polish the results, part of a roughly 2GB download package.
- Face detection and landmark models from the insightface library, such as det_10g.onnx (for finding faces) and 1k3d68.onnx (for aligning them).
These models are powered by deep learning, trained on massive datasets to recognize and manipulate faces with eerie precision.
Prepping the Stage: Handling Your Inputs

If you’re swapping faces in a video, Roop-Floyd uses FFmpeg (a multimedia tool) to break it down into individual frames—imagine splitting a flipbook into single pages. For a 3,808-frame video, that’s 3,808 tiny images to work on! For a single image, it just loads that one file. Either way, it organizes everything into temporary files, ready for the magic to begin.
Spotting the Faces: Detection Time

Using insightface’s detection models (like det_10g.onnx), Roop-Floyd scans your source image and target media to find faces. It’s like a digital detective, pinpointing where each face is with bounding boxes and confidence scores. For videos, it does this frame by frame. Got multiple faces in the target? There’s an option (–many-faces) to handle them all, though it’ll ask you to pick which one to swap onto if needed.
Aligning the Pieces: Landmark Detection

Once the faces are found, Roop-Floyd maps out their key features—eyes, nose, mouth—using a landmark model like 1k3d68.onnx. This step aligns the source face with the target face, ensuring the swap isn’t just slapped on crookedly. It’s a bit like lining up a stencil perfectly before painting, making sure the swapped face fits naturally.
The Big Swap: Face Replacement
Here’s where the star of the show, inswapper_128_fp16.onnx, takes over. This model:
- Crops both faces to a 128×128 pixel grid (a size chosen partly for ethical limits, keeping resolution modest).
- Runs them through a neural network (likely a GAN or autoencoder) to generate the swapped face.
- Blends the result back into the target image or frame, tweaking lighting and colors for a smooth, realistic look.
For videos, this happens frame by frame, which can take time—about 1.37 seconds per frame on a CPU, so a 3,808-frame video could take hours without a GPU!
Polishing Up: Optional Enhancement

Want your swapped face to look even sharper? If you’ve enabled enhancement, Roop-Floyd applies GFPGANv1.4.onnx (or sometimes CodeFormer) to upscale and refine the result. This step smooths out any rough edges, making the face look crisp and lifelike—perfect for those high-quality outputs.
Wrapping It Up: Output Creation

For a single image, Roop-Floyd saves the final swapped version to your chosen output path. For videos, it stitches all those processed frames back together using FFmpeg, creating a new video file with settings like H.264 encoding and your original frame rate (if you’ve opted to keep it with –keep-fps). The result? A shiny new video with the swapped face in place.
How Long Does It Take?
Processing time depends on your hardware. On a CPU, expect a slog—over an hour for a long video. With an NVIDIA GPU and CUDA, it’s much faster, though still frame-by-frame. Memory-wise, it uses about 1.8GB to 2.2GB, so make sure your system can handle it!
A Word of Caution
Roop-Floyd makes face swapping a breeze, but it’s not without controversy. Deepfake tools like this can be misused to create misleading or harmful content, which is why its predecessor, Roop-Unleashed, got pulled from GitHub in January 2025. Use it responsibly—always get consent if you’re swapping someone else’s face!
What’s Next?

After hitting “Start,” Roop-Floyd takes you on this automated journey from file selection to finished product, all powered by clever deep learning. Whether it’s a fun photo edit or a video project, you’re now in on the tech that makes it happen—just don’t be surprised if your CPU begs for a break on those long videos!
🎉 Final Thoughts: Mastering Roop-Floyd
And there you have it! This blog post has guided you through the entire process of installing and using Roop-Floyd, a powerful face-swapping tool driven by deep learning. We’ve covered everything from checking your system requirements to executing the tool with clear, step-by-step commands, while also addressing common hurdles like antivirus blocks and GPU compatibility issues. Beyond the how-to, you’ve gained valuable insights into the technical magic behind Roop-Floyd—how it leverages advanced AI to deliver stunning results. This guide is designed to empower you, whether you’re a curious beginner or a tech enthusiast, by offering practical solutions and a deeper understanding of the tool’s capabilities. It’s not just about getting it to work; it’s about appreciating the innovation that makes it possible.
If this article helped you conquer installation woes or sparked your interest in AI tools, please share it with your community on Twitter or Reddit! Spreading the word helps others tackle the same challenges and keeps the conversation alive among fellow tech explorers.
This post was brought to you by Roshan, who brings years of expertise in AI and deep learning to the table. With a knack for breaking down complex topics into accessible, actionable advice, Roshan has poured their knowledge into making this guide both informative and engaging. A heartfelt thank you for spending your time with us—your curiosity and engagement fuel what we do!
Looking ahead, we’ve got more exciting content on the way. Stay tuned for our next post, where we’ll dive into another cutting-edge AI tool that’s shaking up the creative world. Until then, take care and see you soon! 😊


