I still remember the first time I tried to add a new network in MetaMask — copied some random “RPC” details from a Telegram group, pasted them in, hit save… and nothing happened. Worse, I had no idea if I’d just connected to the wrong chain or opened up my wallet to something sketchy. I actually thought I’d lost my ETH for a second. That moment made me rethink everything.
If you’re here because the manual method just confused the hell out of you — yeah, I get it. That’s exactly why Chainlist MetaMask has become my go-to move, and why I recommend it to everyone I help. It skips the risky stuff. No pasting RPCs. No worrying if you’re on the real Arbitrum or a fake one. Just click “Connect,” approve the network, and move on with your life.
In this guide, I’ll walk you through exactly how to add networks to MetaMask using Chainlist — safely, whether you’re on browser or mobile. We’ll go over real examples like Arbitrum and zkSync, explain how Chainlist actually works, and throw in some sharp tips to avoid fake RPCs or hidden issues.
You’ll also get clear screenshots wherever they help, and I’ll share a few lessons I’ve picked up running a crypto tools blog — where fixing MetaMask setups comes up more often than you’d think.
Save 75% On Hostinger Renewal Discount Trick | No Coupon
🛠️ What Is Chainlist and Why It Solves a Real Problem
Imagine trying to connect your MetaMask wallet to a new network like Arbitrum, Base, or zkSync — but you have no clue if the RPC URL you found is legit. So you Google around, skim Reddit, copy something from a random blog… and just hope it works. That’s the problem Chainlist was built to fix.
Chainlist is a free community-driven site that lets you instantly add verified EVM-compatible networks to your MetaMask wallet — without ever touching long RPC strings or guessing chain IDs. You just find the network you want, click “Connect Wallet,” and approve the request. That’s it.
Instead of searching for “correct Avalanche RPC for MetaMask,” you just… don’t. Chainlist has it all lined up — and it’s backed by the same folks behind DefiLlama, which adds a layer of trust you won’t get from random Discord messages.
It’s not an app. It’s not an extension. It’s just a clean, public website that talks directly to your MetaMask — helping you avoid fake RPCs, connect to the right chain, and stop worrying about whether your wallet is on the real network or some typo-ridden clone.
And honestly? Once you use it, you’ll wonder why MetaMask doesn’t have something like this built in already.
🔥 Wait, How Does MetaMask Actually Work With Chainlist?
Let’s clear something up right away — Chainlist doesn’t replace MetaMask, and it’s not some plugin or download. It’s just a super handy shortcut.
When you open Chainlist in your browser and hit “Connect Wallet,” it sends a request straight to your MetaMask extension (or app). MetaMask then pops up, asking if you want to add a specific network — like Polygon, Base, or Scroll — using all the correct details: RPC URL, Chain ID, currency symbol, and even a block explorer.
So instead of finding and typing those details yourself (and risking a typo or scam), Chainlist does the heavy lifting. All MetaMask does is ask, “Do you trust this connection?” — and once you approve, the new network is live in your wallet.
You’re not signing up for anything new. You’re just letting MetaMask do what it already does — securely manage custom networks like it was built to.
That’s it. You’re not signing up for anything new. You’re just letting MetaMask do what it already does — but faster, safer, and without the copy-paste headache.
And yes, this works on both browser extensions and the MetaMask mobile app. The moment your wallet connects, Chainlist speaks directly to it, no matter what device you’re on.
✅ How to Use Chainlist MetaMask (Step-by-Step)
Using Chainlist with MetaMask is actually very easy — but only if you follow the correct order. Here’s the full process I personally followed, from scratch.
✅ Step 1: Install the MetaMask Chrome Extension
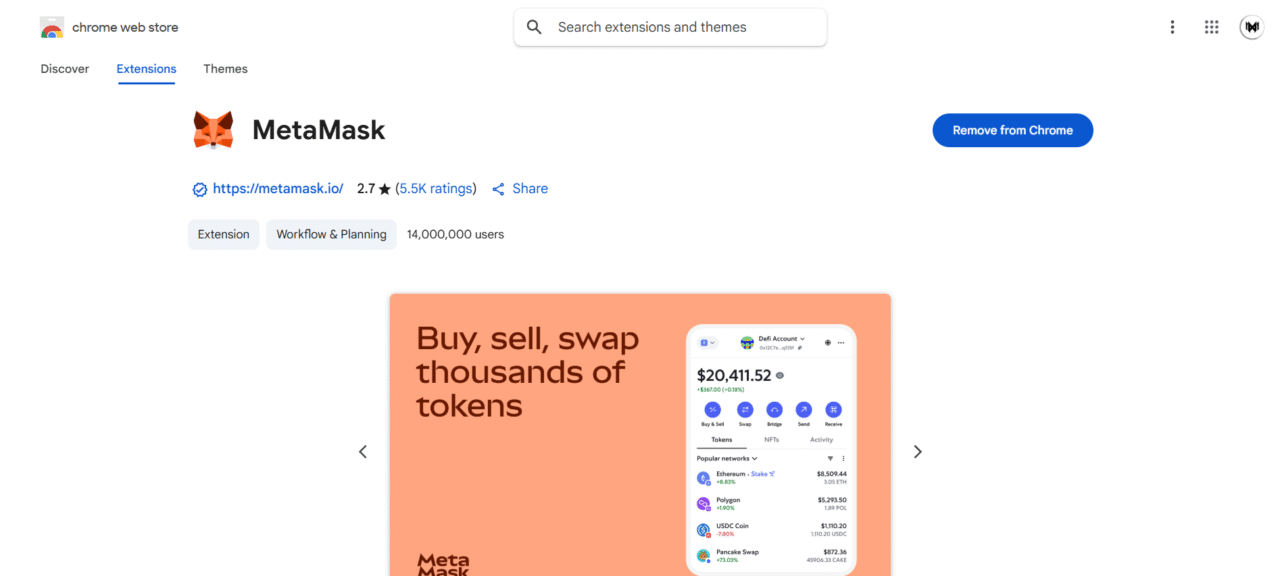
Before doing anything on Chainlist, you need to have MetaMask installed in your browser.
👉 Go to the official MetaMask Chrome Web Store page
Click “Add to Chrome” and confirm the installation.
✅ Step 2: Create a MetaMask Wallet or Import an Existing One
Once the extension is installed, click the MetaMask fox icon in your browser toolbar to open it.
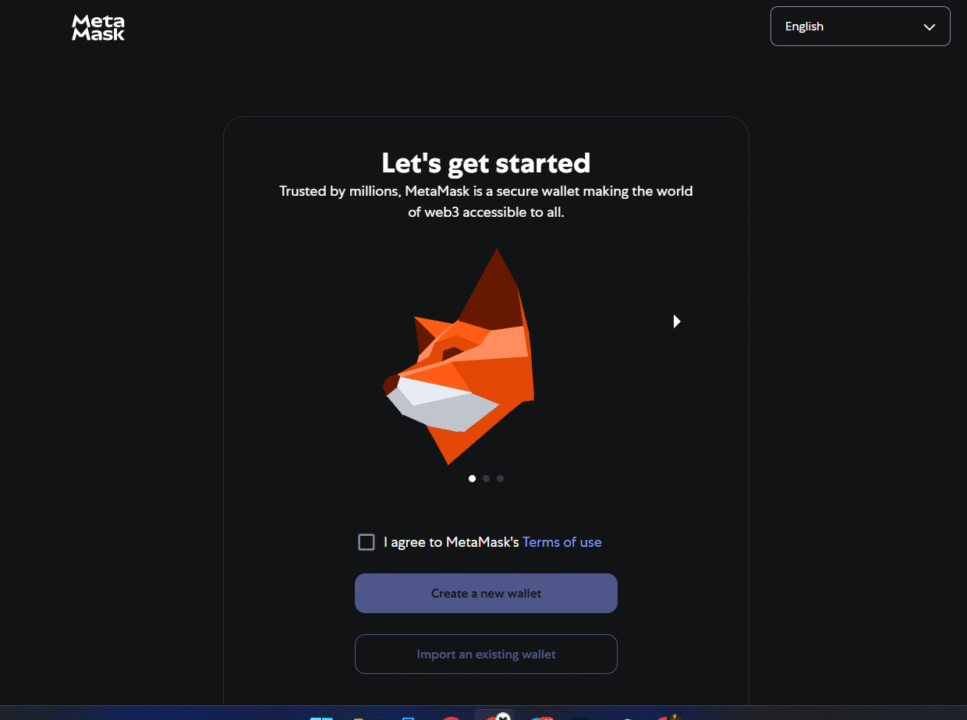
You’ll be given two options:
- Create a new wallet – Choose this if you’re setting up for the first time.
- Import using secret recovery phrase – Choose this if you already have a MetaMask wallet.
📝 Important: If creating a new wallet, you’ll be shown a Secret Recovery Phrase. Write it down somewhere safe — never share it with anyone.
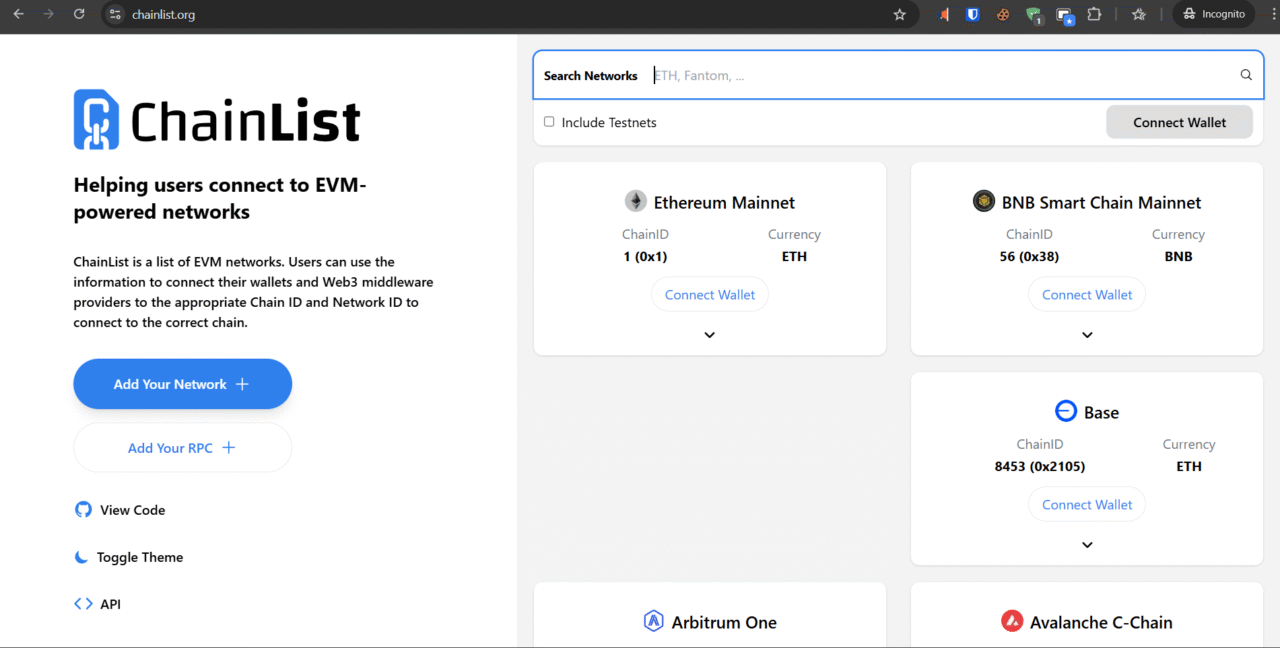
✅ Step 3: Visit the Official Chainlist Website
Now that MetaMask is ready, head over to the official Chainlist site:
Make sure you type it exactly or click the link — there are fake sites out there that mimic the real Chainlist to steal wallet access.
If you’re on mobile, open this link inside MetaMask’s built-in browser (tap the browser icon 🧭 first).
If you’re on desktop, just open it in Chrome or Brave.
✅ Step 4: Connect Your MetaMask Wallet
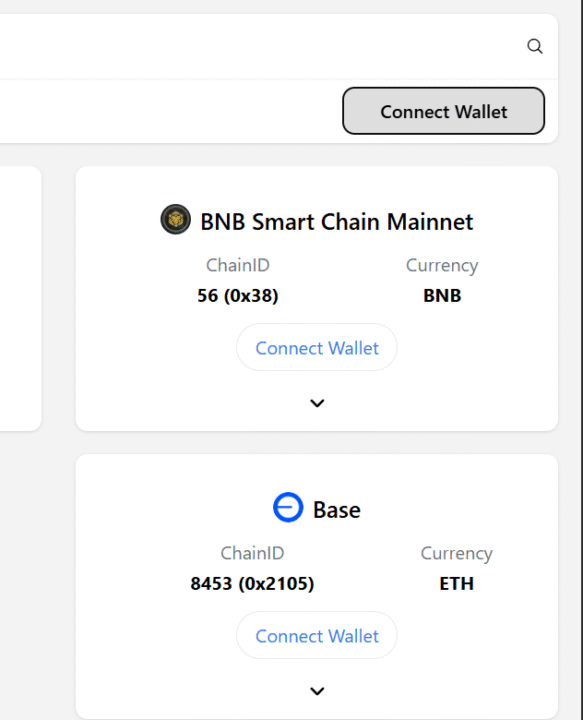
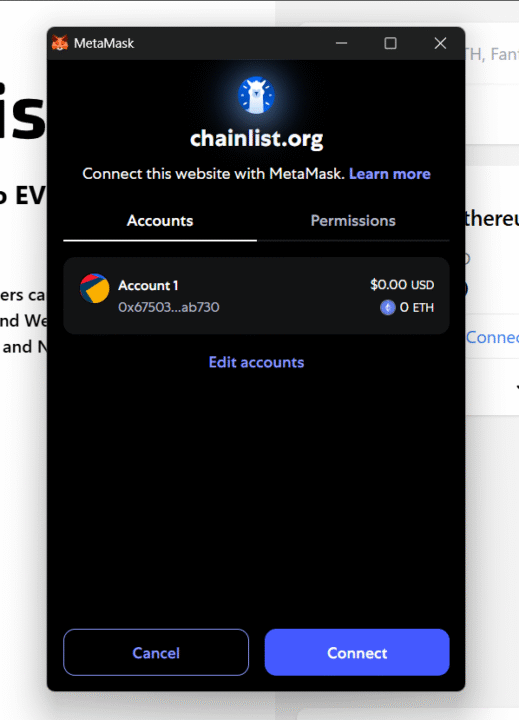
Once you’re on the Chainlist homepage, tap or click “Connect Wallet” in the top-right corner.
Your MetaMask extension or in-app wallet will pop up asking for permission to connect.
👉 Approve the connection.
You’re not sending any tokens — just allowing Chainlist to view your public wallet address and suggest networks.
This is 100% safe as long as you’re on the official site.
✅ Step 5: Search for the Network You Want to Add
Once your wallet is connected, use the search bar at the top of Chainlist.
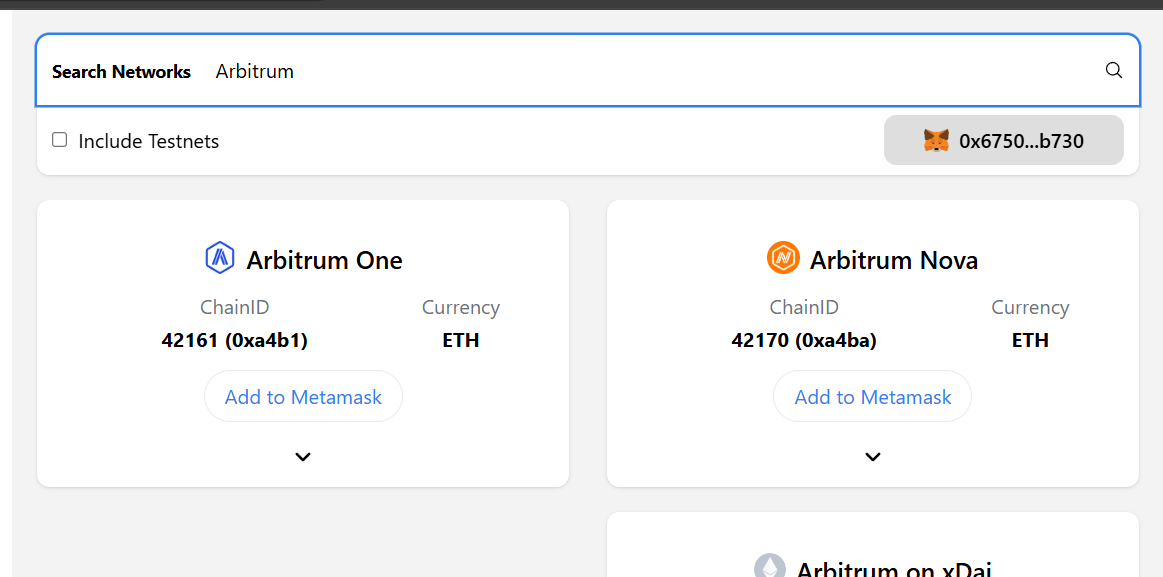
👉 Type the name of the blockchain network you want to add — for example:
ArbitrumzkSyncBaseScroll
Wait a second — verified results will appear below with details like chain name and Chain ID.
✅ Step 6: Approve the Network in MetaMask
Once you click “Add to MetaMask,” a MetaMask popup will appear showing all the network details — including:
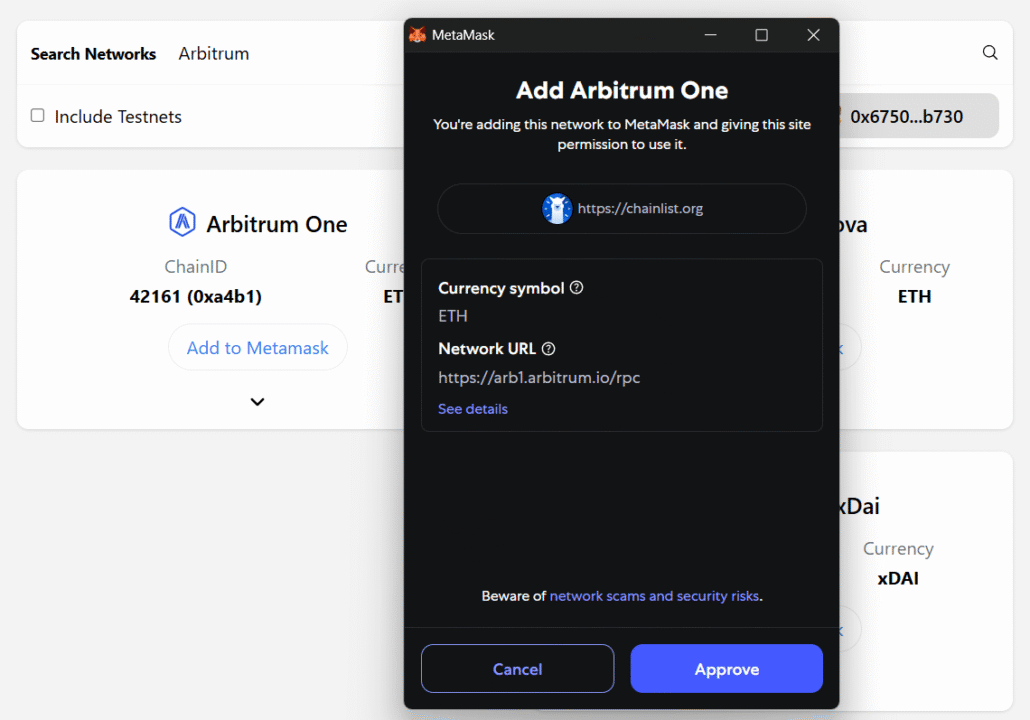
- Chain name (e.g., Arbitrum One)
- Currency symbol (e.g., ETH)
- Network URL (RPC)
- Chain ID
Take a moment to review this information. These values are auto-filled directly from Chainlist, which minimizes the risk of typos or scams.
🛡️ Safety Tip: Always double-check the domain (like https://arb1.arbitrum.io/rpc) and only approve if it looks legitimate.
Once you’re confident everything looks good, click “Approve.”
✅ Step 7: Approve and Wait for Confirmation
After you click “Approve”, MetaMask should automatically add the network — but in many cases (especially on desktop), it won’t show the “Switch to Network” prompt immediately after.
Instead, the popup simply disappears.
🎯 What to do next:
- Don’t worry — the network is still added successfully.
- You just need to manually switch to it by opening MetaMask and selecting it from the top dropdown.
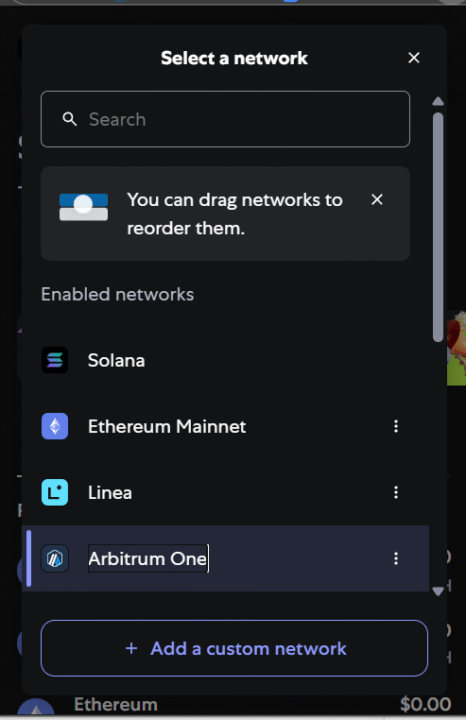
🔍 How to switch manually:
- Open MetaMask
- Click the network selector at the top (it might still say “Ethereum Mainnet”)
- Choose the newly added network (e.g., Arbitrum, Base, etc.)
💡 This extra step ensures your wallet is connected to the correct chain before using any dApp.
✅ Step 8: Confirm You’re Connected to the New Network
Once you manually open the MetaMask extension again, you’ll see the main wallet screen.
🧠 If the newly added network was successfully set as active (like Arbitrum One in your screenshot), you’ll notice it right at the top — beside your account name.
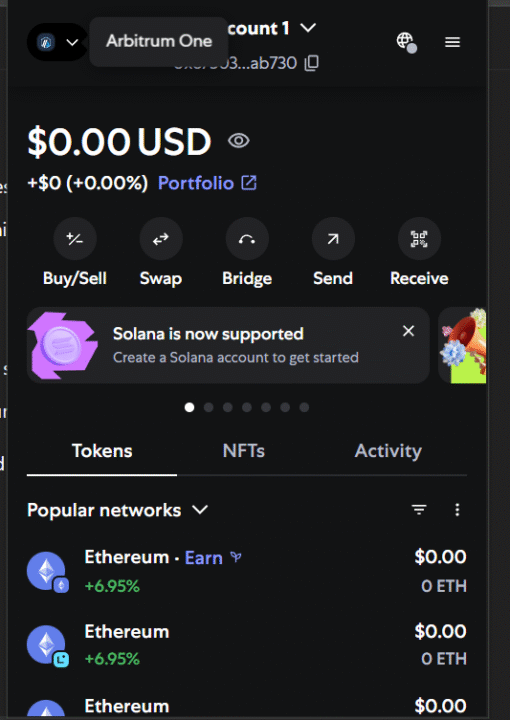
✔️ Look for This:
- ✅ Network Name at the top (e.g., Arbitrum One)
- ✅ Correct tokens and balances shown for that chain
- ✅ Popular tokens may show $0.00, which is fine unless you’ve transferred funds
If it’s still showing Ethereum or something else, just click the dropdown at the top and switch it manually.
✅ Step 9: You’re Now Ready to Use the New Network!
Once your MetaMask shows the correct network (like Arbitrum One), you’re all set to:
- 🚀 Explore dApps on that network (e.g., Uniswap, GMX, etc.)
- 💸 Bridge funds from Ethereum or other chains if needed
- 🎨 Buy or view NFTs specific to that network
- 🧪 Test or develop if you’ve connected to a testnet
🛑 Important:
Adding the network doesn’t transfer your assets automatically. You’ll need to use a bridge if you want to move tokens to the new chain.
🎯 That’s it! You’ve successfully added a network to MetaMask using Chainlist — the easy, secure way with no manual typing.
Would you like me to help design a table, CTA box, or image prompt to wrap this up nicely for the blog?
VIDEO TUTORIAL ON HOW TO USE CHAINLIST TO ADD NETWORKS TO METAMASK
📱 How to Use Chainlist MetaMask on Mobile (Step-by-Step)
If you’re setting up MetaMask and using Chainlist from your smartphone, the process is slightly different — but just as easy. Below is a step-by-step guide (with real screenshots) to walk you through the entire process smoothly.
📱 Step 1: Install MetaMask App on Your Mobile
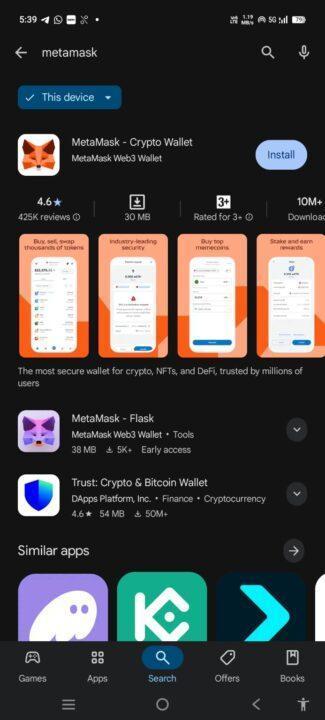
- Go to the Play Store or App Store on your mobile device.
- Search for “MetaMask – Crypto Wallet” and install the official app (check the logo and developer: MetaMask Web3 Wallet).
- The app is around 30MB and has millions of downloads — make sure it’s the real one!
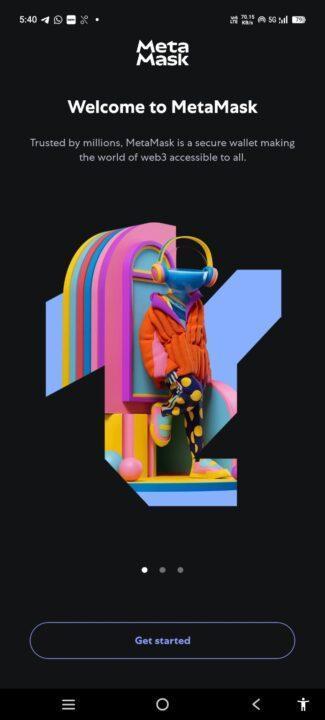
📱 Step 2: Create or Import Your MetaMask Wallet
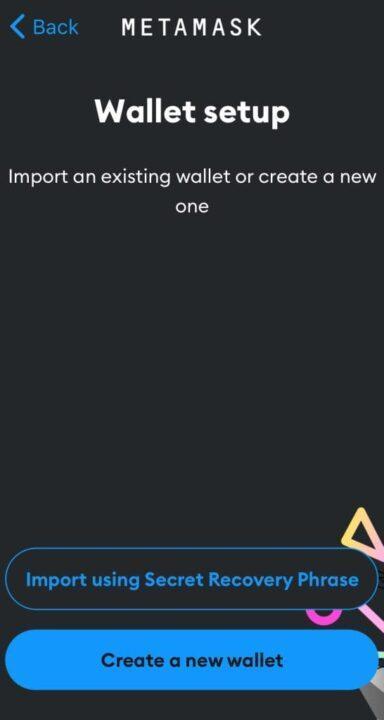
- On this screen, you’ll see two options:
- Import using Secret Recovery Phrase – if you already have a MetaMask wallet.
- Create a new wallet – if you’re starting fresh.
✅ If you’re new, tap “Create a new wallet.”
You’ll be guided through setting up a password and then shown a Secret Recovery Phrase — this is the most important part. Store it securely and privately (write it down, never share it).
📱 Step 3: Access Chainlist from MetaMask Mobile Browser
Once your wallet is created or imported, follow these steps to open Chainlist directly from within the MetaMask app:
- Tap the browser icon (🧭) — usually found at the bottom or in the menu of the MetaMask app.
- In the MetaMask browser, type:
chainlist.org - This ensures you stay within MetaMask’s secure in-app browser environment, which is necessary for smooth wallet connection.
🛡 Tip: Avoid opening Chainlist in Chrome or external browsers — the wallet won’t connect properly outside MetaMask’s built-in browser.
🔍 Step 4: Search and Add the Desired Network
Now that you’re on the Chainlist site inside MetaMask’s browser:
- Use the search bar at the top to type the name of the network you want to add
(e.g., Arbitrum, Base, zkSync, Polygon) - Once the network appears in the list, tap the “Add to MetaMask” button next to it
- MetaMask will open a prompt showing the network details:
Chain ID, RPC URL, and Currency Symbol
🛡 Reminder: Always verify that the details match the official documentation if you’re unsure. Chainlist is trusted, but caution is always good in Web3.
✅ Step 5: Approve and Switch Network
- After tapping “Add to MetaMask”, a popup will appear inside the app showing full network details (like Chain ID, currency symbol, RPC URL).
- Tap “Approve” to confirm adding the network.
- MetaMask may also show a “Switch to this network?” prompt. If it does, tap “Switch” to activate the new chain immediately.
📌 Note: Sometimes, if the switch prompt doesn’t appear, it means MetaMask already activated the new network automatically. You can confirm by checking the top bar — the selected network name (e.g., Arbitrum One) should now be visible.
✅ Step 6: You’re Now Ready to Use the Network
Once the network is added and switched:
- You can view tokens on that chain (e.g., USDT, ETH, MATIC, etc.) — but remember, they won’t appear unless you’ve sent them there.
- You can interact with dApps (like Uniswap, Stargate, GMX, etc.) that support this chain. MetaMask will auto-detect them.
- You’re now fully set to bridge tokens, buy/sell NFTs, or explore DeFi protocols on the selected network.
📌 Pro Tip: If you don’t see your tokens after switching, add them manually using the token’s contract address or use a block explorer like Arbiscan (for Arbitrum) to verify activity.
MetaMask Android – Add Multiple Networks with Chainlist.org
⚠️ Common Chainlist MetaMask Problems (And How to Fix Them)
Adding a network should be smooth, but sometimes MetaMask or the network itself throws a wrench in the process. Let’s walk through the most frequent issues people face — and how to solve them without stress.
| Problem | What It Means | How to Fix It |
|---|---|---|
| 🧩 RPC Error / Chain ID Mismatch | MetaMask couldn’t verify network details. RPC may be offline or unsynced. | – Refresh Chainlist- Uncheck “Include Testnets”- Wait and retry later |
| 🔁 Wrong Network Error | You’re on the wrong chain for the dApp. | – Open MetaMask- Use the network dropdown- Select the correct chain manually |
| 🕵️♂️ Missing or Obscure Chain | The chain isn’t listed in Chainlist (yet). | – Double-check spelling- Try Chain ID search- Check official project docs |
| 🔒 Wallet Doesn’t Respond | Wallet is locked or browser blocked the connection. | – Unlock MetaMask- Reload Chainlist- Use Chrome/Brave- Disable privacy extensions |
🚀 “Okay… I Added the Network. Now What?”
Adding a network in MetaMask simply means your wallet is now aware of that blockchain — but nothing actually moves or activates on its own. Here’s what you can do next to put that network to use:
- 🧳 Transfer Tokens to the New Chain
Adding a network like Polygon won’t bring your ETH or USDC there automatically. You need to use a bridge to move your assets.
Example: To send USDT from Ethereum to Arbitrum, use a trusted bridge like Hop Protocol or Orbiter Finance. Once transferred, the tokens will appear in your wallet on the Arbitrum network. - 🛠 Interact with dApps That Support the Network
After adding the network, dApps like Uniswap, GMX, or LayerZero tools can automatically detect the chain you’re on — if your wallet is connected properly.
If a dApp says “Wrong Network,” just switch to the correct one using MetaMask’s network selector. - 🎨 Trade or Collect NFTs on New Marketplaces
Chains like zkSync, Base, or Optimism are gaining traction in the NFT space. If you’re using OpenSea or a smaller NFT site and don’t see your assets, double-check that you’re on the right network.
Chainlist ensures your setup is correct, but the wallet switch is still up to you. - 👨💻 For Developers: Load Testnets and Experiment
Developers can quickly connect to testnets like Goerli, Sepolia, or Base Sepolia using Chainlist. These are ideal for:- Running smart contract tests
- Deploying frontend UIs
- Simulating transactions with test ETH (which many testnets auto-fund)
✅ In summary: Adding a network is just the beginning — bridges, dApps, NFTs, and dev tools come alive once you start using it.
🔍 What Exactly Is Chainlist (And Can You Trust It?)
🤖 Chainlist Is a Verified RPC Directory
- Source of Truth:
It pulls verified blockchain network data directly from the public EVM Chain ID Spec GitHub repo. - What It Includes:
Each entry includes accurate RPC URLs, Chain IDs, native currencies, and block explorer links — all submitted by trusted developers or project teams. - Why It’s Useful:
Instead of hunting this info online (and risking a scam), Chainlist delivers verified data in one click.
🛡 Is It Safe to Use?
- No Wallet Access Needed:
You never enter your private key or seed phrase on Chainlist. It simply connects with your MetaMask extension to request permission. - Controlled by You:
MetaMask always shows the full network details and asks for your approval. Nothing changes in your wallet unless you explicitly say yes. - Beware of Fake Sites:
Only use chainlist.org. Scam sites may mimic Chainlist’s design but steal wallet access — always double-check the domain before connecting.
📜 Why It Matters
- Saves Time:
No more googling “Polygon RPC” or digging through forum posts to find a Chain ID. - Avoids Mistakes:
Prevents manual errors that can result in connection failures or interacting with the wrong network. - Frictionless Web3 Onboarding:
Whether you’re new to DeFi, NFTs, or dApp development — Chainlist removes the technical barrier.
👤 Who’s Behind MetaMask — And Why People Trust It
If you’ve ever wondered where MetaMask came from or who actually runs it, here’s the real story — no hype, just facts.
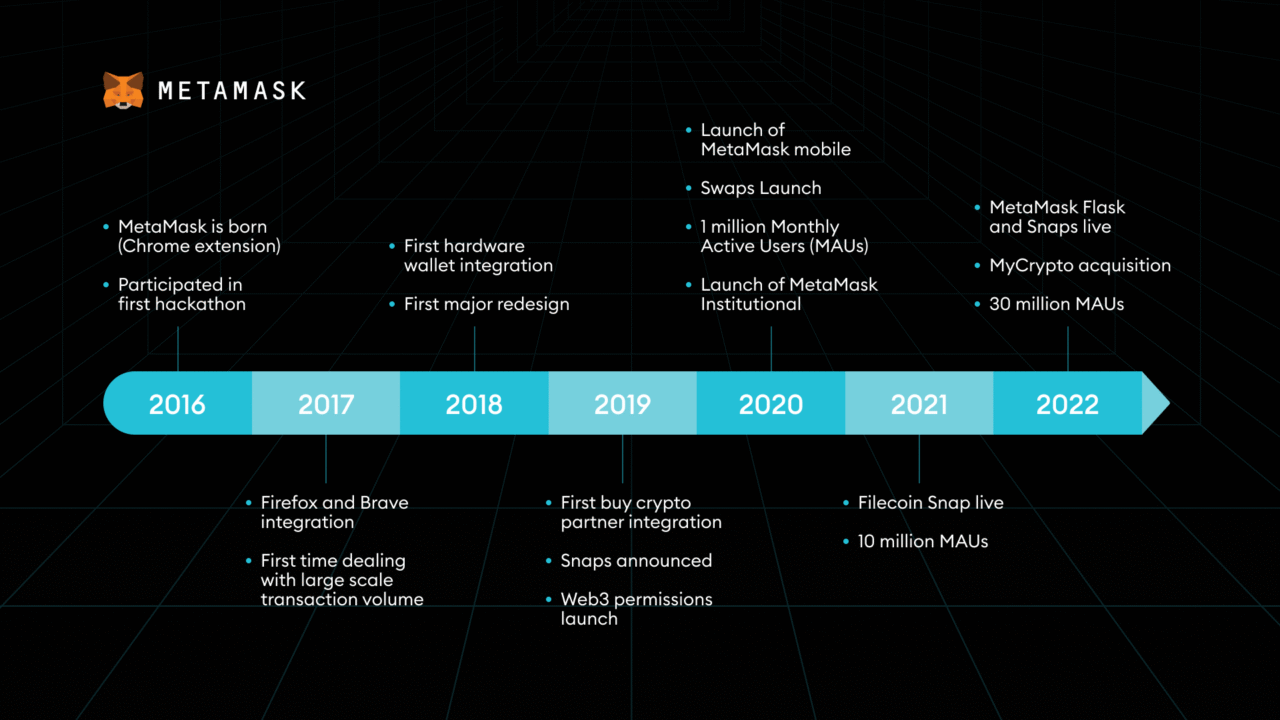
MetaMask was created in 2016 by developers Dan Finlay and Aaron Davis as a side project under a company called Consensys — one of the earliest and most trusted names in Ethereum development. Back then, there wasn’t an easy way for regular users to interact with decentralized apps, so MetaMask became the bridge that made it possible.
💡 Take a quick glance at the timeline above — it shows how MetaMask evolved year by year, from a simple browser extension to a mobile-friendly, feature-rich wallet used by millions.
Today, MetaMask is used by over 30 million people every month. It’s not some unknown startup — it’s backed by Consensys, which has raised funding from giants like JPMorgan, Mastercard, and SoftBank, and works directly with the Ethereum Foundation on core tools.
That’s why people trust it:
- ✅ Open-source and transparent
- ✅ Backed by credible investors and developers
- ✅ Around since the early days of Ethereum
And this is exactly why tools like Chainlist are designed to work with MetaMask — because it’s become the most reliable gateway into the world of Web3.
❓Frequently Asked Questions About Chainlist MetaMask
🔗 What is Chainlist, exactly?
Chainlist is a free site that helps you add verified blockchain networks (like Arbitrum, Base, zkSync) to your MetaMask wallet in just one click — no need to copy-paste RPC URLs or hunt for Chain IDs.
🦊 Why does Chainlist work with MetaMask?
Because MetaMask lets users manually add custom networks, and Chainlist just makes that easier. It sends verified network info to your wallet and asks if you want to add it — you always stay in control.
🔐 Is it safe to use Chainlist?
Yes — as long as you use the official site (https://chainlist.org). You’re not giving away your seed phrase or sending tokens. All you’re doing is connecting to MetaMask and choosing whether or not to add a network.
🔄 What if I already added the network manually?
No problem. Chainlist just makes it faster. If the network is already in your MetaMask, it won’t duplicate it. It’s just a shortcut — not a requirement.
❌ I keep getting “Wrong Network” errors. Will Chainlist fix that?
Only if the issue is that the right network isn’t added yet. If it is added but you’re still getting errors, switch networks manually inside MetaMask — just click the dropdown at the top of your wallet and choose the correct chain.
📱 Does this work on mobile too?
Yes! MetaMask has a mobile app (iOS + Android), and Chainlist works inside the in-app browser. Just visit chainlist.org from inside MetaMask’s browser and connect your wallet.
🔧 I’m a dev — can I add my own network?
You can. Chainlist gets its data from a public GitHub repo (ethereum-lists/chains). If your project has its own chain or testnet, you can submit it there — and it’ll show up on Chainlist if approved.
✅ Final Thoughts: Chainlist + MetaMask Just Make Sense Together
If you’ve made it this far, you’re already ahead of most people fumbling around with RPC errors and missing networks.
The combo of Chainlist MetaMask isn’t some “advanced hack.” It’s just a smoother way to handle one of the most common headaches in crypto — switching chains without breaking things.
You don’t need to memorize Chain IDs. You don’t need to worry about messing up RPC settings. You just click, approve, and keep moving. Whether you’re claiming airdrops, minting NFTs, or testing on new L2s — this setup saves time and protects your wallet from dumb mistakes.
And now that you understand how it works, you’re way less likely to fall for fake MetaMask popups or shady network requests.
So yeah — you’re not just “using Chainlist.”
You’re leveling up how you explore the entire Ethereum ecosystem.