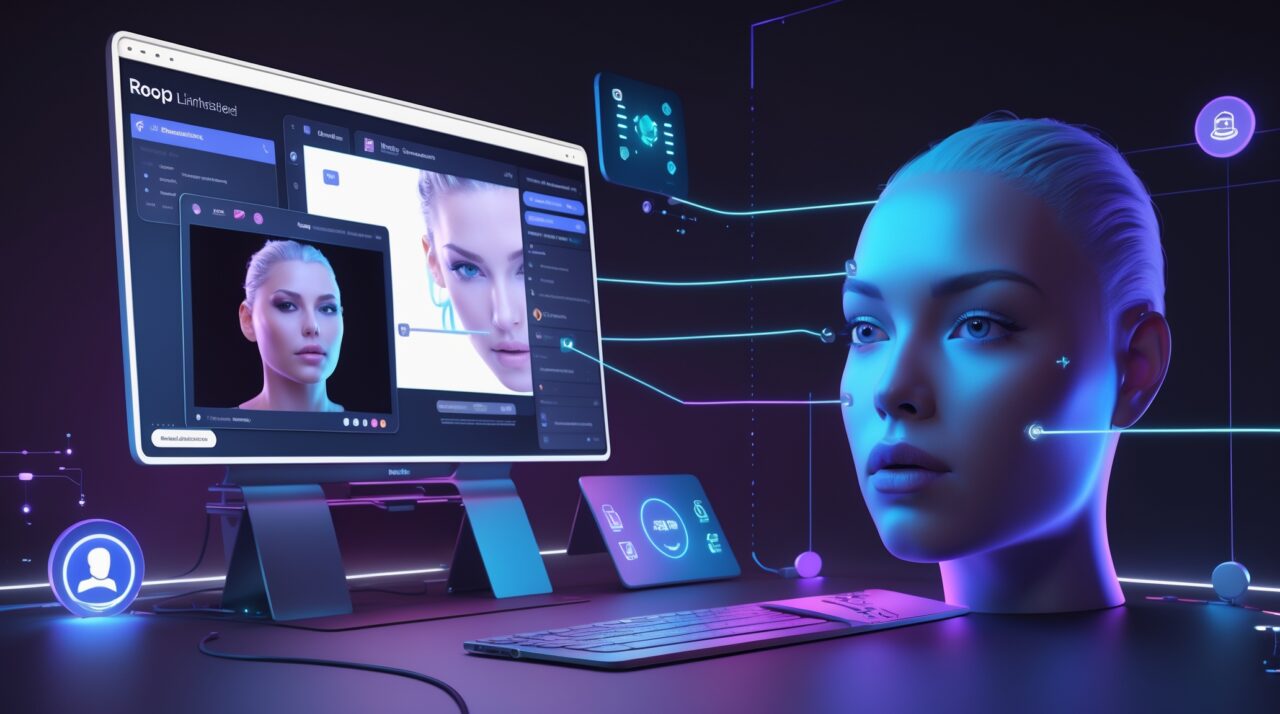
Hi, I’m Roshan Kumar, and welcome to PiximFix.com! If you’re someone who loves creating amazing digital content or just wants to explore cool tech tools, you’re in the right place. PiximFix.com is where I share easy-to-follow guides, exciting tutorials, and powerful tools to help you bring your creative ideas to life. Today, I’m thrilled to introduce you to Roop Unleashed, a game-changing face-swapping tool that makes editing both fun and professional.
As someone with over 5 years of experience in digital media and content creation, I’ve worked on developing innovative tools and written popular articles on topics like AI-powered editing. I know how important it is to have tools that are both easy to use and powerful enough to deliver great results. That’s why I’m excited to walk you through everything Roop Unleashed has to offer.
Did you know that the global face-swapping tech market is growing at an incredible rate of 23.8% every year? This stat from Grand View Research highlights just how popular these tools are becoming, and it’s no surprise—they’re opening up endless possibilities for creators like us. You can read more about it here. Let’s dive into the world of Roop Unleashed and see how this tool, paired with the insights from PiximFix.com, can transform your creative workflow.
How to Download Roop Unleashed
If you’re excited to try out Roop Unleashed and want to download it, I’ve got you covered! Head over to my detailed blog post, where I walk you through the entire installation process step-by-step, including bonus tips for troubleshooting and optimizing your setup. This guide is perfect for beginners and ensures you get everything set up without any hassle.

👉 Click here to read the full installation guide for Roop Unleashed and gain access to exclusive insights, expert tips, and everything you need to get started quickly and easily.
In the blog post, you’ll find:
- System Requirements: Make sure your device meets the necessary specs for a smooth experience, such as at least 8GB of RAM and a modern GPU like NVIDIA GTX 1060 or higher.
- Step-by-Step Instructions: A clear and easy-to-follow process to get Roop Unleashed up and running.
- Tips and Tricks: Useful advice to help you avoid common installation issues, such as compatibility problems with older hardware or troubleshooting download errors during the setup process.
Unlock the potential of Roop Unleashed—a tool designed to transform your creative projects with its cutting-edge features. Check out the guide now and start making incredible face swaps today!
Advantages and Limitations of Roop Unleashed
Advantages
- Easy to Use Roop Unleashed is made to be super simple, even if you’re just starting out. It has a drag-and-drop feature so you can quickly add your files, and a guided setup that helps you get started without any confusion. Its layout is clear and easy to understand, so you won’t feel lost.
- Face Swaps in Real Time One of the coolest features is how you can swap faces in real-time using a live camera. This is great for online events or meetings, letting you add fun or creative touches on platforms like Zoom. It’s also perfect for live streaming on platforms like Twitch, where you can entertain your audience with exciting face swaps as they happen.
- Advanced Tools for Customization Roop Unleashed lets you get really creative with tools for fine-tuning your projects. For example, you can adjust facial features so they fit perfectly or tweak the lighting to make everything look natural and seamless.
- High-Quality Results The tool supports high-resolution outputs up to 512px for face processing, so your projects look sharp and realistic. Plus, it includes different options to make the final result visually appealing.
- Works for Everyone Whether you’re just having fun, creating content for social media, or working on professional projects, Roop Unleashed has features that suit all kinds of users.
- Regular Updates and Support Roop Unleashed has an active community and gets regular updates to add new features and improve performance, so the tool keeps getting better.
Limitations
- Needs a Strong Computer To work well, Roop Unleashed requires a modern computer with a good GPU. If you’re using an older device, it might run slowly or not work at all. It’s recommended to have at least 8GB of RAM and a GPU like the NVIDIA GTX 1060 or better.
- Not Compatible Everywhere The software is designed to work on specific platforms and might not run smoothly on all devices or operating systems, which could limit its use for some people.
- Advanced Features Take Time to Learn While it’s easy to start using, some of the advanced tools, like manual masking, might take practice to master. It’s great for pros, but beginners might need extra time to figure these out.
- Slow on Big Projects If you’re working on high-resolution videos or projects with a lot of frames, it can take a long time to process, even on a good computer. To save time, you can try breaking your project into smaller parts, lowering the resolution for previews, or focusing on key frames first.
- Expensive Setup for Some Users If your computer doesn’t meet the requirements, upgrading can be costly, which might not be worth it for casual users who just want to try it out.
Roop Unleashed is a powerful tool that’s great for creative projects, but it has some challenges, too. Knowing its strengths and limits can help you decide if it’s the right choice for you.
Roop Unleashed Explained
Top Navigation Tabs
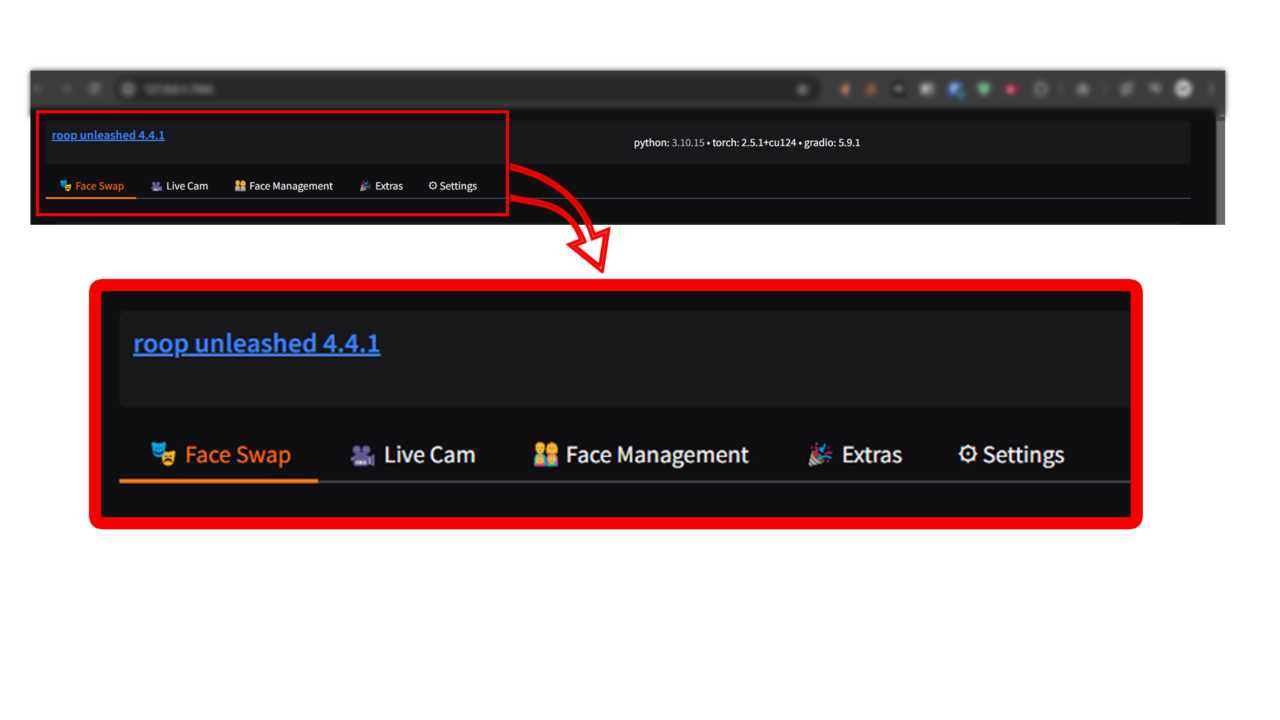
1. Face Swap
- This is where you can swap faces in images and videos. You can use this section to make realistic edits or create fun and creative swaps.
- It includes tools to upload source images, target faces, and set up your preferences for processing.
2. Live Cam
- Lets you use your webcam for live face-swapping. This is perfect for streaming or virtual meetings where you want real-time face swaps.
- You can send the live video stream to virtual cameras for use in video calls or online broadcasts.
- Includes settings to adjust the camera resolution and apply masking.
3. Face Management
- Helps you organize and edit face sets. You can create “blending facesets,” which combine different face angles and expressions to make swaps look more accurate and natural.
- This is great for detailed projects where you need customization.
4. Extras
- Offers extra tools like filters and enhancements. For example, the Colorizer can make black-and-white images colorful, and FilterFX lets you add artistic effects for a creative touch.
- These tools are handy for post-production edits.
5. Settings
- Lets you adjust system preferences, like where files are saved, the output format, and how much memory the program can use. Changing these settings can make the program run faster, especially for bigger projects.
- Allows customization to fit your needs and optimize performance.
Face Swap Section
Input Faces Gallery
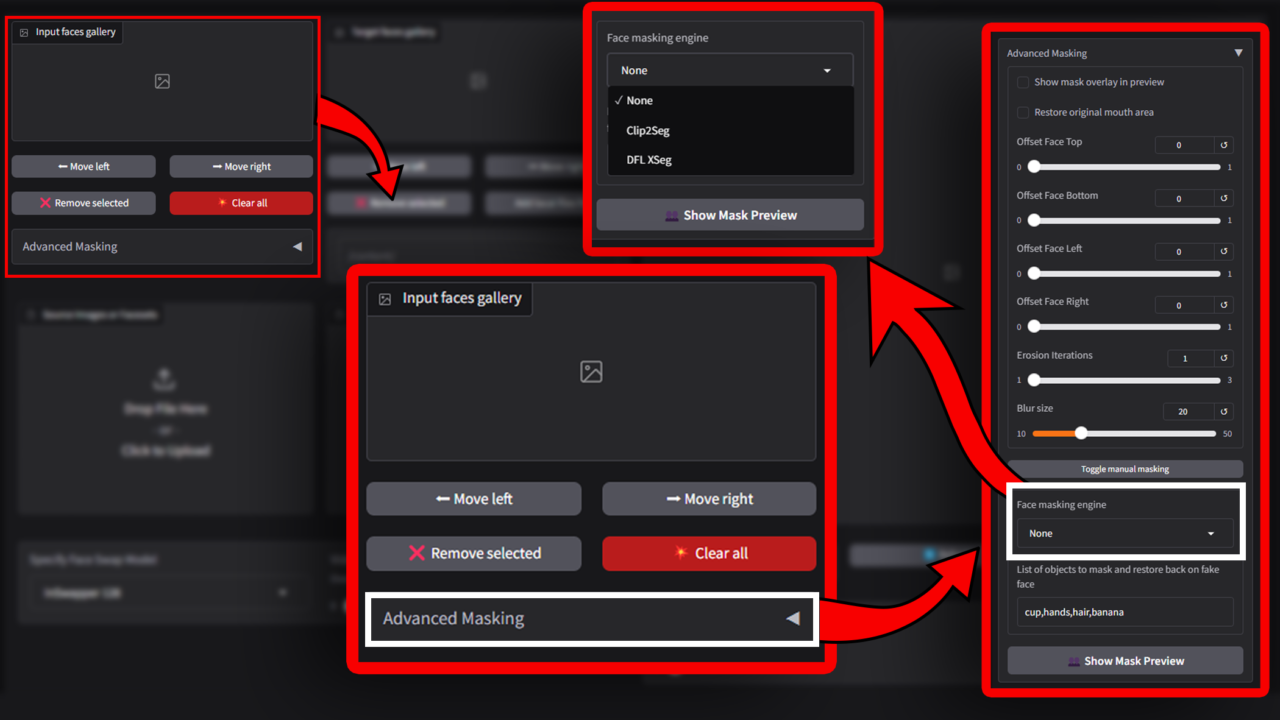
Upload images of the faces you want to swap. Clear and high-quality images make face swaps smoother and more realistic.
Includes navigation buttons:
The Input Faces Gallery is the primary section where you upload and organize the source faces for swapping. The interface provides various tools and options for managing the input faces effectively:
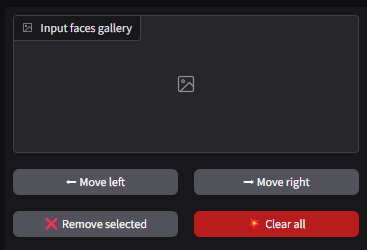
⬅ Move Left / ➡ Move Right: Rearrange the order of uploaded faces. This is useful when prioritizing specific faces for processing.
❌ Remove Selected: Delete individual faces from the gallery. Ideal for removing low-quality or incorrect uploads.
💥 Clear All: Deletes all uploaded faces in the gallery. Be cautious, as this action cannot be undone.
Target Faces Gallery
This gallery mirrors the Input Faces Gallery but is used for the faces you want to swap into the source media. It includes similar management options:
⬅ Move Left / ➡ Move Right: Rearrange the order of target faces.
❌ Remove Selected: Delete specific faces from the target gallery.
The /content/ area in the Target Faces Gallery serves as a field where you can specify or navigate to the directory containing additional target face files. This feature is particularly useful for managing face galleries stored in specific directories.
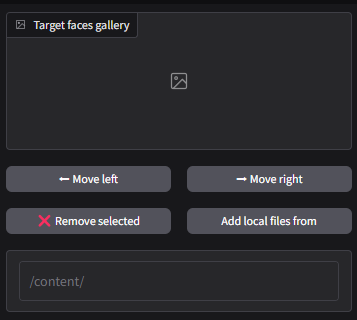
By entering or selecting a folder path here, the tool can directly access and load face data, saving time and maintaining organization.
Advanced Masking
is a feature designed to give users more control over the face-swapping process, helping to refine and enhance the realism of the final results. It allows users to adjust the areas where the face swap is applied, ensuring smoother transitions and more natural appearances. Below are the details of the key options:
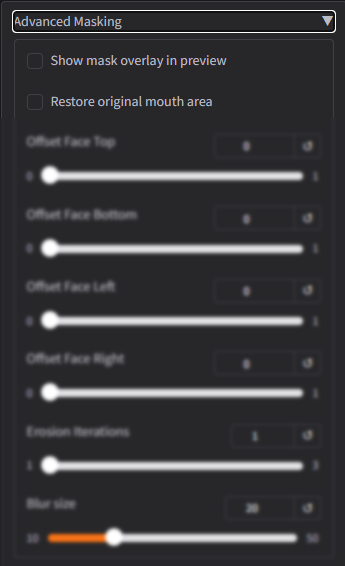
Show Mask Overlay in Preview: This option displays the masking area as an overlay on the face in the preview window. It helps users see exactly which parts of the face are being affected by the face-swapping process.
Restore Original Mouth Area:This feature keeps the mouth area of the original face intact, rather than replacing it with the swapped face. It is particularly useful for maintaining natural speech movements and expressions in videos or images. This option ensures that the mouth looks realistic and matches the rest of the facial movements in the source content.
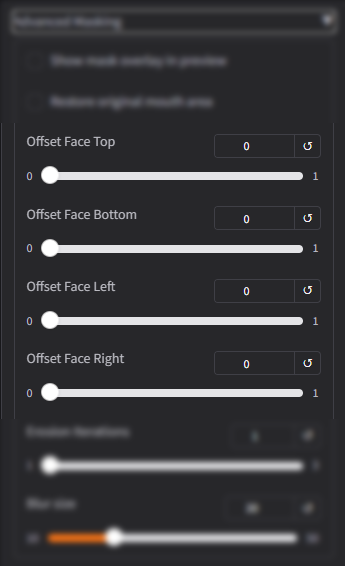
Offset Adjustments
The Offset Adjustments feature allows users to fine-tune the position of the mask applied to the face during the face-swapping process. These adjustments help ensure that the mask aligns perfectly with the target area, improving the overall quality and realism of the swap. The sliders available in this section include:
- Offset Face Top: Moves the mask up or down to adjust how much of the top portion of the face is included in the mask. This is helpful when the upper part of the face, such as the forehead or hairline, needs precise alignment.
- Offset Face Bottom: Shifts the mask higher or lower to control how much of the lower portion of the face, like the chin or jawline, is included. This adjustment ensures a smooth transition between the swapped face and the original.
- Offset Face Left: Moves the mask slightly to the left, helping to correct any misalignment on the left side of the face, such as around the cheek or temple area.
- Offset Face Right: Adjusts the mask to the right, ensuring proper coverage of the right side of the face. This is particularly useful for ensuring symmetry and avoiding cut-off areas during the swap.
These sliders allow for precise control over the mask’s positioning, ensuring that the swapped face blends seamlessly with the source media.
Erosion and Blur
The Erosion and Blur options are designed to refine the edges of the mask applied during the face-swapping process. These tools help ensure the swapped face blends naturally into the original image or video, avoiding harsh lines or unnatural transitions.
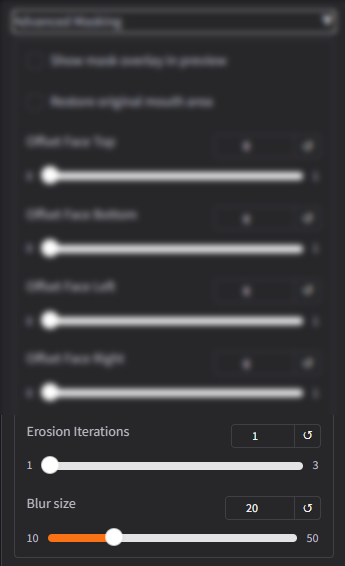
- Erosion Iterations: This setting reduces the size of the mask by eroding its edges. Increasing the number of erosion iterations results in a smaller mask, which can help eliminate any unwanted overlap or excessive coverage beyond the target face area. It’s particularly useful for ensuring that the mask focuses only on the face and avoids covering non-facial areas like hair or background elements.
Adjustable Range: Typically ranges from 1 to 3 iterations.
- Blur Size: This option softens the edges of the mask to create a smoother transition between the swapped face and the surrounding areas. By blurring the mask edges, this setting helps avoid harsh or visible lines where the face swap occurs, resulting in a more natural appearance.
Adjustable Range: Usually ranges from 10 to 50, where higher values create more pronounced blurring.
These options provide fine control over the mask’s appearance, helping users achieve professional-quality face-swapping results. Let me know if you’d like further details!
Manual Masking and Face Masking Engine
The Manual Masking and Face Masking Engine features give users advanced control over the face-swapping process by allowing adjustments to the mask’s coverage and behavior. These tools are ideal for users who want more precision and customization.
Toggle Manual Masking: This option enables users to manually adjust the mask applied to the face. Instead of relying solely on the AI-generated mask, users can define or modify the mask’s shape, size, and position to suit their specific needs.
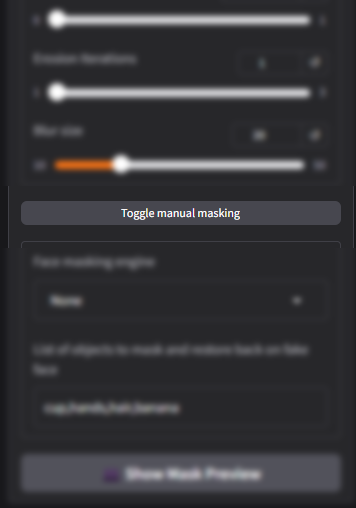
How It Works:
When toggled on, it provides interactive tools (such as drawing or resizing options) for adjusting the mask.
This is especially helpful for projects where the default mask doesn’t perfectly match the face or when the target face has unique requirements (e.g., unusual lighting, angles, or partially covered faces).
Face Masking Engine
The Face Masking Engine is a powerful feature that allows users to choose the method for generating masks during the face-swapping process. Each option offers a different level of detail and accuracy, depending on the complexity of the project.
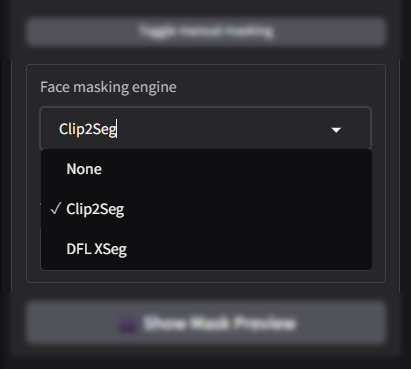
- None: When this option is selected, no specific masking engine is applied. The software uses a basic, default mask for the face-swapping process.
- Clip2Seg: This engine specializes in precise segmentation of facial features. It uses advanced AI algorithms to create highly accurate masks, focusing on separating the face from other parts of the image or video.
- DFL XSeg: The DFL XSeg engine is designed for deepfake-level precision and offers highly customizable masking capabilities. It provides the most advanced level of control, allowing for intricate adjustments to the mask shape and coverage.
Each engine offers unique advantages depending on the project’s requirements. For quick and simple edits, the None option suffices, while Clip2Seg and DFL XSeg are better suited for advanced and detailed face-swapping needs.
List of Objects to Mask and Restore Back on Fake Face
This feature allows users to define specific objects or areas in the media that should either be masked or restored during the face-swapping process. It provides greater control over the final output, ensuring that non-facial elements around the face are handled appropriately.
The tool ensures that objects or elements like hair, hands, or accessories (e.g., glasses or hats) are either excluded from the mask or properly restored in the swapped image or video.
Users can manually input or select items that require masking or restoration, refining the accuracy of the final result.
👥 Show Mask Preview: This option provides a real-time preview of the mask applied to the face and surrounding areas. It helps users visualize which parts of the media are included in the mask and make necessary adjustments before finalizing the face swap.
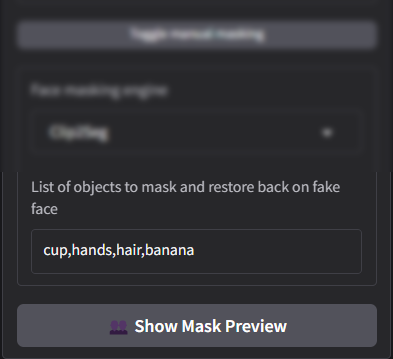
This feature, combined with the Show Mask Preview option, gives users full control over the face-swapping process, resulting in more polished and realistic outputs.
Source Images or Facesets
The Source Images or Facesets feature is where users upload the primary images or faces that will be used as the “source” in the face-swapping process. This section is critical as it provides the reference material for the AI to analyze and swap onto the target media.

Drop File Here or Click to Upload: Drag and drop your source files into this area or click to browse your computer for files. This streamlines the process of adding your source images or facesets.
Accepted File Formats: Common formats like JPEG, PNG, or BMP for images and MP4, AVI, or similar formats for videos.
What Are Facesets?
- Definition: A faceset is a collection of images of a single face taken from different angles and with varying expressions. These help the AI better understand the unique features of the face, making the swaps look more natural and consistent across frames.
- Creation: Users can either create their own facesets by extracting frames from a video or use pre-made facesets.
- Benefits:
- Enhances realism by providing more data for the AI to work with.
- Ensures better results for dynamic media, such as videos with varying facial movements.
This feature is designed to make the face-swapping process flexible and accessible, whether you’re working with a single image or a detailed collection of facesets.
Target Files
The Target Files feature is where users upload the media that will serve as the base or “target” for the face-swapping process. This is the content into which the new face will be swapped, whether it’s an image or a video.
Drop File Here or Click to Upload: Allows users to upload their target files by either dragging and dropping them into the specified area or clicking to browse files on their device.
Accepted File Formats: Common formats include:
- Videos: MP4, AVI, MKV.
- Images: JPEG, PNG, BMP.

How the Target Files Are Used
- Face Analysis: The software analyzes the faces in the target file, identifying key features such as expressions, lighting, and angles.
- Face Alignment: The target face is aligned with the source face to ensure the swap looks natural and realistic.
- Output Creation: After processing, the final media will look like the source face naturally belongs in the target content.
Tips for Best Results:
- Use high-resolution target files to improve the detail and realism of the swap.
- Ensure that the faces in the target media are well-lit and clearly visible to avoid issues with detection and alignment.
This feature ensures that the face-swapping process is seamless and produces professional-quality results.
Specify Face Swap Model
The Face Swap Model selection allows users to choose the AI model used for processing the face-swapping operation. Each model offers different levels of detail and performance, catering to various project requirements.
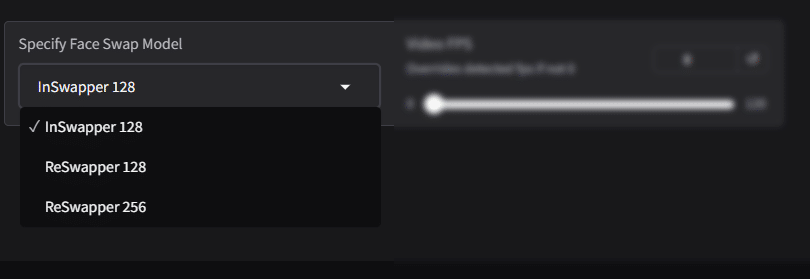
- InSwapper 128: A balanced face-swapping model designed for fast processing while maintaining good quality.Resolution: Processes faces at a resolution of 128 pixels.
Performance:- Speed: Optimized for quicker results, making it ideal for projects where speed is more important than high detail.
- Quality: Provides decent results but may lack finer details compared to higher-resolution models.
Best suited for simple projects, previews, or when working with older hardware or low-resolution target files.
- ReSwapper 128: A more advanced version of InSwapper that focuses on improving quality while still working at 128-pixel resolution.
- Performance:
- Speed: Slightly slower than InSwapper but still efficient.
- Quality: Delivers better detail and blending compared to InSwapper 128.
Ideal for projects requiring a balance between speed and quality, such as casual edits or standard-definition videos.
- ReSwapper 256: The most advanced model, capable of processing faces at 256-pixel resolution, offering the highest level of detail and realism.
- Performance:
- Speed: Requires more processing time and resources compared to the other models.
- Quality: Produces highly detailed and realistic swaps, making it suitable for professional-grade projects.
Perfect for high-resolution media, intricate projects, or when working on powerful hardware with ample resources.
Choosing the Right Model:
- Use InSwapper 128 for quick edits and previews.
- Use ReSwapper 128 for medium-quality outputs with faster processing.
- Use ReSwapper 256 for professional-quality results on high-end hardware.
This flexibility allows users to tailor the tool’s performance to their specific project needs.
Video FPS (Frames Per Second)
The Video FPS option allows users to adjust the frame rate of the video during the face-swapping process. This feature ensures that the output video maintains smooth motion and synchronization with the original content.
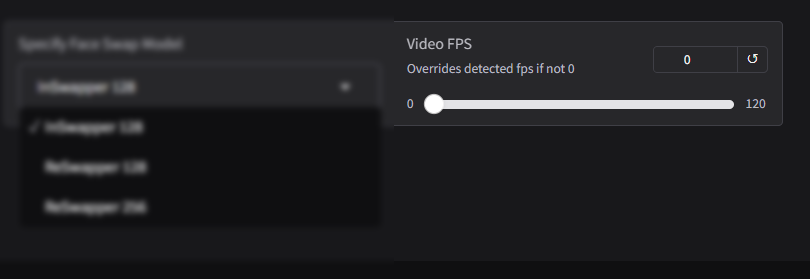
Default to 0: When the FPS value is set to 0, the software automatically detects and uses the frame rate of the original video. This ensures that the output matches the motion and timing of the original file without requiring manual adjustments.
Custom FPS Settings: Users can manually override the detected frame rate by entering a specific FPS value. This option is useful for creative projects or when the desired output requires a different frame rate than the original.
Example Values:
- 24 FPS: Standard for cinematic videos.
- 30 FPS: Common for online and TV content.
- 60 FPS: Ideal for smooth, high-quality motion in gaming or action videos.
Adjusting the FPS is particularly helpful when the original video’s frame rate is inconsistent or if users want to experiment with motion effects (e.g., slowing down or speeding up the video).
Tips for Best Results:
- Use the Default to 0 setting if you want to preserve the original video’s natural flow.
- Only manually adjust the FPS if you have specific requirements or need creative control over the output.
- Ensure that the chosen FPS value aligns with the video’s intended playback environment to avoid choppy or unnatural motion.
This feature gives users flexibility to maintain or modify the smoothness and flow of their output video.
Preview Image Section
The Preview Image Section provides a visual representation of the current frame or image being processed. It helps users monitor the progress and make real-time adjustments to ensure the face-swapping process is accurate and seamless.
Face Swap Frames Checkbox Option: When enabled, this checkbox applies face-swapping only to specific frames of a video rather than the entire sequence. It allows users to target frames where face-swapping is needed while skipping others.
🔄 Refresh Purpose: The refresh button updates the preview to reflect any changes made to the settings or input files. This ensures that users can see the most recent adjustments before proceeding with processing.
Use Face from this Frame: This button lets users select and extract the face from the currently displayed frame to use as the target face for the swapping process. It ensures the face used for swapping is taken directly from the previewed frame, providing precise control over which face to use.

How It Works:
Click the Use Face from this Frame button to extract the face for swap
Navigate to the desired frame in the video.
Benefits of the Preview Image Section:
- Helps users visually confirm that face-swapping parameters, such as masks and alignments, are applied correctly.
- Provides flexibility to swap faces on selected frames or extract specific faces for better control and accuracy.
- Saves time by allowing users to adjust and preview settings in real-time before processing the entire video or image.
Frame Number
The Frame Number feature displays the currently selected frame in the video being processed. It helps users navigate through the video and apply face-swapping or adjustments to specific frames.

What It Does:
- Displays Frame Position: Shows the exact position of the current frame in the video timeline, usually in the format of a numerical value (e.g., Frame 1, Frame 100, etc.).
- Navigation: Allows users to jump to specific frames by entering the desired frame number or using navigation tools provided by the software.
- Reset Option: Includes a reset button (↺) to return to the first frame or the default starting point of the video.
If users need to apply face-swapping or adjustments to a specific moment in the video, the frame number helps pinpoint the exact location.
- Frame-Specific Actions:
- Extract faces from a particular frame for use in the face-swapping process.
- Preview and verify edits made to individual frames before processing the entire video.
Benefits:
- Control: Provides detailed control over frame-by-frame navigation and editing.
- Efficiency: Helps users avoid unnecessary processing by focusing only on relevant frames.
- Flexibility: Works seamlessly with other preview and adjustment tools, such as the Use Face from this Frame button or the Face Swap Frames Checkbox Option.
This feature is crucial for ensuring accuracy and saving time during the face-swapping workflow.
Processing Frame Range
The Processing Frame Range feature allows users to define a specific portion of the video to apply face-swapping. Instead of processing the entire video, users can select a range of frames to save time and resources.
⬅ Set as Start Action Button: Marks the currently displayed frame as the starting point for the face-swapping process. This tells the software to begin processing from this frame onward.
➡ Set as End
Action Button: Marks the currently displayed frame as the endpoint for the face-swapping process. The software will stop processing once it reaches this frame.

How It Works:
- Navigate to the frame where you want the process to begin.
- Click ⬅ Set as Start to mark the starting frame.
- Navigate to the frame where you want the process to stop.
- Click ➡ Set as End to mark the ending frame.
- The software will only process the frames within this defined range.
Benefits:
- Efficiency: Saves time and resources by limiting processing to only the necessary frames.
- Precision: Provides control over where face-swapping is applied, ensuring edits are targeted to specific parts of the video.
- Flexibility: Easily adjust the start and end points as needed to refine the frame range.
This feature is especially useful for large videos or projects with specific timing requirements.
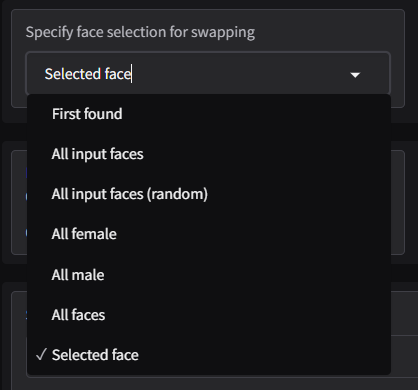
Specify Face Selection for Swapping
The Specify Face Selection for Swapping feature lets users decide how the software chooses which faces to swap in the input media. This provides flexibility for projects with multiple faces in an image or video, ensuring the tool targets the appropriate face(s) for swapping.
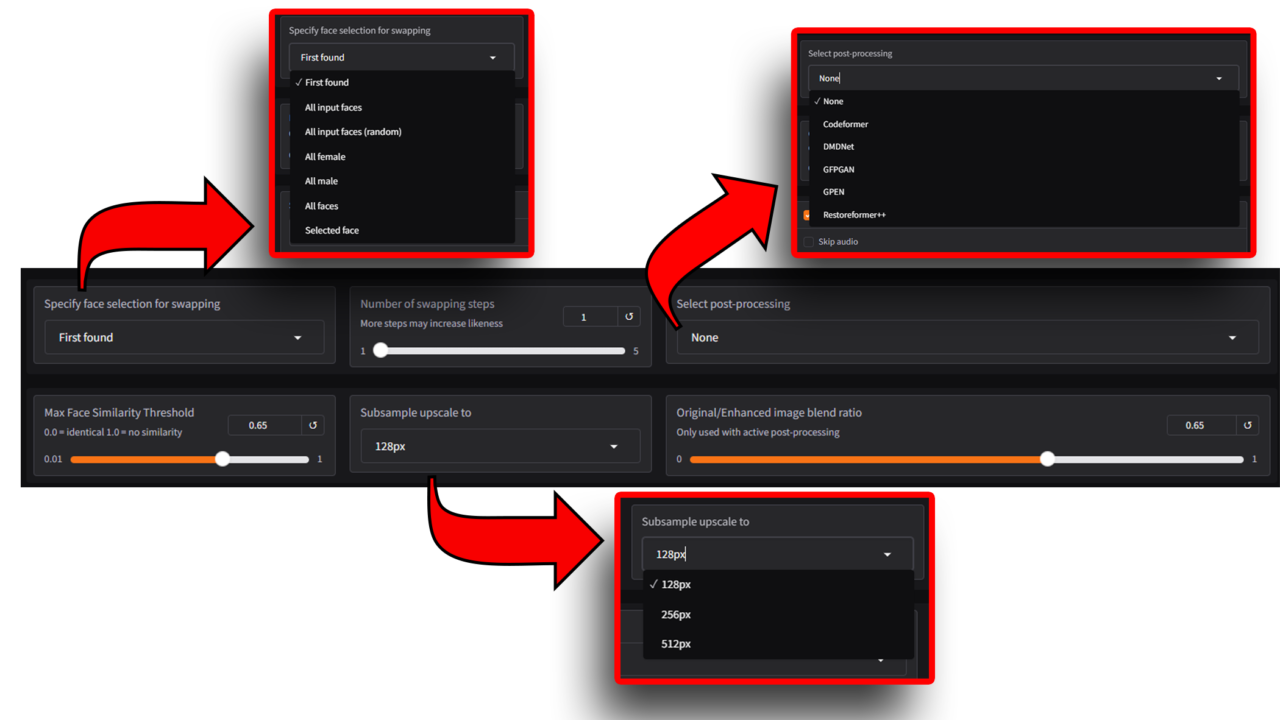
This dropdown menu allows users to decide how faces are selected during the swapping process. Each option has specific use cases to improve flexibility and output quality:
- First Found: Swaps the first detected face in the input image or video.
- All Input Faces: Applies the swap to all detected faces in the input image or video.
- All Input Faces (Random): Randomly swaps faces in the input image or video.
- All Female: Focuses only on detected female faces for the swapping process.
- All Male: Focuses only on detected male faces for the swapping process.
- All Faces: Processes all detected faces regardless of gender.
- Selected Face: Targets a specific face that you manually select for the swap.
Benefits:
- Flexibility: Offers various options to handle different scenarios, from single-face swaps to complex group projects.
- Control: Allows users to focus on specific faces or swap all faces, depending on the project needs.
- Efficiency: Saves time by avoiding unnecessary processing of irrelevant faces.
This feature ensures that face-swapping is tailored to the user’s requirements, providing both precision and versatility.
Number of Swapping Steps:
The Number of Swapping Steps option determines the number of iterations the AI performs to refine the face-swapping process. Each step improves the quality, accuracy, and likeness of the swapped face, ensuring it looks natural and seamless.
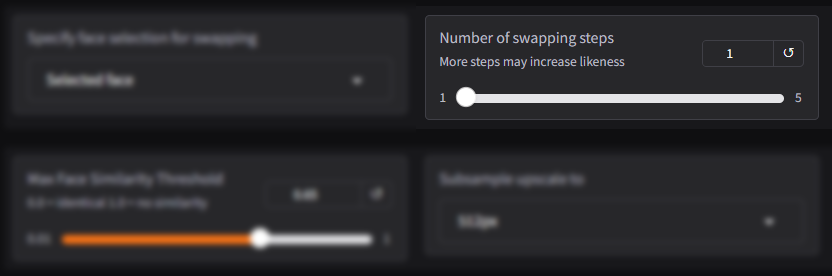
- More Steps = Higher Likeness: Increasing the number of steps enhances the level of detail and realism in the final output. The AI goes through additional refinement cycles to better align the swapped face with the original media, focusing on subtle details like facial expressions, lighting, and textures.
- While more steps improve likeness and realism, they also require more processing time and computational resources.
Range
Typically, the number of swapping steps can be adjusted within a specific range, for example:
- 1 Step: Quick processing with minimal refinement. Suitable for previewing results or when quality is less critical.
- 3 Steps (Default): Balances speed and quality, producing good results for most projects.
- 5 Steps: Maximum refinement for projects requiring high levels of detail and likeness. Ideal for professional-grade outputs.
Use Cases
- Fewer Steps (1-2):
- For quick previews or when working on low-resolution media.
- When computational resources are limited (e.g., older hardware).
- More Steps (3-5):
- For high-resolution images or videos.
- When achieving photorealistic results is critical.
- On systems with powerful GPUs and sufficient RAM to handle the extra workload.
Tips for Best Results:
- Start with the default number of steps to gauge the initial output quality.
- Increase the steps if you notice inconsistencies or want to enhance fine details.
- Be mindful of hardware limitations, as higher steps may significantly increase processing time.
This feature allows users to balance speed and quality, tailoring the process to their specific project and hardware capabilities.
Select Post-Processing
The Post-Processing feature enhances the final output after the face-swapping process is complete. Users can choose from several post-processing methods to improve the quality, sharpness, and realism of the result. Each option is tailored for specific improvements based on the project’s needs.:

- None: No additional enhancements are applied. The output is left as-is after the face-swapping process.
- Codeformer: A versatile tool for improving overall image quality. It focuses on restoring details and enhancing the clarity of the face, particularly in cases where the source or target image was blurry or low-resolution.
- DMDNet: Specializes in recovering textures and details in facial regions, ensuring the swapped face appears lifelike and consistent with the original.
- GFPGAN: Balances fidelity (accuracy to the original face) and realism. GFPGAN restores facial details while ensuring the swapped face looks natural within the context of the media.
- GPEN: Focuses on improving the overall resolution and clarity of the output. It enhances both the swapped face and surrounding areas for a cohesive result.
- Restoreformer++: An advanced restoration tool designed for high-quality detail recovery. It excels in restoring subtle features in complex face swaps, such as wrinkles, skin textures, and fine lines.
Tips for Choosing a Post-Processing Method:
- Use None if the original face swap already meets your quality expectations.
- Use Codeformer or GFPGAN for general-purpose improvements.
- Opt for Restoreformer++ or DMDNet for high-detail restoration in professional or complex projects.
- Consider GPEN when the resolution of the entire output needs enhancement.
Each method is designed to cater to different needs, allowing users to customize their results based on their project goals.
Max Face Similarity Threshold
The Max Face Similarity Threshold determines how closely the swapped face should resemble the source face. By adjusting this setting, users can control the balance between maintaining the original face’s appearance and blending it naturally into the target media.
Default: At the default value of 0.65, the swapped face achieves a balance between accuracy and natural blending. This ensures the swapped face retains key features of the source while integrating seamlessly into the target content.
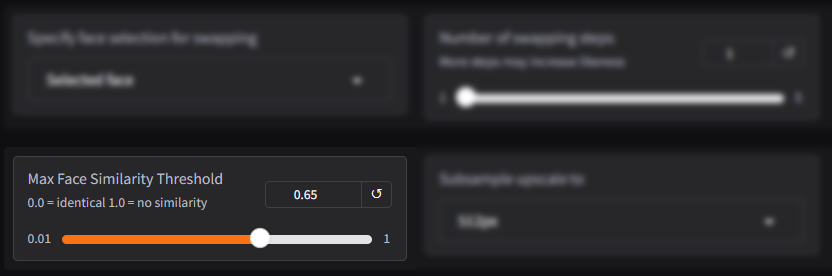
How It Works:
- Higher Values (e.g., 0.7 – 1.0): Reduce similarity to the source face, prioritizing smoother integration with the target content. This is useful for creating more natural-looking results in videos or images with challenging lighting or angles.
- Lower Values (e.g., 0.0 – 0.5): Make the swapped face look more like the source face. This is ideal when high similarity to the source face is required but may sacrifice some blending with the target media.
Adjustable Range
- Range: Typically adjustable between 0.0 and 1.0.
- 0.0: The swapped face looks exactly like the source face with no adjustments for blending.
- 1.0: The swapped face is fully adapted to match the target face, with minimal resemblance to the source.
Tips for Best Results:
- Start with the default value (0.65) to evaluate the output.
- Lower the threshold if the swapped face doesn’t look close enough to the source.
- Increase the threshold for projects that prioritize natural integration over exact likeness.
This setting provides users with flexibility to achieve the desired balance between source similarity and target blending.
Subsample Upscale To
The Subsample Upscale To option determines the resolution at which the AI processes the face during the swapping process. This setting directly affects the quality of the output and the computational resources required.

128px: The lowest resolution option, processing faces at 128 pixels.
Quality: Offers quicker processing but sacrifices some detail. Faces may appear less sharp and realistic compared to higher resolutions.
Resources: Highly resource-efficient and suitable for older hardware or when quick results are needed.
256px: A mid-range resolution, processing faces at 256 pixels.
Quality: Provides a good balance between detail and processing efficiency. Faces appear clean and natural without requiring as much computational power as 512px.Resources: Suitable for systems with moderate GPU power and VRAM (e.g., 4GB or higher).
512px: The highest resolution option, processing faces at 512 pixels.
Quality: Delivers the most detailed and realistic face-swaps with sharp features and fine textures.
Resources: Requires significant GPU power and VRAM, as well as additional processing time.
Choosing the Right Resolution:
- 512px: Use for professional or high-quality outputs where detail is a priority.
- 256px: A versatile choice for most projects, balancing quality and performance.
- 128px: Best for quick previews, low-resolution media, or systems with limited hardware capabilities
Tips for Best Results:
- Start with 256px as a default setting for balanced performance and quality.
- Use 512px when working with high-resolution images or videos that require exceptional detail.
- Choose 128px for quick edits or when testing settings.
This feature allows users to tailor the processing resolution to meet their specific project and hardware requirements.
Original/Enhanced Image Blend Ratio
The Original/Enhanced Image Blend Ratio setting controls how much the enhanced swapped face blends with the original image or video. This feature provides flexibility to maintain a natural appearance or emphasize the enhancements made during face-swapping.
Default: At the default value of 0.65, the output is a balanced mix of the original and enhanced faces. This setting ensures the swapped face integrates naturally into the source media while retaining important enhancements like sharpness, texture, and alignment.

How It Works:
- Original (Lower Values): The swapped face closely resembles the original target face, maintaining its natural look with minimal enhancements.
- Enhanced (Higher Values): The swapped face incorporates more AI-driven enhancements, prioritizing sharpness, detail, and smooth blending.
Tips for Best Results:
- Start with the default value (0.65) and adjust based on the specific needs of your project.
- Lower the ratio for a more natural and less processed look.
- Increase the ratio for sharper and more detailed results, especially in high-resolution media.
This setting ensures flexibility for achieving the desired balance between natural integration and detailed enhancement in face-swapping projects.
Select Video Processing Method
The Video Processing Method determines how the software handles video frames during the face-swapping process. Users can choose between two options depending on their system’s resources and project requirements.
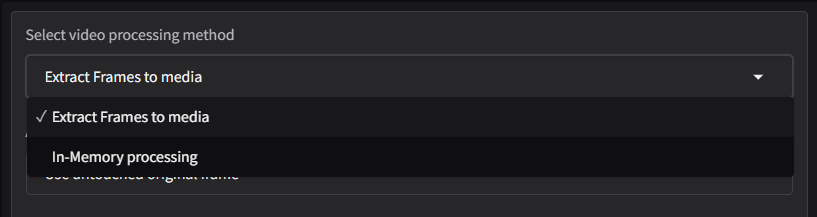
- Extract Frames to Media: This method extracts individual video frames and saves them as temporary files in a designated folder. The software processes each frame independently and then reassembles them into a final video.
- In-Memory Processing: This method processes video frames directly in the system’s RAM without creating temporary files on the disk. It is faster and more efficient for systems with sufficient memory.
Choosing the Right Method:
- Extract Frames to Media:
- Use for large videos or when working with systems that have limited memory (e.g., less than 8GB of RAM).
- Helpful when temporary storage space is not an issue.
- In-Memory Processing:
- Use for smaller videos or when working on systems with high RAM capacity.
- Best for projects where speed and efficiency are essential.
Tips for Best Results:
- If unsure, start with Extract Frames to Media to ensure stability, especially for large projects.
- Use In-Memory Processing on high-end systems to save time and avoid disk I/O delays.
This flexibility allows users to tailor the video processing method to match their system capabilities and project requirements.
Action on No Face Detected
The Action on No Face Detected setting determines how the software handles frames where no face is detected during the face-swapping process. This feature provides flexibility for dealing with problematic or edge cases in videos.
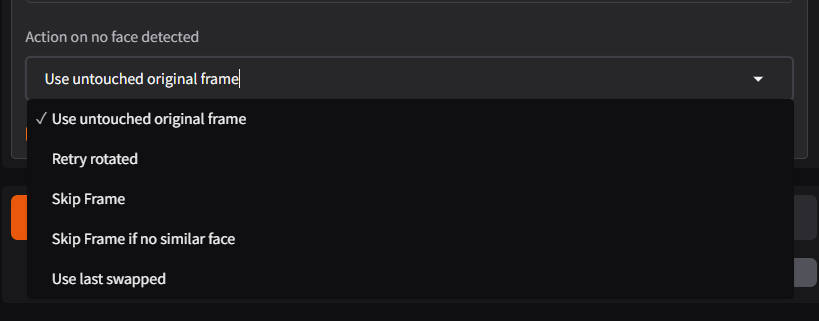
- Use Last Swapped: Reuses the last successfully swapped face for the current frame if no face is detected.
- Use Untouched Original Frame: Leaves the frame unchanged if no face is detected, preserving the original frame from the input video
- Retry Rotated: Attempts to detect a face by rotating the frame, ensuring better coverage for unusual angles.
- Skip Frame: Excludes the frame from processing entirely, speeding up the workflow for irrelevant frames.
- Skip Frame if No Similar Face: Skips the frame only if the detected face doesn’t meet the similarity threshold, useful for maintaining quality.
Choosing the Right Option:
- Use Last Swapped: Best for maintaining continuity in videos with temporary detection issues.
- Use Untouched Original Frame: Perfect for preserving the integrity of the original video.
- Retry Rotated: Ideal for frames with tilted or challenging face angles.
- Skip Frame: Suitable for skipping irrelevant frames to save processing time.
- Skip Frame if No Similar Face: Recommended for maintaining strict quality and likeness standards.
Tips for Best Results:
- Use Retry Rotated for complex videos with varying face angles.
- Use Last Swapped or Skip Frame if No Similar Face for projects requiring high visual consistency.
- Opt for Use Untouched Original Frame for minimal disruptions in the video’s flow.
This feature ensures flexibility and precision, even in cases where face detection is challenging.
VR Mode
The VR Mode feature is designed to adapt face-swapping processes for virtual reality (VR) media. This ensures that face-swaps appear seamless and natural when applied to VR-specific content, such as 360-degree videos or immersive environments.
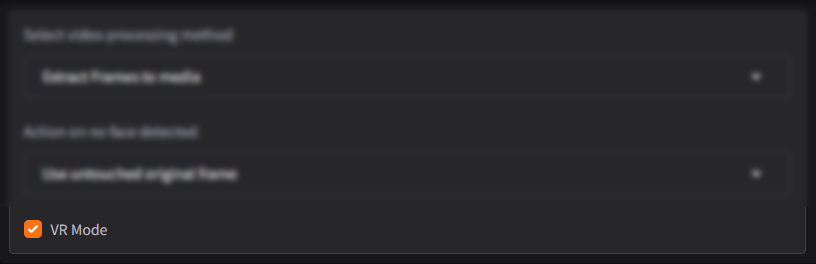
How VR Mode Works
- Handles Distortions: Corrects distortions caused by VR-specific lenses, ensuring that face-swaps look natural when viewed in a VR headset.
- Adapts for 360-Degree Content: VR Mode adjusts the face-swapping process to account for the unique characteristics of VR media, such as spherical video formats and wide fields of view.
- Maintains Perspective: Ensures that swapped faces remain aligned and consistent with the VR video’s perspective, even as the viewer’s angle changes.
Tips for Using VR Mode:
- Input Media: Ensure that the input media is formatted for VR, such as 360-degree video or equirectangular projections, for best results.
- Hardware Considerations: VR Mode may require more processing power due to the increased complexity of VR content. A powerful GPU with at least 6GB of VRAM is recommended.
- Preview Results: Test the face-swapped VR content on a VR headset to confirm that the results look natural and consistent across all viewing angles.
Additional Options
The Additional Options feature includes various tools and settings to fine-tune the face-swapping process and its output. These options provide added flexibility, ensuring users have greater control over specific aspects of the workflow.
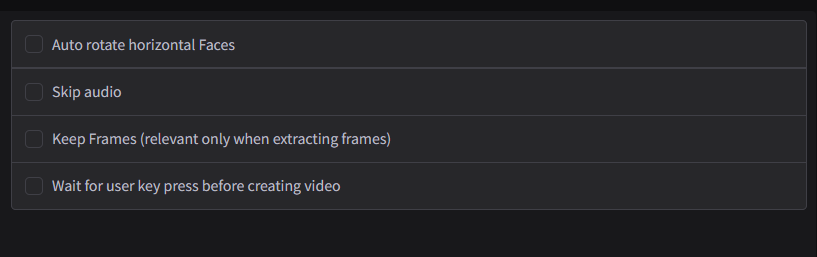
- Wait for User Key Press Before Creating Video: Pauses the process before finalizing and creating the output video, allowing users to review settings or preview results.
- Auto Rotate Horizontal Faces: Automatically adjusts the orientation of faces that appear sideways or tilted in the input media. This ensures the swapped face aligns correctly with the target face
- Skip Audio: Excludes the audio track from the final output, creating a video without sound.
- Keep Frames (Relevant Only When Extracting Frames): Retains the extracted frames in a temporary folder after processing, instead of deleting them. This allows users to access individual frames for further editing or reuse.
Benefits of These Options:
- Flexibility: Allows users to customize the workflow to suit their project requirements.
- Efficiency: Saves time and resources by automating or streamlining specific tasks (e.g., rotating faces or skipping audio).
- Control: Offers more oversight, especially with the ability to review settings before creating the final video.
Let me know if you’d like additional examples or further clarification!
Control and Management Settings
The Control and Management Settings provide users with basic operational controls to manage the face-swapping process effectively. These settings ensure users have full control over when and how the tool processes their media.

▶ Start: Initiates the face-swapping process. Once all settings are configured, clicking the Start button begins processing the input media.
What Happens When You Click Start:
- The software applies all the selected configurations, such as face masking, blending options, and frame range.
- The processing starts for the uploaded images or video, and the progress is displayed in real-time.
⏹ Stop: Halts the ongoing face-swapping process immediately. Clicking the Stop button cancels the current operation and prevents further processing.
What Happens When You Click Stop:
- The tool stops processing frames or media at its current point.
- No additional face-swapping or adjustments are applied beyond the stop point.
Benefits of These Controls:
- Flexibility: Allows users to start or stop the process at any point, giving them complete control over the workflow.
- Error Management: Ensures users can halt processing if they identify mistakes or wish to make changes to settings before continuing.
- Efficiency: Reduces wasted resources by letting users terminate unwanted or unnecessary tasks promptly.
These simple yet essential controls ensure a smooth user experience and the ability to manage tasks effectively. Let me know if you’d like further details or examples!
👀 Open Output Folder
Opens the folder where the processed files (images or videos) are saved. This makes it easy for users to locate and review their final outputs without navigating through their file system.
Select Output Method
This setting allows users to choose how they want the processed face-swapped media to be delivered.
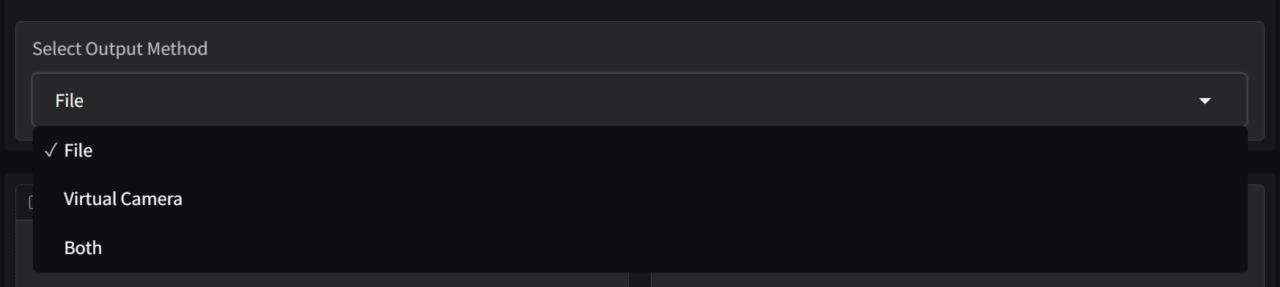
- File: Saves the output as a file (e.g., an image or video) on the user’s system.
- Virtual Camera: Streams the processed video directly to a virtual camera, enabling real-time face-swapping for live use in video calls, streaming, or virtual meetings.
- Both: Combines both methods by saving the output as a file while also streaming it to a virtual camera
Tips for Using Output Settings:
- Use File for standard projects where a saved version is required for editing, storage, or distribution.
- Select Virtual Camera for dynamic, real-time applications like live streaming or video conferencing.
- Choose Both to cover all bases, allowing you to save the output while utilizing it live.
These settings ensure that users can manage their output effectively, catering to a wide range of scenarios.
Webcam and Virtual Camera Integration
The Webcam and Virtual Camera Integration feature allows users to apply face-swapping effects in real-time using their physical webcam or stream the processed output to a virtual camera. This is especially useful for live video calls, online meetings, or live streaming.
Start and Stop Options:

- ▶ Start: Begins the real-time face-swapping process, activating the webcam or virtual camera to display the face-swapped outpu
What Happens When You Click Start:
- The software captures input from your physical webcam.
- Applies the face-swapping effects in real-time.
- Streams the processed output to the virtual camera, which can be selected in apps like Zoom, OBS, or Teams.
- ⏹ Stop: Stops the real-time face-swapping process, deactivating the webcam or virtual camera.
What Happens When You Click Stop:
- The software stops processing input from the webcam.
- Returns the video feed to its original state or shuts off the virtual camera stream.
Benefits of Webcam and Virtual Camera Integration:
- Real-Time Application:
- Allows users to showcase face-swapped output live during calls or streams.
- Compatibility:
- Works seamlessly with apps like Zoom, Microsoft Teams, OBS, or any platform that supports virtual cameras.
- Ease of Use:
- Simple start/stop controls make it easy to toggle the face-swapping process as needed.
This feature is particularly valuable for creating dynamic, engaging, and interactive content in real-time scenarios.
Camera Number
The Camera Number feature allows users to select the input camera that the software will use for face-swapping. This is particularly useful for systems with multiple cameras, such as built-in webcams, external USB cameras, or virtual camera inputs.
- Range: 0 to 8. The slider lets users choose from up to 8 camera options, with each number corresponding to a specific camera device connected to the system.
How It Works:
- The software scans available cameras and assigns a unique number to each one.
- Users can select the desired camera using the slider or input the number directly.
- ↺ Reset Button: The reset button restores the camera selection to its default setting (usually the first detected camera, Camera 0).
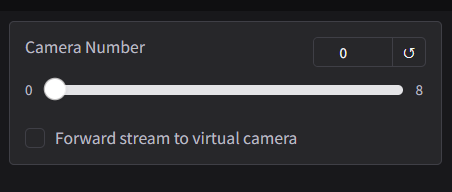
Stream Forwarding to Virtual Camera: This feature enables the processed video feed (with face-swapping applied) to be forwarded to a virtual camera. The virtual camera can then be used as the video source in applications like Zoom, Microsoft Teams, or OBS.
How It Works:
- After selecting the input camera, the face-swapping process applies effects in real-time.
- The modified video stream is routed to a virtual camera, which appears as a selectable video source in supported apps.
Tips for Best Results:
- Use Camera Number 0 as a starting point if unsure which device corresponds to your desired camera.
- Adjust the slider to find and test other connected cameras if multiple devices are available.
- Enable the virtual camera stream to use face-swapping effects live in your preferred application.
This feature ensures flexibility and compatibility with various camera setups, making it easy to achieve professional-looking, real-time face-swapping results.
Fake Camera Resolution
The Fake Camera Resolution and advanced masking options allow users to customize the quality of the face-swapped video output and control specific elements like masking and facial regions. These settings are crucial for achieving high-quality and realistic results, particularly in live-streaming or virtual camera applications.
- 1920×1080: Produces high-definition video output with sharp details and excellent clarity.
- Performance: Requires more GPU power and bandwidth, making it suitable for high-performance systems.
- 1280×720 (HD): A balanced resolution offering good quality while using fewer system resources compared to Full HD.
- Performance: Suitable for mid-range systems.
- 640×480 (SD): A standard-definition resolution that prioritizes efficiency over visual quality.
- Performance: Requires minimal GPU and processing power.

Use DFL XSeg Masking: Enables advanced masking using the DFL XSeg technique, which provides precise control over the mask applied to the face during the swapping process.
How It Works:
- The software keeps the mouth area from the original video while blending the rest of the swapped face seamlessly.
- This ensures natural synchronization of lip movements and speech, avoiding unnatural-looking results.
Restore Original Mouth Area: Preserves the original mouth region of the target face instead of replacing it with the swapped face. This is particularly useful for maintaining realistic speech movements and expressions in videos.
Tips for Using These Options:
- Choose 1920×1080 resolution for high-quality outputs but ensure your system can handle the increased demand.
- Enable DFL XSeg Masking for precise and professional results, particularly for detailed or high-resolution projects.
- Use Restore Original Mouth Area to preserve natural speech patterns in video projects, especially in dynamic or dialogue-heavy scenes.
These settings provide a high level of customization, allowing users to achieve the desired quality and realism in their face-swapping projects.
Fake Camera Output:
The Fake Camera Output feature displays the real-time video stream generated by the face-swapping process and sent to the virtual camera. This output is what external applications, such as Zoom, OBS, or Microsoft Teams, will receive and display during live sessions.

Fake Camera Output
The Fake Camera Output feature displays the real-time video stream generated by the face-swapping process and sent to the virtual camera. This output is what external applications, such as Zoom, OBS, or Microsoft Teams, will receive and display during live sessions.
How It Works:
- The face-swapping process applies the desired effects, such as swapping the face, blending, and masking, in real-time.
- The processed video stream is routed to a virtual camera, which is then available as a selectable video source in any application that supports virtual cameras.
- Users can preview the output directly within the software to ensure the swapped face looks natural and aligns correctly before or during use.
Key Features:
- Live Preview:
- Displays the processed feed in real time so users can adjust settings if needed (e.g., alignment, masking, or resolution).
- Ensures that the output matches expectations before it is forwarded to the virtual camera.
- Customizable Settings:
- Adjustments like resolution (e.g., 1920×1080, 1280×720) and face-swapping parameters (e.g., blending ratio, masking) directly impact the appearance of the fake camera output.
- Interactive Feedback:
- Users can make live tweaks while monitoring the changes in the fake camera output to achieve the best possible results.
Tips for Best Results:
- Preview First: Always check the fake camera output in the software’s preview window to verify alignment, blending, and quality.
- Optimize Resolution: Match the fake camera resolution to the requirements of the application or platform you’re using.
- Test Integration: Open the target application (e.g., Zoom or OBS) and select the virtual camera to ensure compatibility and proper display.
This feature ensures a seamless transition of processed video to external platforms, making it a valuable tool for real-time face-swapping applications. Let me know if you’d like additional details or examples!
Cut Face from Video Frame:
The Cut Face from Video Frame feature allows users to extract a face from a specific frame of a video. This extracted face can then be used for creating or enhancing face-swapping projects, such as building a faceset or directly applying it to other media.
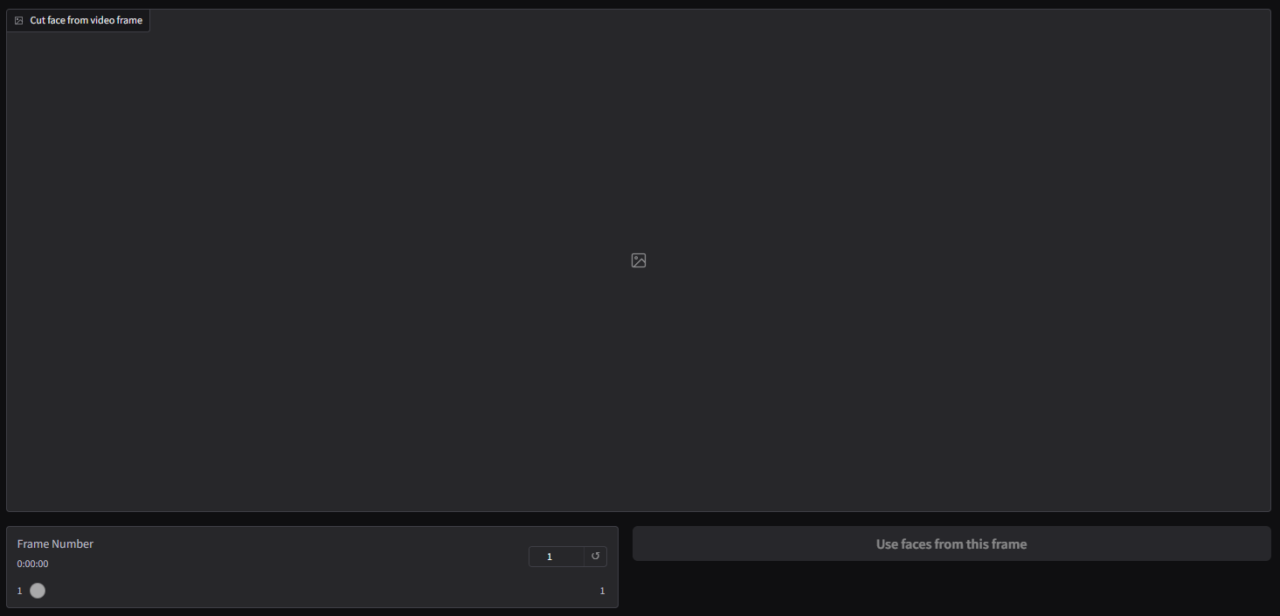
Frame Number: Displays the currently selected frame in the video timeline, allowing users to pinpoint the exact frame where the desired face appears.
How It Works:
- Users navigate through the video frames to find the one that contains the clearest or most suitable face.
- The Frame Number field updates dynamically to show the current position.
- Users can manually input a frame number to jump directly to that point in the video.
↺ Reset Button
- Description: Resets the video frame selection to the starting frame (usually Frame 0 or the first frame of the video).
Benefits:
- Precision: Ensures that users can extract the exact face needed for the face-swapping process, improving accuracy and quality.
- Efficiency: Saves time by allowing direct frame navigation and easy resetting when adjustments are required.
- Flexibility: Works seamlessly with both manual frame selection and automated processes, making it suitable for a wide range of video editing scenarios.
This feature is essential for projects where high-quality face data is required for swapping or creating a faceset. Let me know if you’d like further clarification or examples!
Faceset and Input Files:
The Faceset and Input Files section is where users manage the source images and facesets used for face-swapping. This area provides tools for uploading, organizing, and accessing the files necessary for accurate and realistic results.
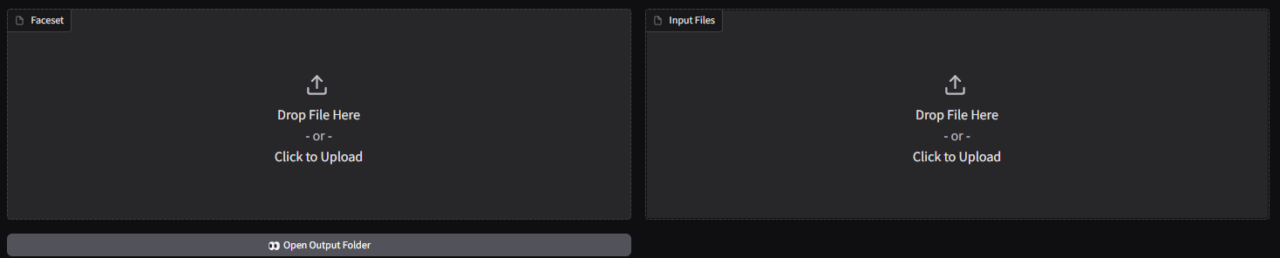
- Faceset: A faceset is a collection of images of a single face, captured from various angles and expressions. It serves as a high-quality reference for the face-swapping process, improving accuracy and detail.
How It Works:
- Users can upload an existing faceset or create a new one using extracted frames from a video or individual photos.
- The faceset is used by the software to analyze and apply the source face more effectively in the target media.
- Input Files: Input files refer to the raw images or videos provided by the user for face-swapping. These files are processed to extract faces or serve as the target media for the swap.
How It Works:
- Users upload input files by dragging and dropping them into the designated area or by browsing their file system.
- The software analyzes the files to detect faces, align features, and prepare for swapping.
Accepted Formats:
- Images: JPEG, PNG, BMP.
- Videos: MP4, AVI, MKV.
Open Output Folder
his option opens the folder where processed files, such as created facesets or face-swapped outputs, are saved. It provides quick access to review, edit, or share the results.
Benefits:
- Faceset: Improves the precision and quality of face-swapping by using a comprehensive reference of the source face.
- Input Files: Provides flexibility to work with both raw media and prepared facesets, catering to diverse project needs.
- Output Folder: Enhances user convenience by streamlining access to processed files.
This section is key for managing the inputs and outputs of the face-swapping workflow, ensuring efficiency and high-quality results.
Faces in this Faceset:
The Faces in this Faceset section provides tools to manage and refine the collection of facial images used for face-swapping. This is particularly useful for ensuring high-quality results by organizing and customizing the faceset.

Displays the list of all images currently included in the faceset. Users can view, organize, and edit the collection to ensure it meets the needs of the face-swapping project.
- Remove Selected: Deletes specific images from the faceset. Users can manually select the images they want to remove and clean up the collection.
- Create/Update Faceset File: Combines the current collection of images into a single faceset file or updates an existing file with new additions.
How It Works:
- Users add or refine images in the faceset.
- Click the Create/Update Faceset File button to save the finalized faceset.
- Clear All: Removes all images from the current faceset in one action, effectively resetting the collection.
Benefits:
- Organization: Allows users to maintain a clean and efficient faceset by removing low-quality or irrelevant images.
- Customizability: Provides the flexibility to create or update facesets tailored to specific projects.
- Efficiency: Speeds up the face-swapping process by ensuring the faceset is optimized with high-quality images.
This section is critical for managing the faceset effectively, ensuring the best possible results in face-swapping projects.
Extras Section Explanation
The Extras Section offers additional tools and features for processing media files, such as extracting frames, re-encoding videos, or creating GIFs. These utilities go beyond basic face-swapping, providing users with advanced editing and customization options to enhance their workflow.

File(s) to Process
This is the starting point in the Extras Section where users upload the media files they want to work with. These files can include videos, GIFs, or images, depending on the task.
How It Works:
- Users drag and drop files into the designated area or click to browse and upload from their file system.
- The uploaded files are prepared for various tasks, such as frame extraction, trimming, or creating new media.
- Accepted File Formats:
- Images: JPEG, PNG, BMP.
- Videos: MP4, AVI, MKV.
- GIFs: Animated GIF files.
Benefits:
- Flexibility: Handles a wide range of media types, offering users more options for processing and editing.
- Efficiency: Simplifies complex tasks like frame extraction and GIF creation, saving time and effort.
- Customization: Provides granular control over how media files are processed, allowing for tailored results.
The File(s) to Process area is a powerful starting point for advanced media processing tasks, giving users the tools they need to go beyond standard face-swapping projects. Let me know if you’d like further clarification or details!
Video/GIF Processing Options (Poor Man’s Video Editor)
The Video/GIF Processing Options in the Extras Section provide a lightweight yet effective set of tools for editing videos and GIFs. These features are designed to make essential video and GIF processing tasks simple and accessible without requiring advanced video editing software.
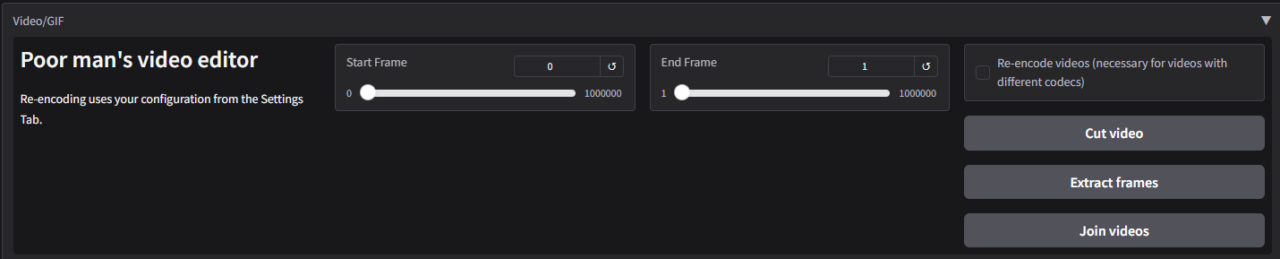
Start Frame / End Frame:
Allows users to define a specific frame range for processing tasks. This ensures that only the selected portion of the video or GIF is edited or processed.

How It Works:
- Start Frame: Specifies the first frame of the range to be processed.
- End Frame: Marks the last frame of the range to be processed.
- Users can input frame numbers manually or navigate through the video to set the range.
↺ Reset Button:
- Resets both the start and end frame selections to the default values, typically the full range of the video or GIF.
- Useful for starting over after making changes.
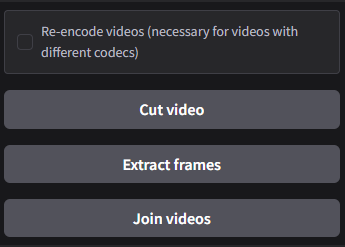
Re-encode Videos:
Converts the video file into a different format or codec to improve compatibility, reduce file size, or optimize performance. Users select a video file and choose the desired output format or settings.The software processes and re-encodes the video without altering its visual content.
Cut Video:
Trims the video to the specified frame range, removing unnecessary parts while retaining the essential segment. Define the Start Frame and End Frame. The software processes and saves only the selected portion as a new video file.
Extract Frames:
Extracts individual frames from the video or GIF within the specified range and saves them as separate image files. Define the frame range or use the entire video.The software processes each frame and outputs it as an image (e.g., PNG or JPEG).
Join Videos:
Combines multiple video files into a single video, ensuring they are seamlessly joined. Users upload multiple videos of the same resolution and format.The software processes and merges the videos into one continuous file.
Benefits:
- Ease of Use: Simple interface for basic video editing tasks without requiring technical expertise.
- Efficiency: Saves time by focusing on essential edits like cutting, joining, or extracting frames.
- Flexibility: Supports a wide range of input formats and allows for precise control over the editing process.
This lightweight editor is perfect for users who need quick and simple video or GIF processing capabilities without the complexity of full-scale video editing software.
Create Video/GIF from Images:
The Create Video/GIF from Images tool allows users to compile a series of images into an animated video or GIF. This feature is particularly useful for creating time-lapse videos, stop-motion animations, or seamless GIFs from individual frames.
Set Frames Per Second (FPS): Determines the playback speed of the output video or GIF by defining how many frames are displayed per second.

Range: 0 to 120 FPS.
- Higher FPS (e.g., 60 FPS): Creates smoother animations, but requires more frames for consistent quality.
- 0 FPS: Stops playback (used for testing or generating static outputs).
- 30 FPS (Default): A balanced frame rate that works well for most animations and videos.
↺ Reset Button:
- Resets the FPS setting to the default value of 30 FPS, allowing users to revert to the standard playback speed.
Content Directory Field (/content/): Specifies the folder where the input images are stored. The software retrieves images from this directory to compile them into a video or GIF.
How It Works:
- Users input or navigate to the directory path containing the desired image sequence.
- The images are processed in order of their filenames, ensuring a seamless animation.
Benefits:
- Flexibility: Works with various FPS settings to create slow or fast-paced animations.
- Organization: Uses a content directory to streamline image management.
- Efficiency: Converts image sequences into professional-quality videos or GIFs quickly.
This tool is perfect for animators, editors, or anyone working on creative projects that require turning static images into dynamic media.
Create GIF from Video:
The Create GIF from Video feature allows users to convert a video clip into an animated GIF. This tool is ideal for creating shareable and loopable GIFs from video content, perfect for social media, presentations, or casual use.

Converts a selected video segment into a high-quality, animated GIF. Users can specify which part of the video to convert and adjust settings such as resolution and frame rate for optimal results.
- How It Works:
- Users upload a video file.
- Define the start and end points of the segment to be converted into a GIF.
- The software processes the video segment and exports it as a looping GIF.
Create Button: Finalizes the GIF creation process. After all settings are configured, clicking the Create button generates the GIF from the specified video segment.
What Happens When You Click Create:
- The software processes the selected video segment.
- Applies the specified settings, such as FPS, resolution, and loop count.
- Saves the output GIF in the designated output folder.
Benefits:
- Customization: Users can adjust the start/end points, resolution, and frame rate to control the GIF’s quality and length.
- Efficiency: Converts video clips into GIFs quickly without requiring external software.
- Versatility: Ideal for creating short, shareable GIFs from longer video content.
Tips for Best Results:
- Choose a short video segment to keep the GIF file size manageable.
- Adjust the FPS to balance smoothness and file size (e.g., 15-30 FPS is ideal for most GIFs).
- Preview the video segment before clicking Create to ensure the selected range is accurate.
This feature makes it easy to produce eye-catching GIFs directly from video content with minimal effort.
Settings Section: Detailed Explanation
The Settings Section provides users with advanced configuration options to customize the face-swapping software’s performance, output quality, and operational behavior. These settings allow users to optimize the tool for their specific hardware, project requirements, and workflow preferences.
Themes: Allows users to customize the visual appearance of the interface.
Available Themes: Includes options like “Default,” “Dark Mode,” “Monochrome,” and others to suit user preferences.

Server Settings
The Server Settings section enables users to configure the software for local or network use, customize file output behavior, and manage how outputs are stored and named. These options are particularly useful for advanced setups and maintaining organized workflows.
Server Name/Port: Defines the server name and port number for running the application.
How It Works:
- Server Name: The name or IP address used to access the server.
- Port: The port number the server listens to for connections.
- Defaults to
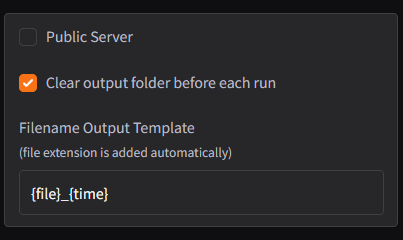
localhostand a standard port if no changes are made. - Public Server: Enables hosting the application as a public server for external access.
Clear Output Folder Before Each Run
Automatically deletes all files in the output folder before starting a new session.
Filename Output Template
- Customizes how output files are named.
- Default Template:
{file}_{time}.{file}: The name of the input file.{time}: A timestamp to ensure unique filenames.
- Customization Options:
- Users can modify the template to include additional information, such as frame numbers or custom identifiers.
- Example:
{file}_{frame}_{time}could result in filenames likevideo_001_20250125.mp4.
Benefits:
- Server Name/Port: Enables flexible hosting configurations for local or remote access.
- Public Server: Facilitates collaborative work by allowing external connections.
- Clear Output Folder: Ensures clean and organized project files with every run.
- Filename Output Template: Enhances file organization and traceability.
These settings provide advanced control over how the software operates and handles outputs, making it ideal for professional and collaborative environments.
Provider Settings
The Provider Settings allow users to configure how the software utilizes hardware resources for processing tasks. These options help optimize performance and tailor the tool’s resource usage to the user’s specific system capabilities.
Provider Options
CPU : Uses the system’s processor (CPU) for all operations.
Performance: Typically slower than GPU-based options but universally supported on all systems. Suitable for systems without dedicated GPUs or when GPU resources are unavailable.
- TensorRT : Leverages NVIDIA TensorRT for optimized GPU performance, accelerating deep learning tasks like face-swapping.
Performance: Provides faster processing times by optimizing GPU resource utilization. Requires an NVIDIA GPU that supports TensorRT.
- CUDA: Utilizes NVIDIA’s CUDA framework to offload processing tasks to the GPU for acceleration.
Performance: Significantly faster than CPU-based processing for supported systems. Requires an NVIDIA GPU with CUDA support and sufficient VRAM.
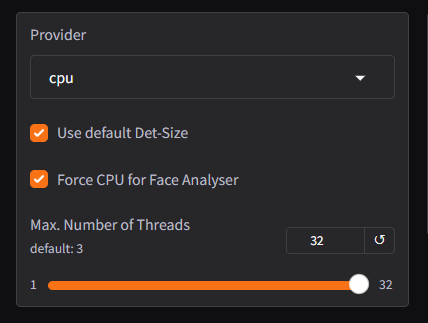
Tips for Optimizing Provider Settings:
- Choose CUDA or TensorRT: Use GPU acceleration for faster processing if you have a compatible NVIDIA GPU.
- Force CPU for Light Tasks: For lightweight projects or on systems without a dedicated GPU, rely on the CPU.
- Adjust Max. Threads: Match the thread count to your CPU’s capabilities to avoid overloading the system.
Benefits:
- Customization: Tailor resource usage to the specific capabilities of your hardware.
- Performance: Maximize speed and efficiency by leveraging GPU acceleration or multi-threaded CPU processing.
- Flexibility: Offers fallback options like CPU-only processing to ensure compatibility across various systems.
This version removes the “Use Case” sections while maintaining the flow and purpose of the explanation.
Output Settings
The Output Settings section lets users customize how processed results are saved, focusing on memory usage and image file formats to ensure optimal quality and performance.

Max. Memory to Use (GB):Limits the amount of system memory (RAM) allocated for processing tasks.
Advantages:
Prevents system overload during high-resource operations.
Ensures smoother performance on devices with limited RAM.
Image Output Format:
WEBP: A modern image format with high compression efficiency.
- Advantages:
Smaller file sizes than both PNG and JPG.
Supports transparency and animations.
PNG: A lossless image format that retains high-quality details.
- Advantages:
Maintains transparency.
Perfect for preserving fine details and high fidelity.
JPG: A lossy compression format that balances file size and image quality.
Suitable for general-purpose use where quality can be slightly compromised.
Advantages:
Smaller file sizes than PNG.
Tips for Best Results:
- Set Max. Memory to Use (GB) to match your system’s available RAM for efficient resource management.
- Choose WEBP for web projects where smaller sizes are essential.
- Use PNG for high-quality outputs or when transparency is needed.
- Opt for JPG when prioritizing small file sizes for general sharing or previews.
This format provides a structured and consistent explanation for each option, making it easier to follow.
Video Codec:
The Video Codec setting determines the encoding format used to compress and save processed video files. Each codec offers different advantages in terms of quality, file size, and compatibility.
libx264: A widely used codec for H.264 compression that is compatible with most devices and platforms and offers efficient compression with minimal quality loss.
libx265: An advanced codec for H.265 (HEVC) compression that provides smaller file sizes compared to H.264 while maintaining similar quality, making it ideal for high-resolution content like 4K videos.
libvpx-vp9: A codec for VP9 compression that is free and open-source, offering excellent quality-to-file-size ratio for web content and making it a cost-effective option.
h264_nvenc: NVIDIA’s hardware-accelerated encoder for H.264 compression that provides faster encoding times due to GPU acceleration while maintaining quality and reducing processing load on the CPU.
hevc_nvenc: : NVIDIA’s hardware-accelerated encoder for H.265 (HEVC) compression that combines efficient compression with hardware acceleration for faster results and produces smaller file sizes with excellent quality.
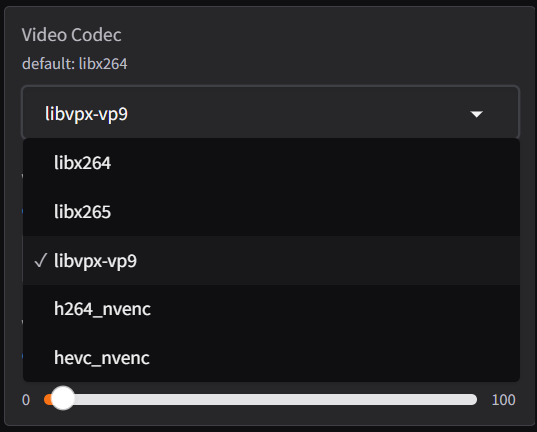
Tips for Choosing a Codec:
- Use libx264 for maximum compatibility across devices and platforms.
- Opt for libx265 or hevc_nvenc for high-quality, space-efficient videos, especially in 4K.
- Select libvpx-vp9 for web-based content or when working with open-source requirements.
- Choose h264_nvenc or hevc_nvenc if you have an NVIDIA GPU and prioritize faster encoding.
This streamlined version integrates the advantages directly into the descriptions, making the text concise yet informative.
Video Output Format:
The Video Output Format and Video Quality (CRF) settings determine the file type and quality of the processed video. These options provide flexibility for compatibility, file size, and resolution needs.
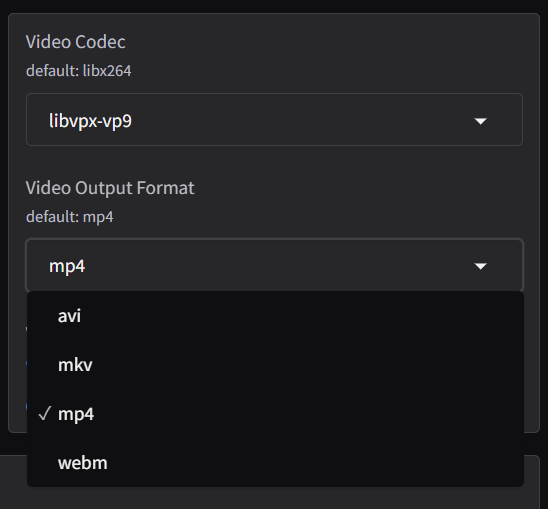
MP4: A widely supported format that balances quality and file size, making it ideal for general-purpose use.
MKV: A versatile format that supports advanced features like multiple audio tracks and subtitles but may have limited support on some platforms.
AVI: An older format that provides high-quality output but produces larger file sizes and is less efficient compared to modern formats.
WEBM: A web-friendly format optimized for streaming and open-source platforms, offering small file sizes and good quality.
Specifies the container format for the output video file, which impacts compatibility and features.
Video Quality (CRF)
The Constant Rate Factor (CRF) setting controls the balance between video quality and file size during compression. Lower CRF values result in better quality but larger file sizes, while higher CRF values reduce quality for smaller file sizes.
- Range: 0–51 Lossless quality, no compression (largest file size).
- 23 (Default): A balanced setting that provides good quality with reasonable file size.
- Higher Values (e.g., 35+): Lower quality but significantly smaller file sizes.
How It Works:
The encoder adjusts the compression level based on the CRF value, ensuring consistent visual quality across the video
Tips for Best Results:
- Use lower CRF values (e.g., 10–15) for professional-grade videos or high-resolution content like 4K.
- Use MP4 for compatibility across most devices and platforms.
- Select WEBM for web-based projects to optimize streaming performance.
- Set CRF to 18–23 for high-quality outputs suitable for most purposes.
This explanation combines clear descriptions of the formats and CRF settings, ensuring users can make informed choices based on their project needs.
Temporary Storage
The Temporary Storage and server options provide tools for managing temporary files, server functionality, and applying changes to ensure efficient operation of the software.
Show Video in Browser: Displays the processed video directly in the browser after encoding, allowing users to preview the final output without navigating to the output folder.
Use OS Temp Folder: Saves temporary files in the operating system’s default temp directory during processing.
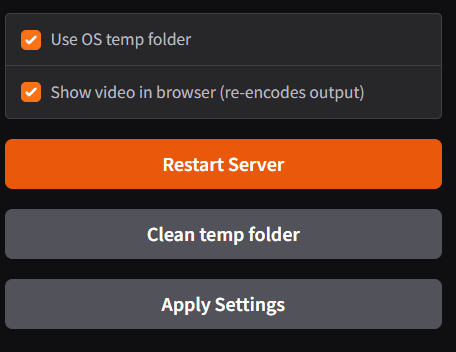
- Server and Cleanup Options
Restart Server: Restarts the application server to apply new configurations or resolve technical issues. - Clean Temp Folder: Deletes all temporary files created during processing to free up disk space and maintain system efficiency.
- Apply Settings: Confirms and applies all modified settings within the software.
Tips for Best Results:
- Use Show Video in Browser to preview results quickly after processing.
- Enable Use OS Temp Folder for simpler management of temporary files.
- Regularly Clean Temp Folder to maintain disk space and avoid performance bottlenecks.
- Restart the server only when significant changes are made or technical issues arise.
- Always click Apply Settings after modifying configurations to ensure changes take effect.
Server and Cleanup Options
The Server and Cleanup Options allow users to configure how the software communicates with local or external networks, enabling seamless operation and control.

Server Name: Defines the hostname or IP address that the server uses to identify itself on the network.
How It Works:
- By default, the server runs on
localhost, meaning it only operates on the current system. - Users can specify a custom hostname or IP address if they want to access the software from other devices on the same network.
Server Port
Specifies the port number the server uses for communication. The port acts as a channel through which the application sends and receives data.
How It Works:
- The default port is automatically assigned if no custom port is specified.
- Users can set a specific port number to avoid conflicts with other applications running on the same system.
Benefits:
- Customization: Adjusting the server name and port ensures compatibility with unique system configurations.
- Remote Access: Enables access to the software from external devices, increasing its versatility.
- Conflict Resolution: Custom port selection avoids interference with other applications using default ports.
These settings are essential for users managing the software in networked environments or for those hosting it on shared systems.
Conclusion
Roop Unleashed is an amazing tool that makes face-swapping easy and fun while also offering powerful options for professionals. In this blog, we talked about how simple it is to use, its real-time features, advanced customization tools, and the high-quality results it can create. We also covered some challenges, like needing a strong computer and learning how to use its advanced features. Hopefully, this post gave you helpful tips and ideas to see if Roop Unleashed fits your creative needs.
If you liked this article, please share it with your friends on Twitter or Reddit! By sharing, you help others discover great tools, connect with other creators, and build a strong, supportive community.
This blog was written by Roshan Kumar, who has over 5 years of experience in digital media and content creation. Roshan has worked on cool projects like face-editing software and written helpful guides to support creators in reaching their goals. Thanks for taking the time to read this post—it means a lot to us!
Don’t miss our next post, where we’ll show you how to use advanced masking techniques to create flawless face swaps. Take care, stay creative, and see you in the next post!